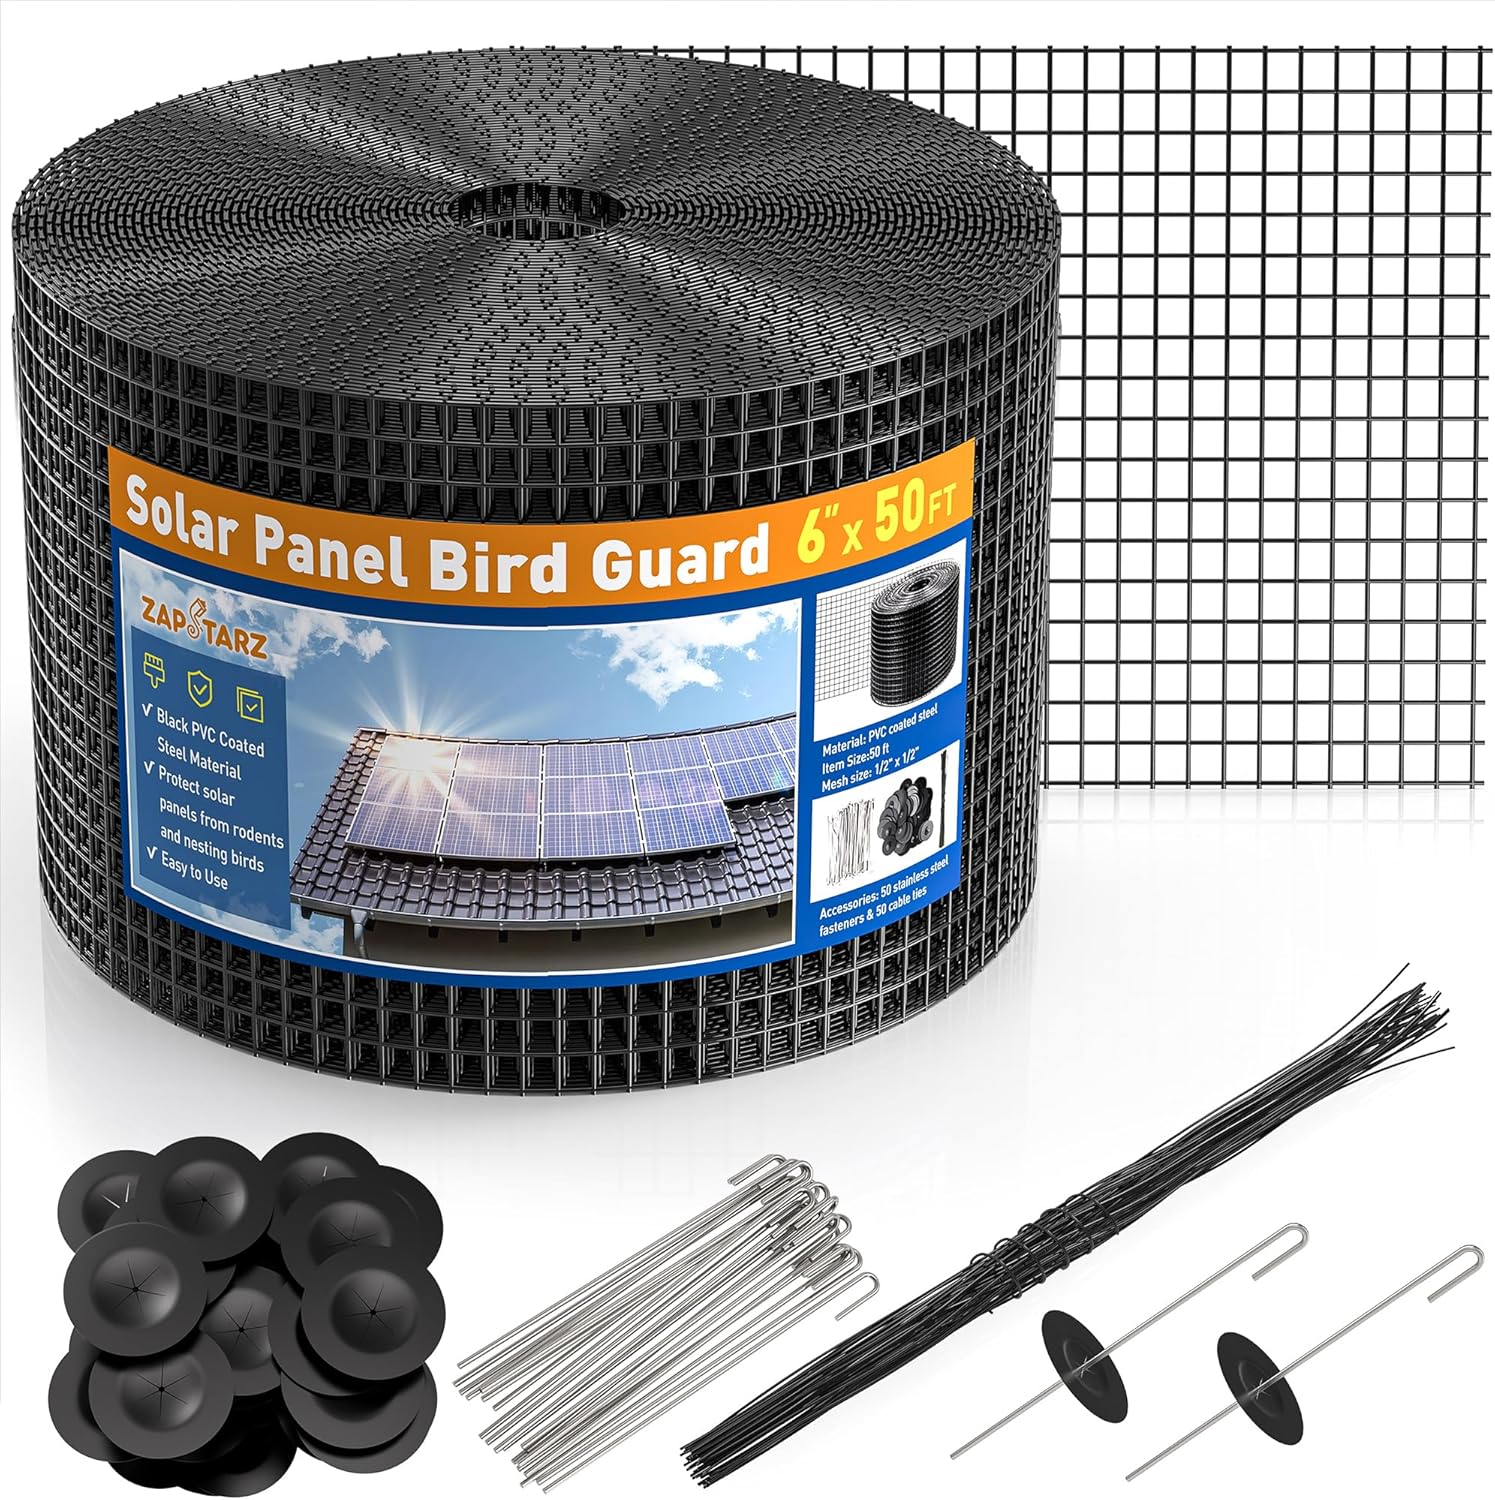


Solar Panel Bird Guard 6″ x 50ft Mesh Kit, PVC-Coated Critter Guard with 50 Fasteners
Original price was: $28.99.$25.99Current price is: $25.99.
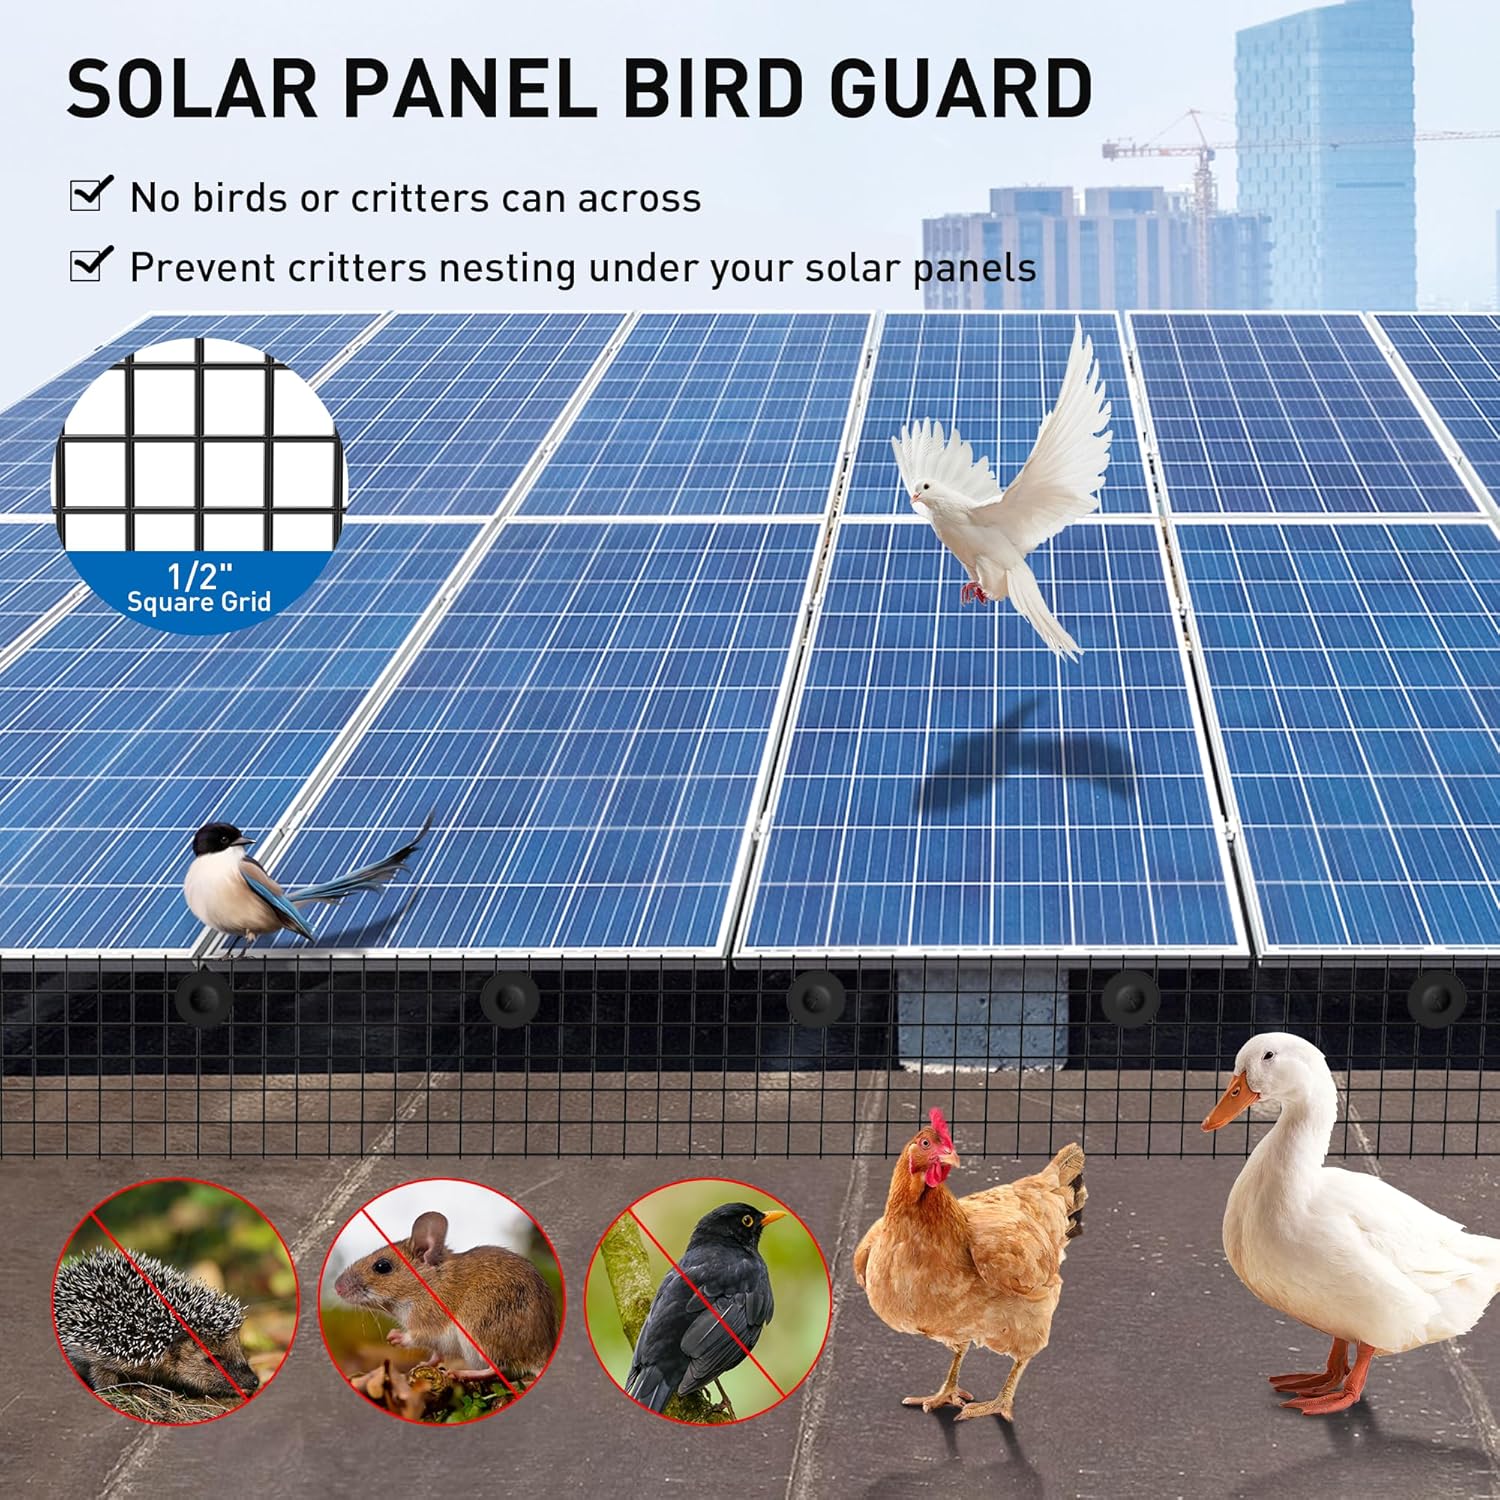
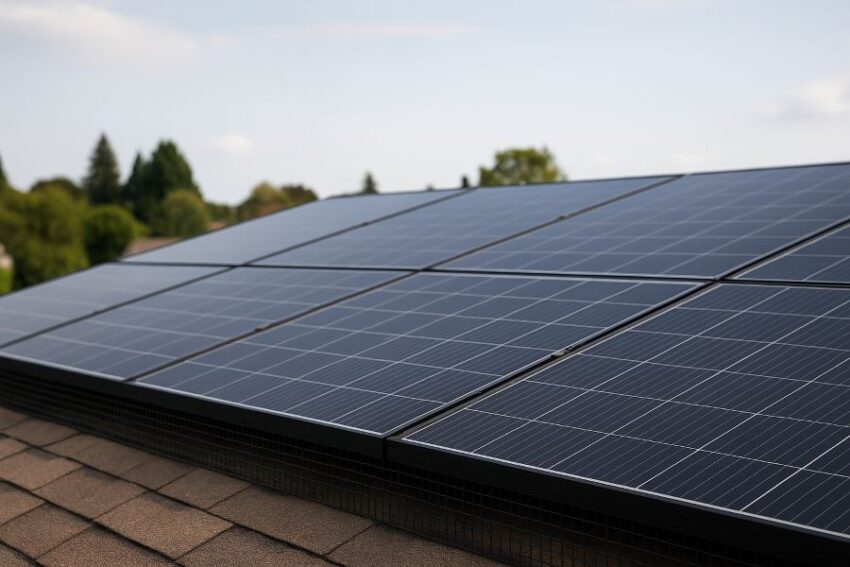
Keep birds and squirrels out of your panels without touching the roof. This 6 in x 50 ft solar panel bird guard uses PVC-coated, 1/2 in welded wire critter guard mesh that clips to the module frame with non-penetrating hardware, so you avoid drilling while creating a clean, durable perimeter. The open solar panel mesh screen preserves airflow and keeps factory drain holes clear, which manufacturers require for safe operation. It is a simple weekend upgrade that protects wiring, the roofline, and your energy yield.
Description
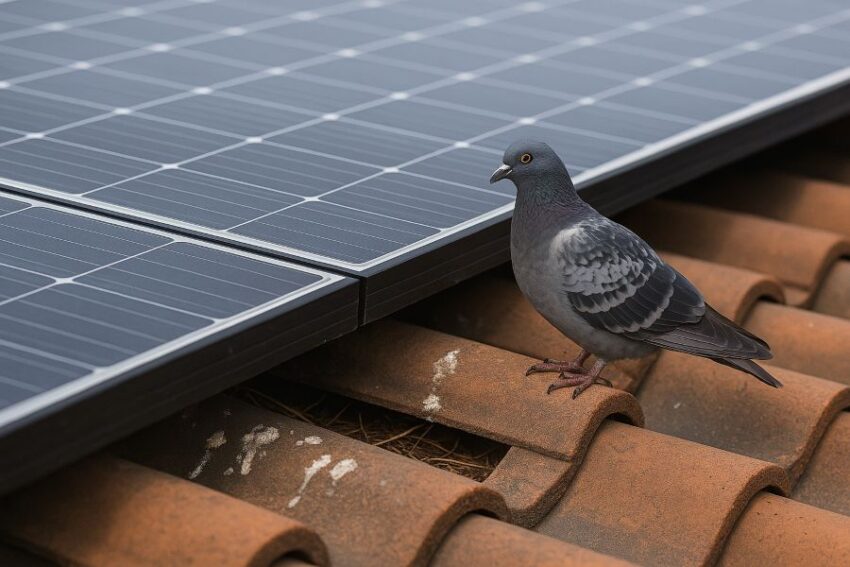
If pigeons and squirrels have discovered the cozy gap under your PV array, the Solar Panel Bird Guard 6″ x 50ft Mesh Kit, PVC-Coated Critter Guard with 50 Fasteners gives you a clean, permanent way to seal that entry without blocking airflow. Bird droppings are acidic and can reduce output by shading cells, while nests and debris trap heat; reputable solar and bird-control sources flag these as leading causes of performance loss and long-term corrosion, which is exactly what this PVC-coated, 1/2-inch mesh is designed to stop.
Left unchecked, critters also chew cable insulation and peck at under-panel wiring, creating intermittent faults and costly repairs, so a properly sized critter guard around the array perimeter is considered best practice by installers and solar hardware makers. This kit’s proven mesh format matches what professional bird-exclusion systems use, helping you keep production steady and your roofline quiet again.
Key Customer Benefits
- Protect your energy output, today and long term. A solar panel bird guard stops pigeons and debris from blocking light and piling up under arrays, which reduces shading and hot spots that hurt production. Peer-reviewed research finds bird droppings are among the most harmful contaminants to PV efficiency, and industry guidance echoes that even small shaded areas can drag performance.
- Shield cables from chewing and prevent expensive faults. Squirrels and other rodents are notorious for gnawing PV wire insulation, which can cause short circuits, intermittent errors, or even fire risk. Critter guard mesh physically blocks access to the gap under panels, where animals tend to travel and nest. Installer and hardware makers highlight this as a top reason to add protection.
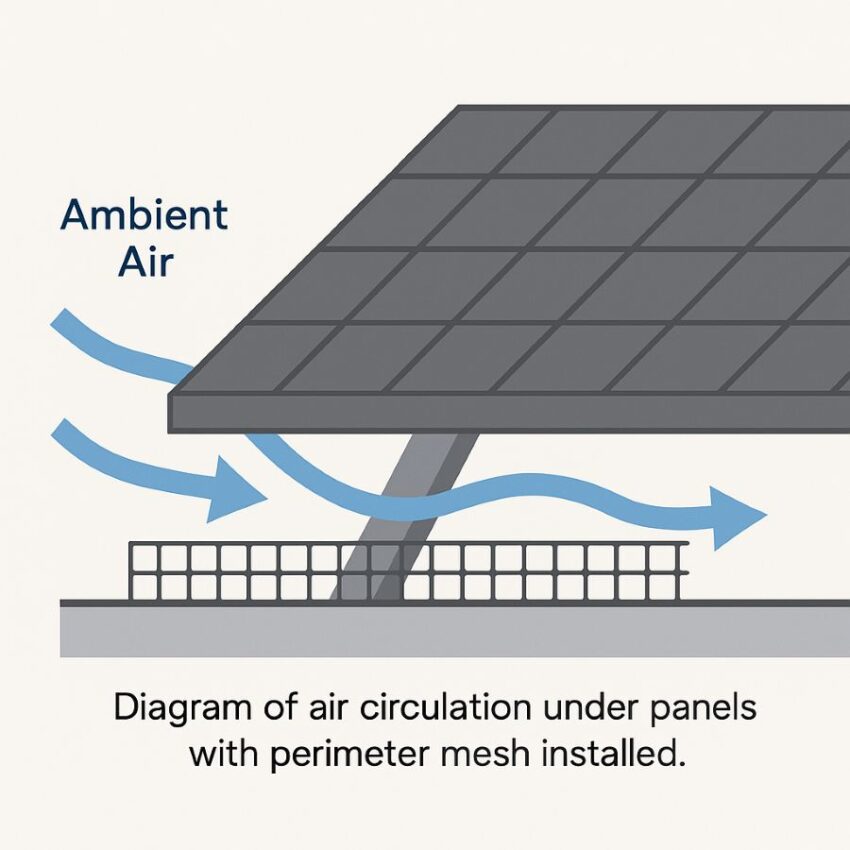
- Keep airflow under the array, keep panels cooler. Quality solar panel pigeon proofing mesh is designed to exclude birds while allowing ventilation through the standard air gap beneath modules, supporting thermal performance and preventing debris from creating a fire hazard. Reputable product pages and ventilation resources emphasize that the mesh should permit free air movement rather than sealing the perimeter.
- Reduce cleanings and surprise service calls. By stopping roosting and nesting, you cut down on acidic droppings, clogged drains, and under-array messes that trigger maintenance visits. Contractors note that adding a critter guard is a cost-effective, quick upgrade compared with repairing wiring or replacing damaged components.
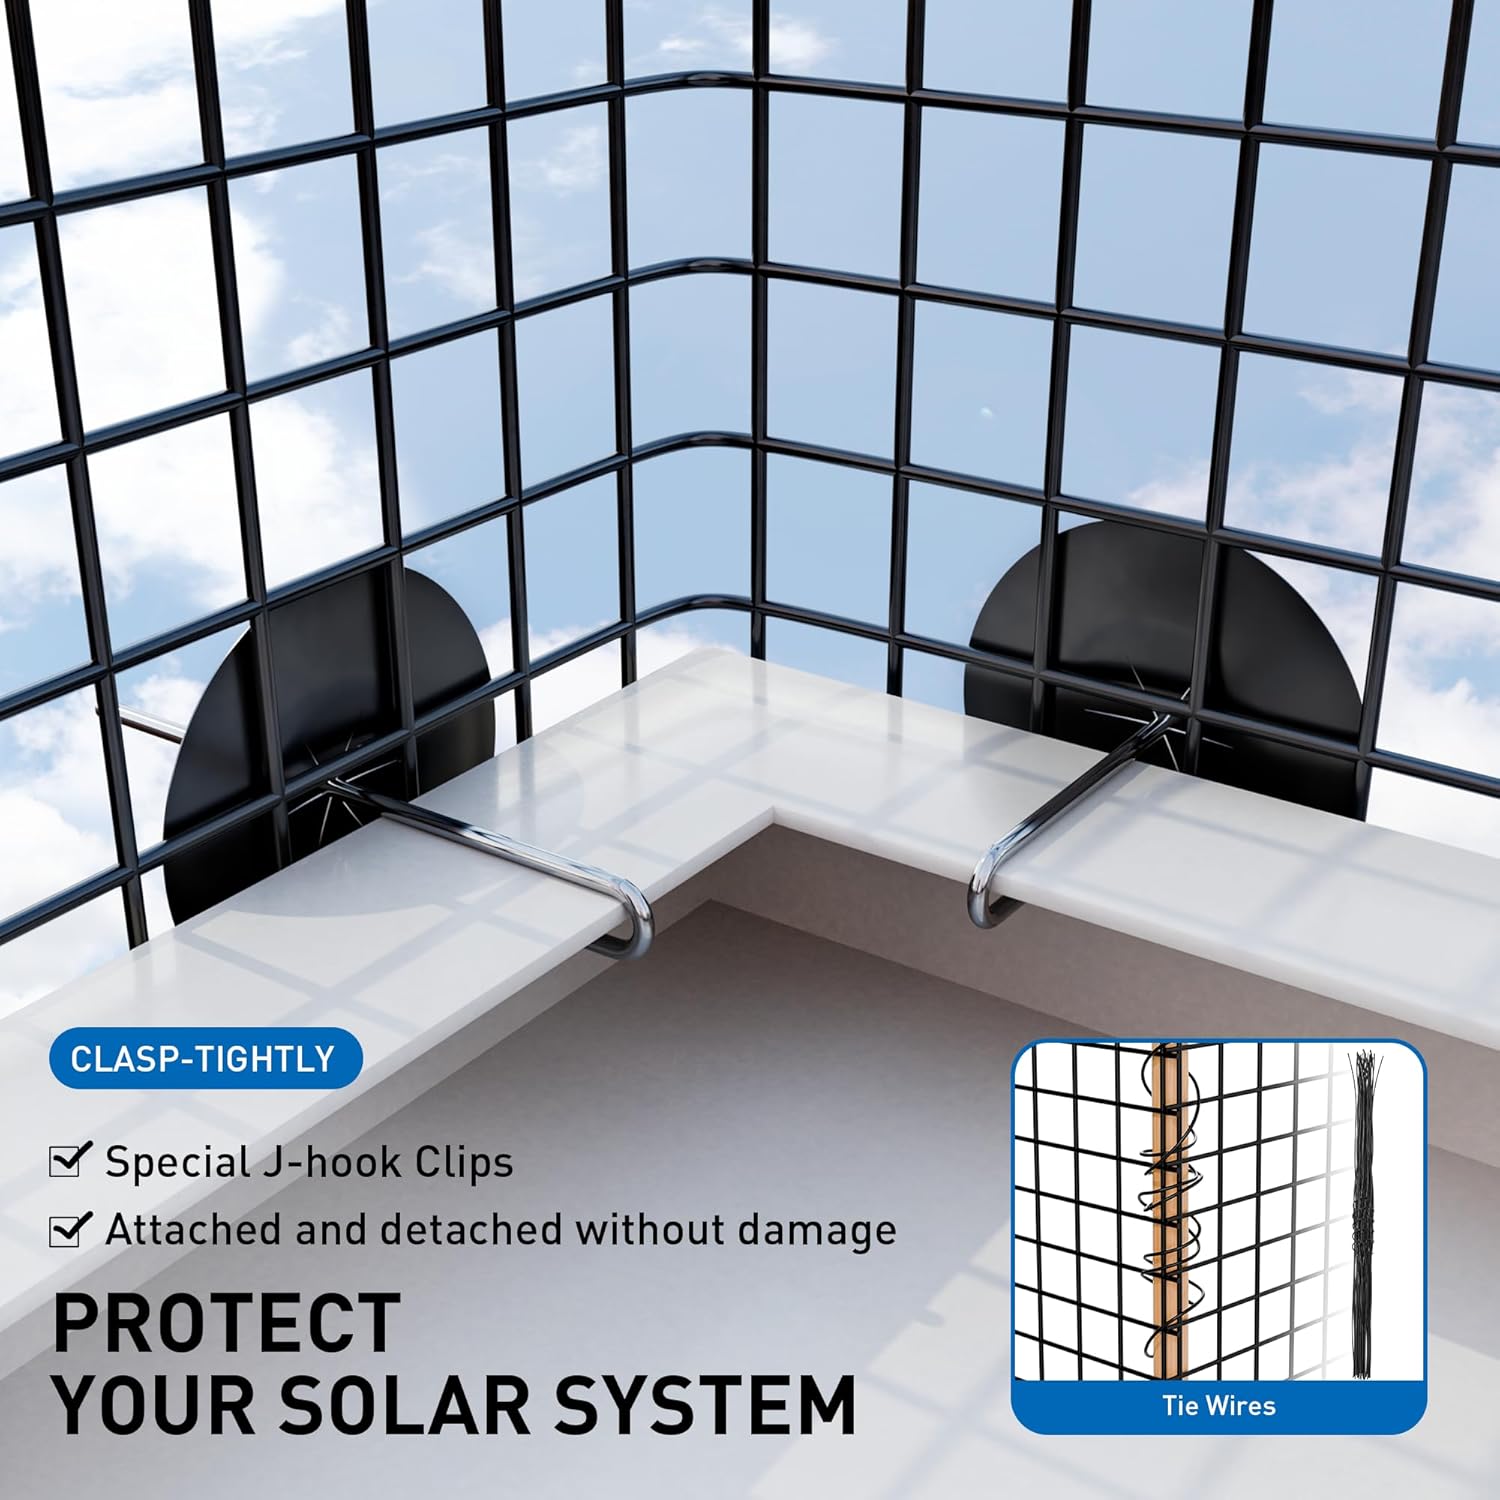
- Use roof-safe, non-penetrating attachment. This kit style pairs PVC-coated 1/2 inch mesh with panel clips, so you avoid drilling into frames or shingles. Manufacturer instructions and datasheets show clip-on and adhesive options that secure the mesh while protecting the array hardware.
- Improve hygiene around the home. Nesting under panels brings mites and insects, plus corrosive droppings that stain and can affect connectors. Excluding birds helps keep the roofline quieter and cleaner for the household.
Product Description
What this kit is
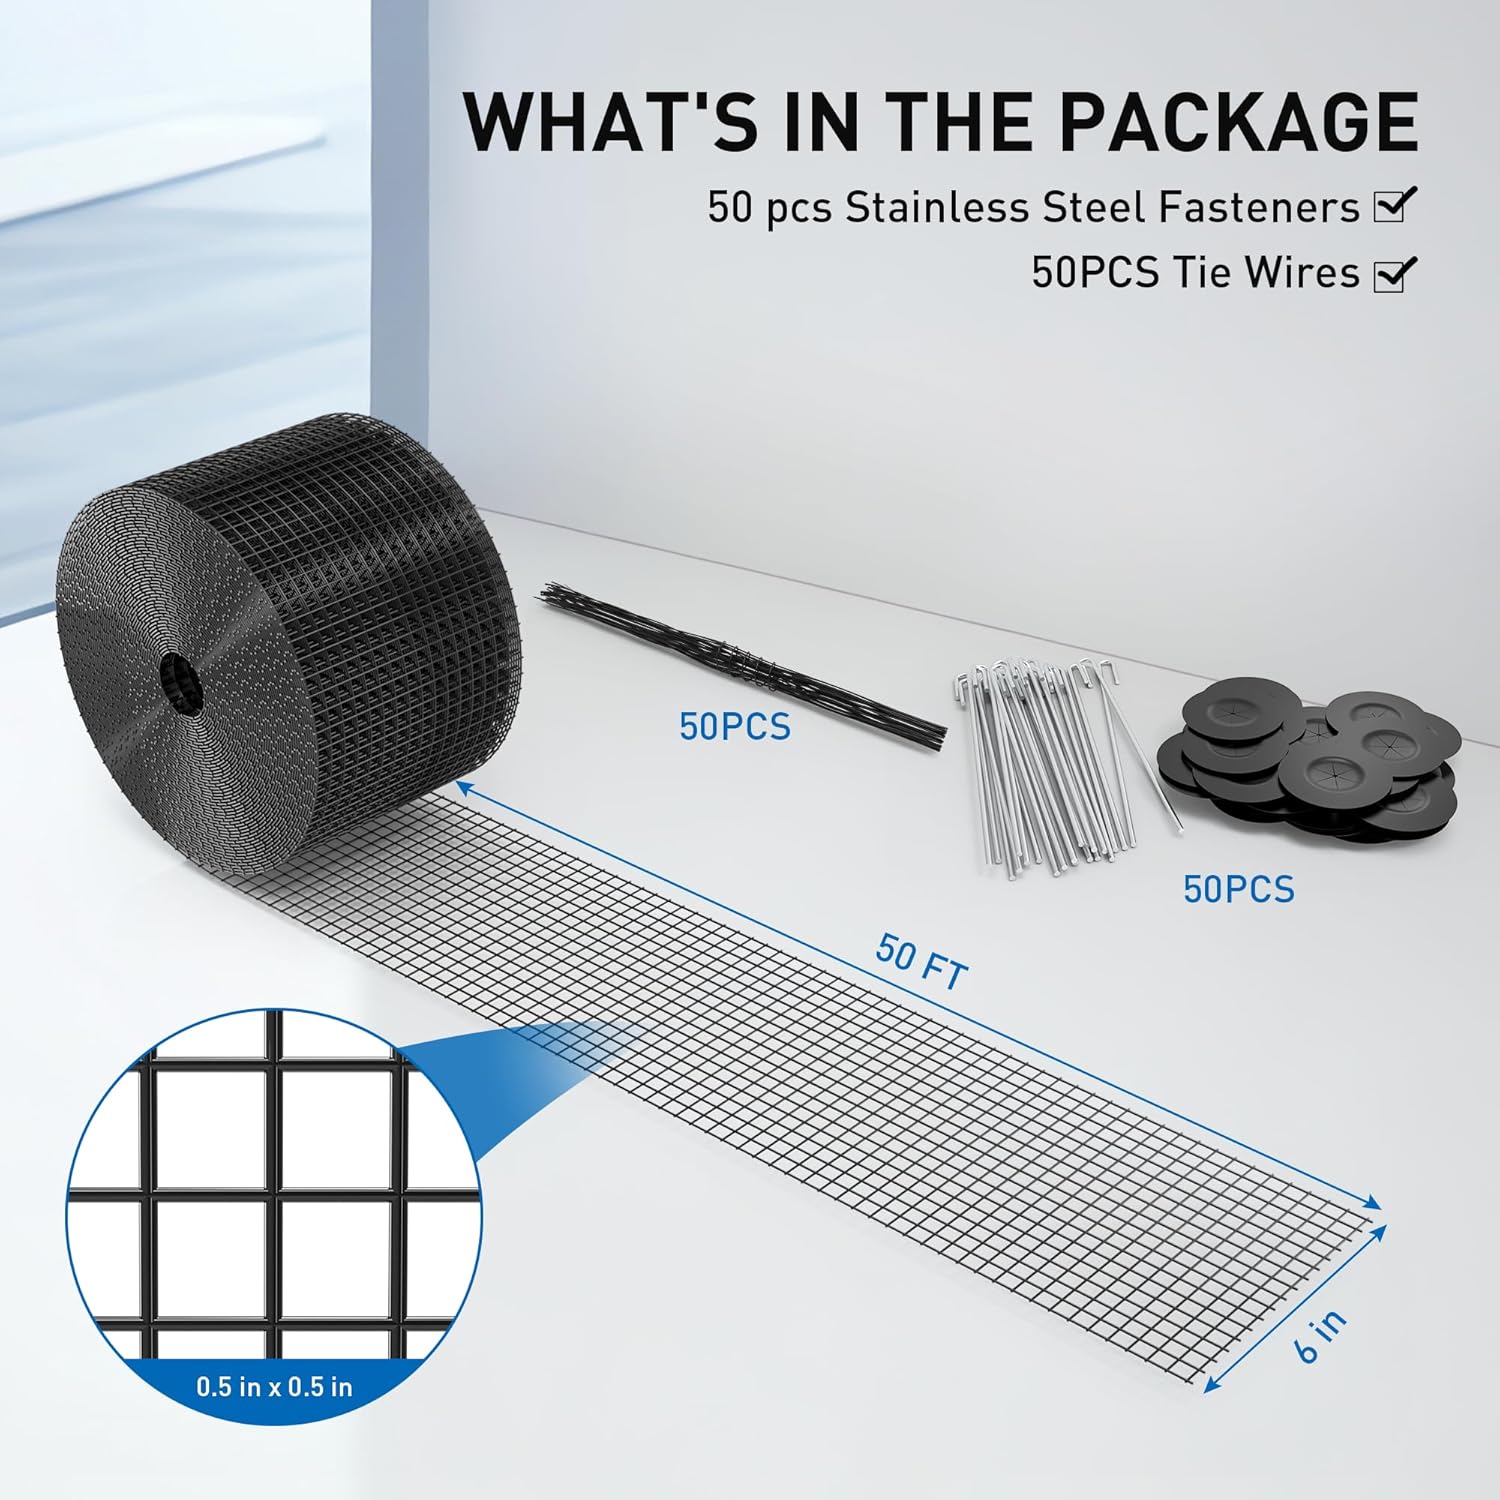
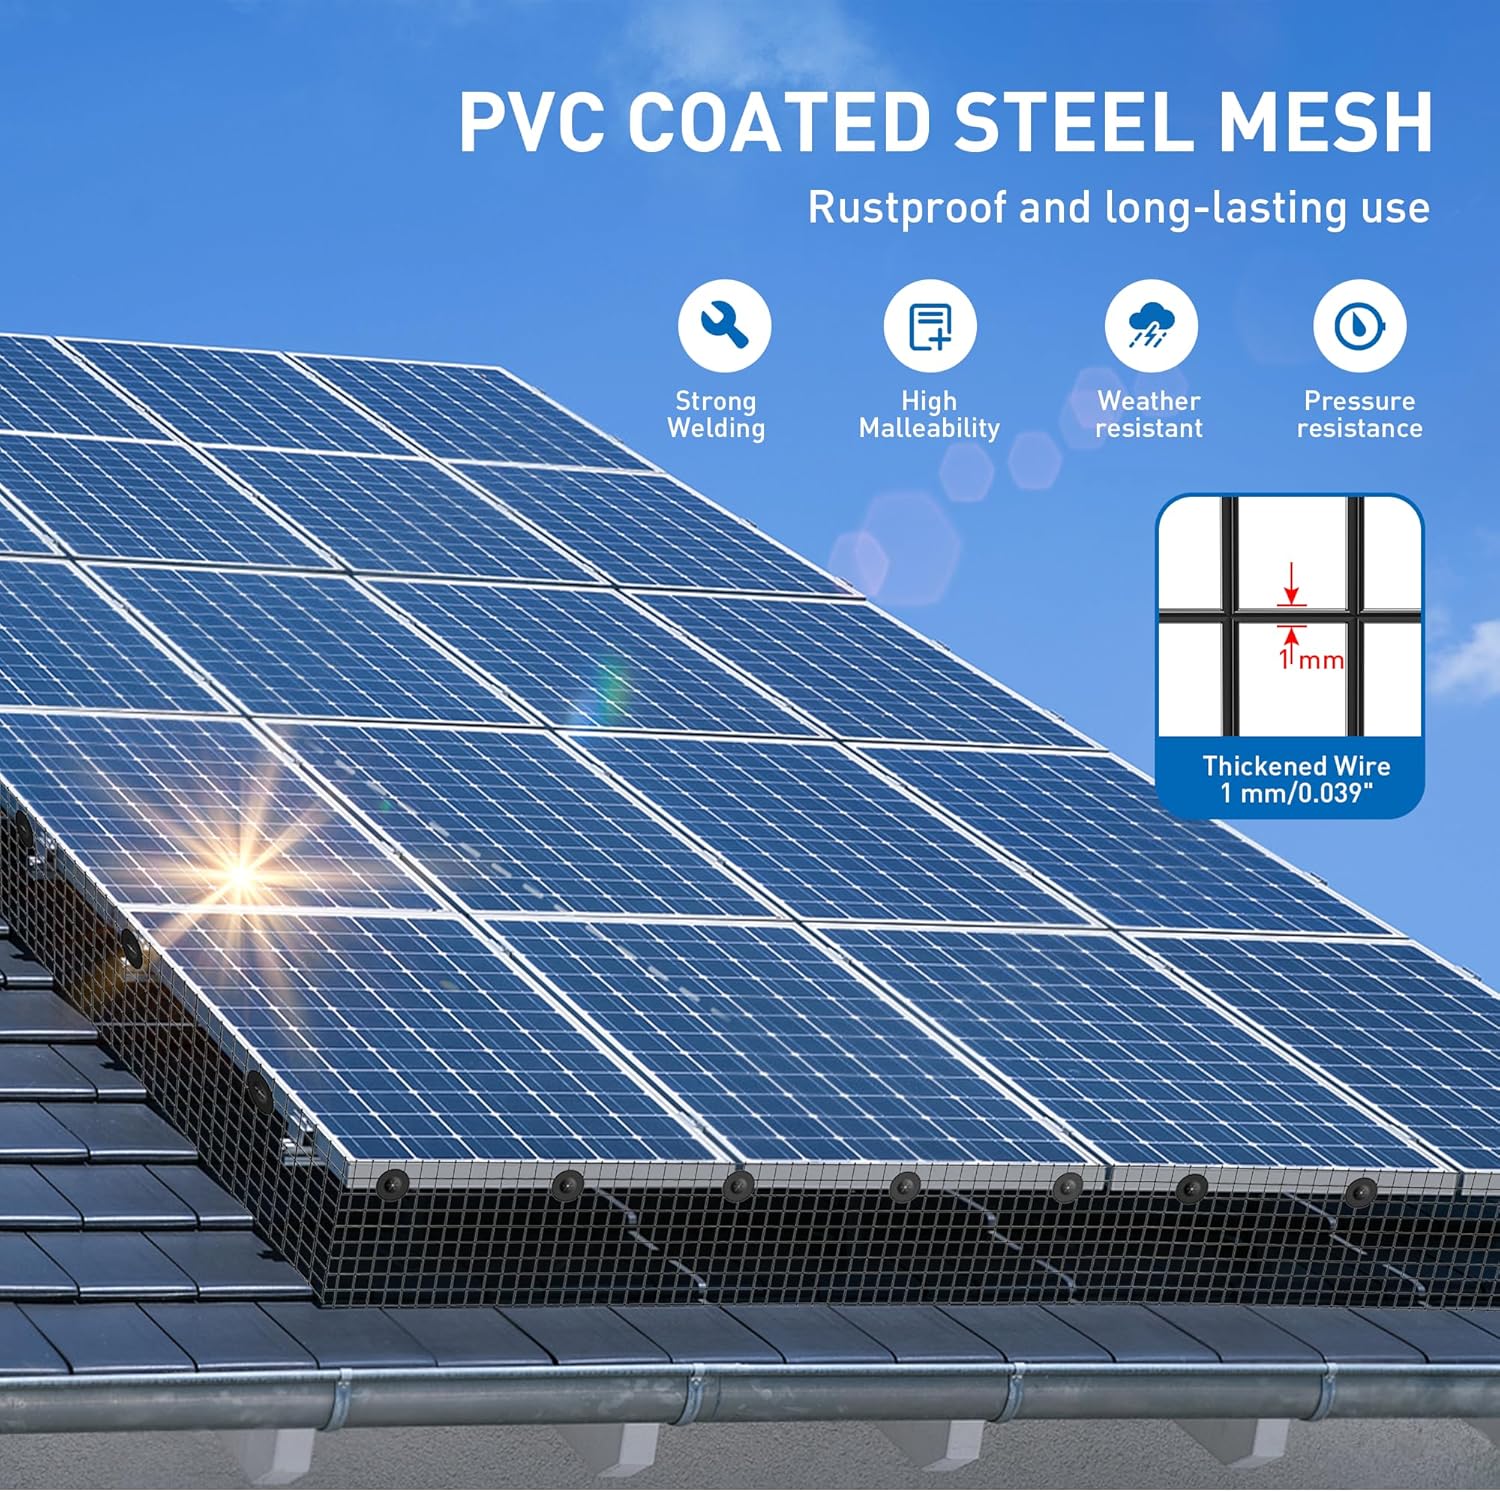
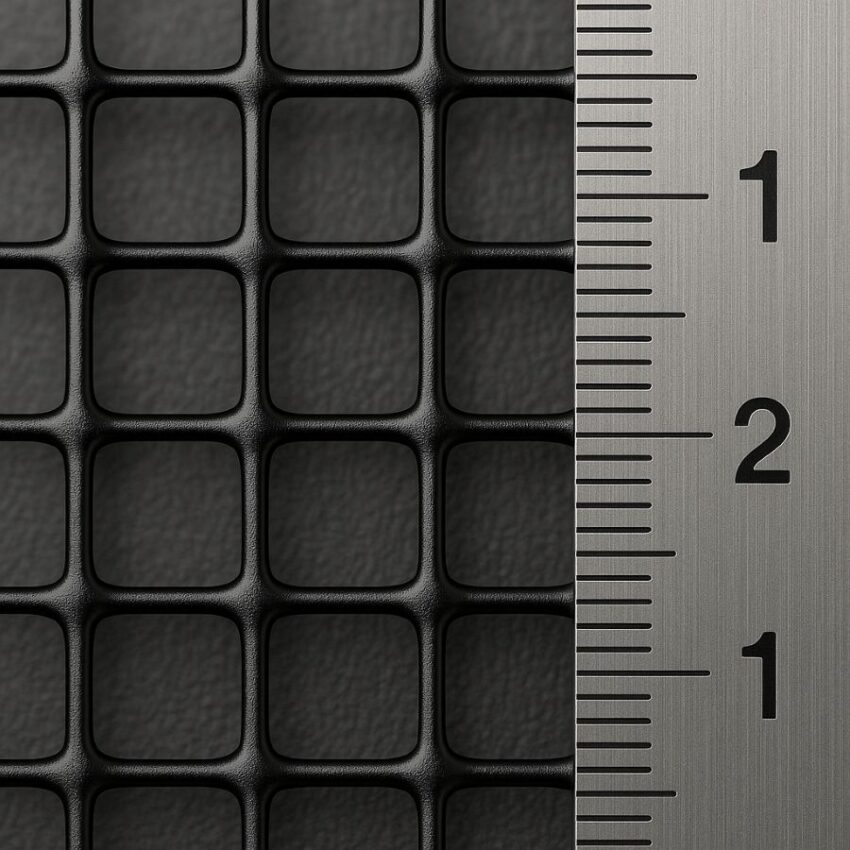
This 6 inch x 50ft Solar Panel Bird Guard, Wire Mesh Critter Guard with 50 fasteners is a perimeter screen that closes the gap between your roof and the underside of your solar panels. The roll is a PVC-coated welded wire mesh that matches what pro bird-exclusion kits use, typically a one half inch square opening, so birds, squirrels, and wind-blown debris stay out while air still moves freely. Non-penetrating panel clips lock the mesh to the module frames, so there is no drilling into panels or shingles. Comparable industry kits specify black PVC-coated galvanized mesh with one half inch openings and clip systems that attach to the panel frame rather than the roof, which is exactly the configuration most installers prefer for long life and service access.
How it works and why it matters
Under-array cavities are perfect hideouts for pigeons and rodents. Nesting and droppings do not just make a mess, they can shade cells, create hot spots, and corrode hardware. Recent reviews and experiments note that bird droppings are among the most impactful contaminants on PV performance, and that partial shading from droppings or debris can drive sizable power loss and localized heating.

By blocking entry, a critter guard reduces these risks at the source. At the same time, the mesh format preserves the ventilation gap that most rooftop arrays rely on for cooling, which helps maintain output and reduces thermal stress on components. Academic and industry sources emphasize the importance of keeping an unobstructed air gap behind the modules for natural convective cooling, and using perimeter screens that do not seal the array tight.
What makes this style effective and different
A good solar panel mesh screen does three specific things. First, it uses corrosion-resistant materials, for example galvanized steel with a UV-stable black PVC jacket, so it blends visually under the array and holds up to weather. Second, it relies on purpose-made, non-intrusive clips that grip the panel frame, which avoids roof penetrations and lets technicians remove sections for future service. Third, it uses a tight, consistent opening size, commonly one half inch, that excludes birds and most rodents without restricting airflow. Professional exclusion manufacturers call out these same design choices in their kits and bulk mesh specifications, and they recommend clip spacing along the frame to keep the skirt neat and secure.
Usage Scenario
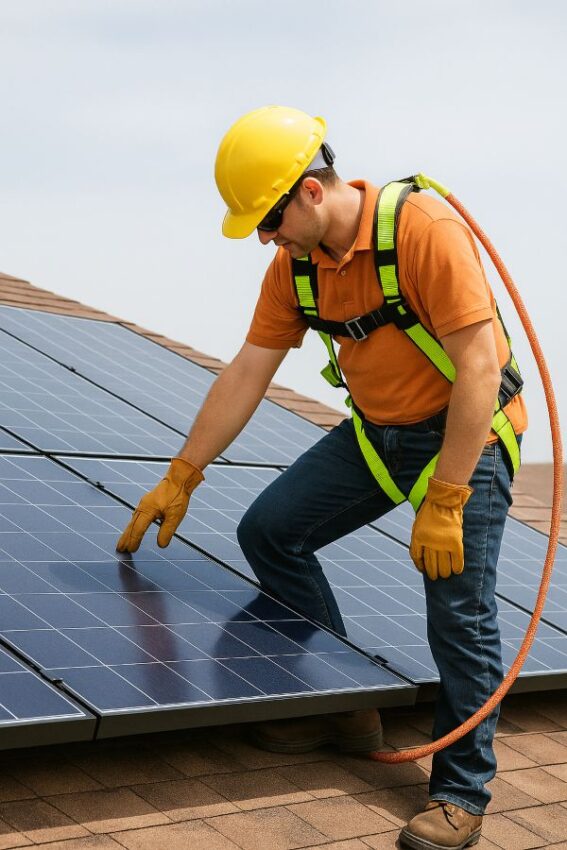
A homeowner notices twigs poking from under the south array, along with early morning pigeon noise. On inspection day, the installer finds nesting debris and insulation nibbles near the wire run, a known risk since rodents gnaw to keep teeth short and can expose conductors that lead to shorts or fire hazards. The crew vacuums out debris with the system made safe, then installs a black PVC-coated critter guard around the perimeter using non-penetrating clips.
The roofline goes quiet, gutters stop clogging, and routine rinses are easier because droppings no longer accumulate under the panels. Forum and contractor guidance echo two important lessons in this story. Do not pull nests yourself while the array is live, and prevent repeat visits by adding a proper frame-mounted exclusion screen once the area is clean.
Product Specifications
| Spec | Details for this kit | Practical notes |
|---|---|---|
| Roll size | 6 inches tall x 50 feet long | One roll wraps up to 50 linear feet of array perimeter. Measure the total outer edge of your array to estimate how many rolls you need. |
| Mesh opening | 1/2 inch by 1/2 inch welded wire | The 1/2 inch square keeps pigeons and most rodents out while still letting air move under the array. |
| Material | Galvanized steel wire with black PVC coating | The PVC jacket helps with corrosion resistance and a low-profile look from the ground. |
| Wire thickness | About 0.7 mm to 1.0 mm, depending on model | Common ranges shown across listings. Heavier wire is stiffer at corners yet still cuttable with snips. |
| Fasteners in box | 50 stainless-steel J-hooks and washers (plus cable ties on some kits) | Stainless hardware resists rust at the roofline. |
| Attachment method | Non-penetrating solar clips that grip the module frame | Avoids drilling panels or shingles. Designed to be removable for service. |
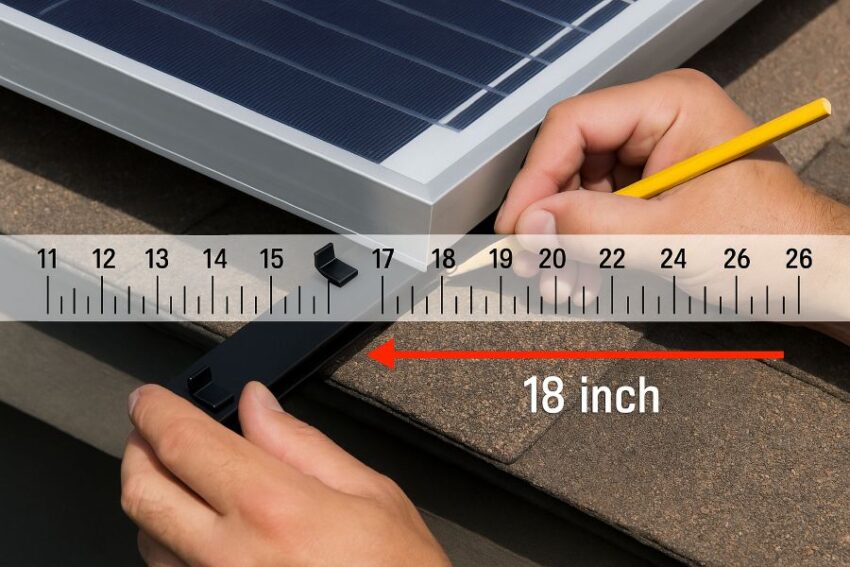
| Clip spacing (installer guidance) | About every 18 inches along the frame | Keeps the skirt taut and neat around corners and seams. |
| Airflow compatibility | Mesh does not seal the array; it preserves the under-panel ventilation gap | Rear ventilation is important for PV temperature and output. Use screens that allow free air movement. |
| Color | Black | Blends visually with most frames and roofs. |
| Typical install time | A few hours for a standard residential array | Time varies with roof pitch and access. |
| Tools you will use | Tin snips or aviation snips; pliers; marker; tape measure | Cut, bend, and clip per the installer guide. |
| Safety and roof care | No drilling into panel frames or shingles; maintain drainage paths | Work with the system made safe, and keep gutters clear. |
| Certifications | None typically required; this is a passive mechanical barrier | Check local code and your installer’s warranty rules before you start. |
How to Use and Install the Solar Panel Bird Guard
Before you climb: safety and legality come first
Working at roof height and around a live PV system deserves respect. On any roof edge at or above six feet, OSHA requires fall protection. That can be guardrails, a personal fall arrest system, or a properly rigged travel-restraint setup. If work is between six and 15 feet from the edge, protection is still required, and unqualified people should not be near exposed electrical parts. Plan your anchor, harness, and tie-off before you touch a ladder.
Solar panels are energized whenever light hits them. Treat conductors as live, avoid disconnecting under load, and do not open enclosures you are not qualified to service. If isolation is needed, have a licensed solar professional de-energize using the marked PV system disconnects and verify the absence of voltage. Early morning or overcast conditions reduce risk, but do not assume a system is safe without proper testing.
If you are cleaning out old nesting, wear gloves and eye protection. For heavy accumulations of droppings, a NIOSH-approved respirator is recommended and vacuum removal with high-efficiency filtration may be appropriate. In some cases, hiring a specialist is the safer option.
Last, check local wildlife rules. In the United States most active nests are protected under the Migratory Bird Treaty Act. Rock pigeons are a notable exception as a non-native species, but always verify your local regulations before removing nests.
What you will need
Tin or aviation snips, pliers, tape measure, marker, and the kit’s clips, rods, and speed washers. Stainless hardware is preferred at the roofline. Have cable ties on hand for tidy overlaps. Keep a trash bag ready for debris and wear gloves and eye protection throughout.
Step 1. Inspect, clean, and measure the array perimeter
Walk the roof safely, note conduit entries and corners, and confirm the total linear footage around the array. Remove loose twigs and debris from the under-panel gap. If you encounter extensive droppings, pause for PPE as above and use controlled cleanup methods that minimize airborne dust.
While you are there, visually confirm that frame drain holes are open. Your mesh skirt must not obstruct these. Module manufacturers explicitly warn that blocking the frame’s drainage voids intended water pathways and may affect warranty coverage.
Step 2. Pre-cut and pre-bend the mesh for easier handling
Cut the 6 inch mesh into workable sections. Five-foot pieces are easy to control on a roof. Using a straight 2×4 as a guide, bend two or three squares to roughly a 45-degree angle along the bottom. That gentle toe helps the skirt hug the roof surface and discourages birds from prying a gap.
Plan for at least three inches of overlap wherever one section meets the next and around corners. Overlaps make a continuous barrier that small birds and rodents cannot exploit.
Step 3. Place the non-penetrating clips on the panel frames
Slide a clip onto the underside lip of the module frame. Push it outward until it fully seats on the frame lip. Space clips about every 18 inches along the edge you are working. This pattern keeps the skirt neat and prevents waves that animals can work under. Avoid any method that drills the panel frame because most manufacturers state that drilling or modifying frames will void the warranty.
If you prefer an adhesive skirt product, some systems bond to the frame with high-bond acrylic foam tape and do not require clips. These are also non-penetrating options.
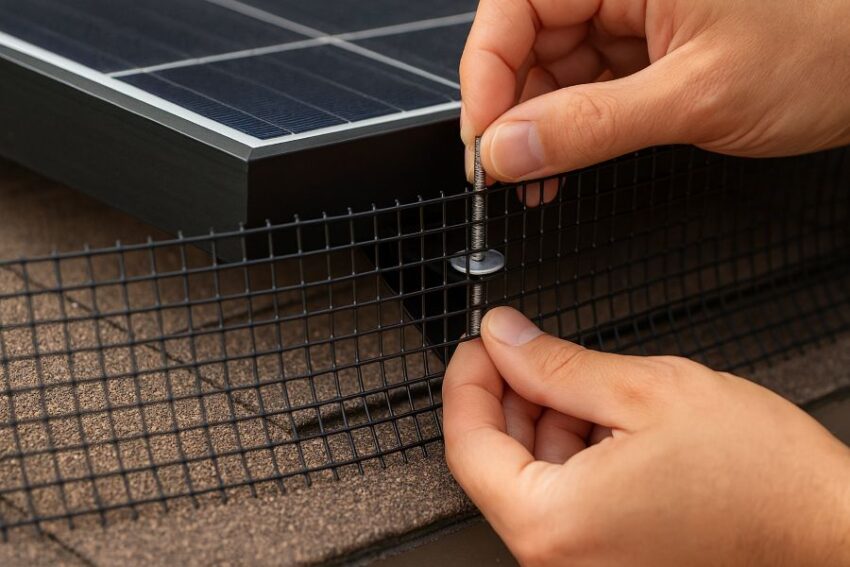
Step 4. Hang the mesh and lock it with speed washers
Lift your pre-bent section into place so the fastener rod passes through a mesh opening at a slight upward angle. That angle puts gentle pressure on the mesh so it rests against the roof surface. Slide a speed washer up the rod until the mesh sits snug. Adjust for a straight line and continue clip by clip. The goal is contact with the roof, clear drainage at the module frame, and no visible gaps.
At the next section, overlap by at least three inches and tie the lap with cable ties. Continue the same clip spacing and washer tension so the skirt looks uniform.
Step 5. Handle corners, conduit, and tricky transitions
Inside corners are easier if you snip a 45-degree relief at the bottom, then overlap the two cut flanges in opposite directions before fastening. For odd shapes, bend and lace the overlap with ties so there is no daylight showing through. Around conduit or standoffs, notch the mesh carefully and close any resulting seams with ties or a small patch piece under the main run. These corner and patching techniques create a continuous, pry-resistant barrier.
If your array uses a taller standoff and the roof-to-panel gap is larger than average, confirm that a six inch skirt still reaches the roof surface. Some installers step up to eight or ten inch mesh on high-profile racks.
Step 6. Final checks that protect performance and warranty
Walk the perimeter and tug lightly on each section. There should be no gaps, including at seams. Even inch-and-a-half to two-inch openings can admit small birds, so lap and tie until everything is tight. Confirm again that you have not blocked any module drain holes. Finally, look for any clip placement that could shade cells or interfere with existing racking clamps.
Avoid any attachment that pierces the panel frame or roof covering. Major module manuals state that drilling frames can compromise strength and void warranties. Use frame-gripping clips or listed adhesive skirt systems instead.
Aftercare, service, and maintenance
A quick visual check each season keeps you ahead of wind-lifted corners or new debris. If you schedule professional cleanings or service, let the crew know you have a clip-on skirt. Quality kits are designed to be removed and reinstalled at service without damage. During any work, maintain electrical safety boundaries and let qualified personnel handle energized equipment.
Solving Common Issues
If pigeons keep testing the barrier at one spot, add an extra clip between the standard 18-inch spacing and re-secure the overlap with two ties instead of one. If water appears to pool at the array edge after storms, re-inspect for anything that could be blocking frame drain holes or roof drainage paths and correct immediately. If you ever see chewed wire insulation, stop and call a licensed solar technician. Do not handle damaged conductors in daylight.
Why this method is trusted by pros
Professional bird-exclusion systems specify PVC-coated welded wire, non-penetrating frame clips, consistent clip spacing, bent toes for roof contact, and overlapped seams. Those details are exactly what stops entry while keeping the under-panel ventilation that PV systems are designed around. The mesh is a mechanical barrier that preserves airflow and does not alter the module frame, so it protects both performance and warranty standing.
Frequently Asked Questions
Does a solar panel bird guard restrict airflow or make panels run hotter?
Short answer. No, when you choose a 1/2 inch welded mesh and install it correctly, airflow under the array remains open. Installers and manufacturers stress two things. Keep the ventilation gap and do not block the small drain holes on the underside of the panel frame. Canadian Solar’s manual explicitly requires reliable rear ventilation and says the drainage holes must not be blocked. Silfab and LONGi manuals say the same. Pro guides on bird mesh also emphasize that the mesh is a perimeter barrier that still lets air circulate.
Will adding a mesh screen void my solar panel warranty?
It will not, provided you use non-penetrating methods and do not modify the frame. Major module makers are very clear. Drilling or making extra holes in the frame invalidates the warranty. REC and Canadian Solar say it outright. SunPower’s installation instructions warn that improper clamping or frame deformation can void the warranty as well. Mesh kits that clip to the frame or use listed adhesives avoid those issues.
What mesh size and material should I buy for pigeon proofing and critter guard duty?
For rooftop arrays, a 1/2 inch square, black PVC-coated, galvanized steel mesh is the industry standard. It is small enough to keep pigeons out and sturdy enough to deter rodents while remaining visually low profile. Bird Barrier’s pro line specifies 19-gauge, 1/2 inch openings in 6 to 12 inch heights. Many homeowner kits follow the same spec.
How many clips do I need and how far apart should they be?
Plan roughly 50 to 75 clips per 100 feet of perimeter and space clips about every 18 inches. That spacing is recommended in several pro guides and product pages. Expect to add extra clips at corners and around obstacles so there are no pry points.
Could squirrels chew through the mesh or still damage my system?
Squirrels are relentless chewers and they do target PV wire insulation, which can create shorts or fire risk. That is one of the key reasons to install a physical barrier. Use steel mesh and stainless or metal clips. Rodent-exclusion guidance and installer articles favor galvanized or stainless mesh for durability, and forum anecdotes back up the risk to wiring if systems are left unprotected. A few installer blogs note that extremely determined squirrels can damage lighter materials, so choose quality mesh and keep branches trimmed back.
Is it legal to remove nests that are already under my panels?
In the United States, most native birds and their active nests are protected by the Migratory Bird Treaty Act. You generally need to wait until a nest is inactive, or obtain a permit in limited health or safety situations. Rock pigeons, house sparrows, and European starlings are non-native and are not protected at the federal or many state levels, yet always check local rules before removal.
Will a mesh “skirt” reduce energy production by shading the panels?
A properly installed solar panel mesh screen attaches to the frame perimeter and does not shade the glass, so it will not reduce output. What does hurt production is debris and droppings. Research and industry summaries report that bird droppings can cause significant power loss and hot spots. The mesh helps by stopping nesting and the mess that leads to repeat soiling. Avoid any idea of draping netting over the face of panels, since even small shading reduces yield.
Does bird mesh block water drainage or create pooling problems?
It should not, provided you leave the panel frame drainage paths open and keep the skirt snug to the roof. Multiple installation manuals instruct installers not to block drain holes. Adhesive skirt systems even note that a small gap from the roof surface is acceptable and still protective. After storms, give the array a quick look to make sure leaves have not accumulated at the bottom edge.
Can I install this myself or should I hire a pro?
Many homeowners install critter guard themselves in a few hours if the roof is accessible, yet safety and warranty rules apply. If your roof is steep or high, or if you are not comfortable working at height, hire a qualified installer. Pro vendors describe their clip-and-mesh systems as non-penetrating and designed for efficient DIY or contractor installs. Always follow the panel manufacturer’s manual during any work near the array.
What routine maintenance should I plan after installation?
Walk the perimeter visually each season. Tighten any loose overlap ties and add a clip if birds test a spot. Make sure no leaves or debris are trapped along the top or bottom edges. Solar DIY and pro forums note that mesh allows plenty of airflow, yet seasonal leaf buildup can occur in some roof valleys. If you ever see chewed insulation or exposed conductors, stop and call a licensed solar technician.
Does this actually improve performance or is it just for cleanliness?
It helps both. Preventing birds from living under your array reduces droppings and debris on the glass and preserves airflow. Studies and field reports show that soiling and droppings can cause notable efficiency losses and hot spots. A good critter guard is preventive maintenance that protects energy yield and reduces future service calls.
Conclusion
If birds or squirrels have found the gap under your array, a simple, durable fix is often the smartest money you will spend on your system. Research shows that bird droppings and spot shading can cut output and create hot spots, which is a performance hit you can prevent with an effective barrier rather than chasing cleanings after the fact.
This 6 inch x 50ft solar panel bird guard kit uses the same fundamentals trusted by pros, a half inch PVC-coated steel critter guard mesh that keeps pests out while letting your array breathe, and non-penetrating clips that attach to the module frame. That approach aligns with manufacturer guidance to keep drainage paths open and to avoid drilling frames, both for safety and to protect your warranty.
Before you remove any nests, take a moment to check local rules. Most active nests are protected under federal law in the United States, while common pest pigeons are generally not, so timing and identification matter. When in doubt, pause and verify to stay compliant.
Related products
-

Bird B Gone White Plastic Bird Spikes 10 ft, Humane Pigeon Deterrent
$27.08 Buy Now -
304 Stainless Steel Bird Spikes, 11 ft Pigeon & Small Bird Deterrent, 10 Pack
$16.99 Buy Now -
Sale!
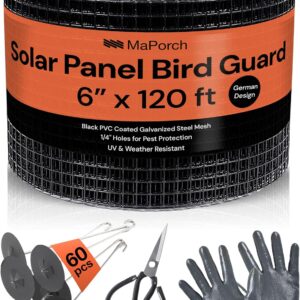
MaPorch 6″x120FT Solar Panel Bird Proofing Mesh Kit, With 60 clips
Original price was: $89.99.$80.99Current price is: $80.99. Buy Now
Reviews
There are no reviews yet.