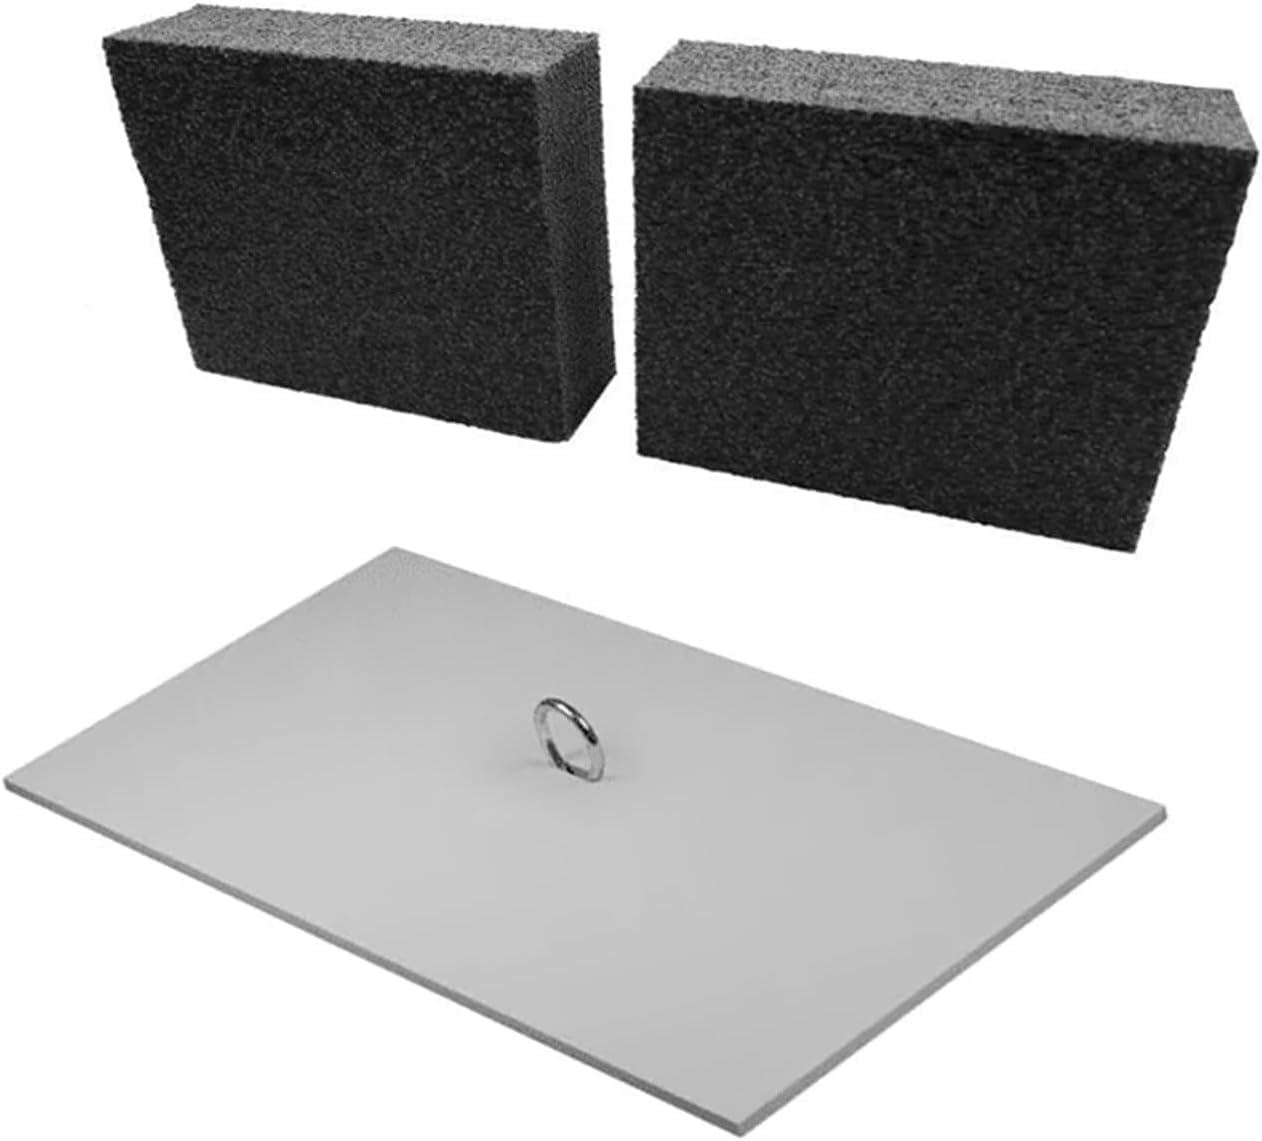
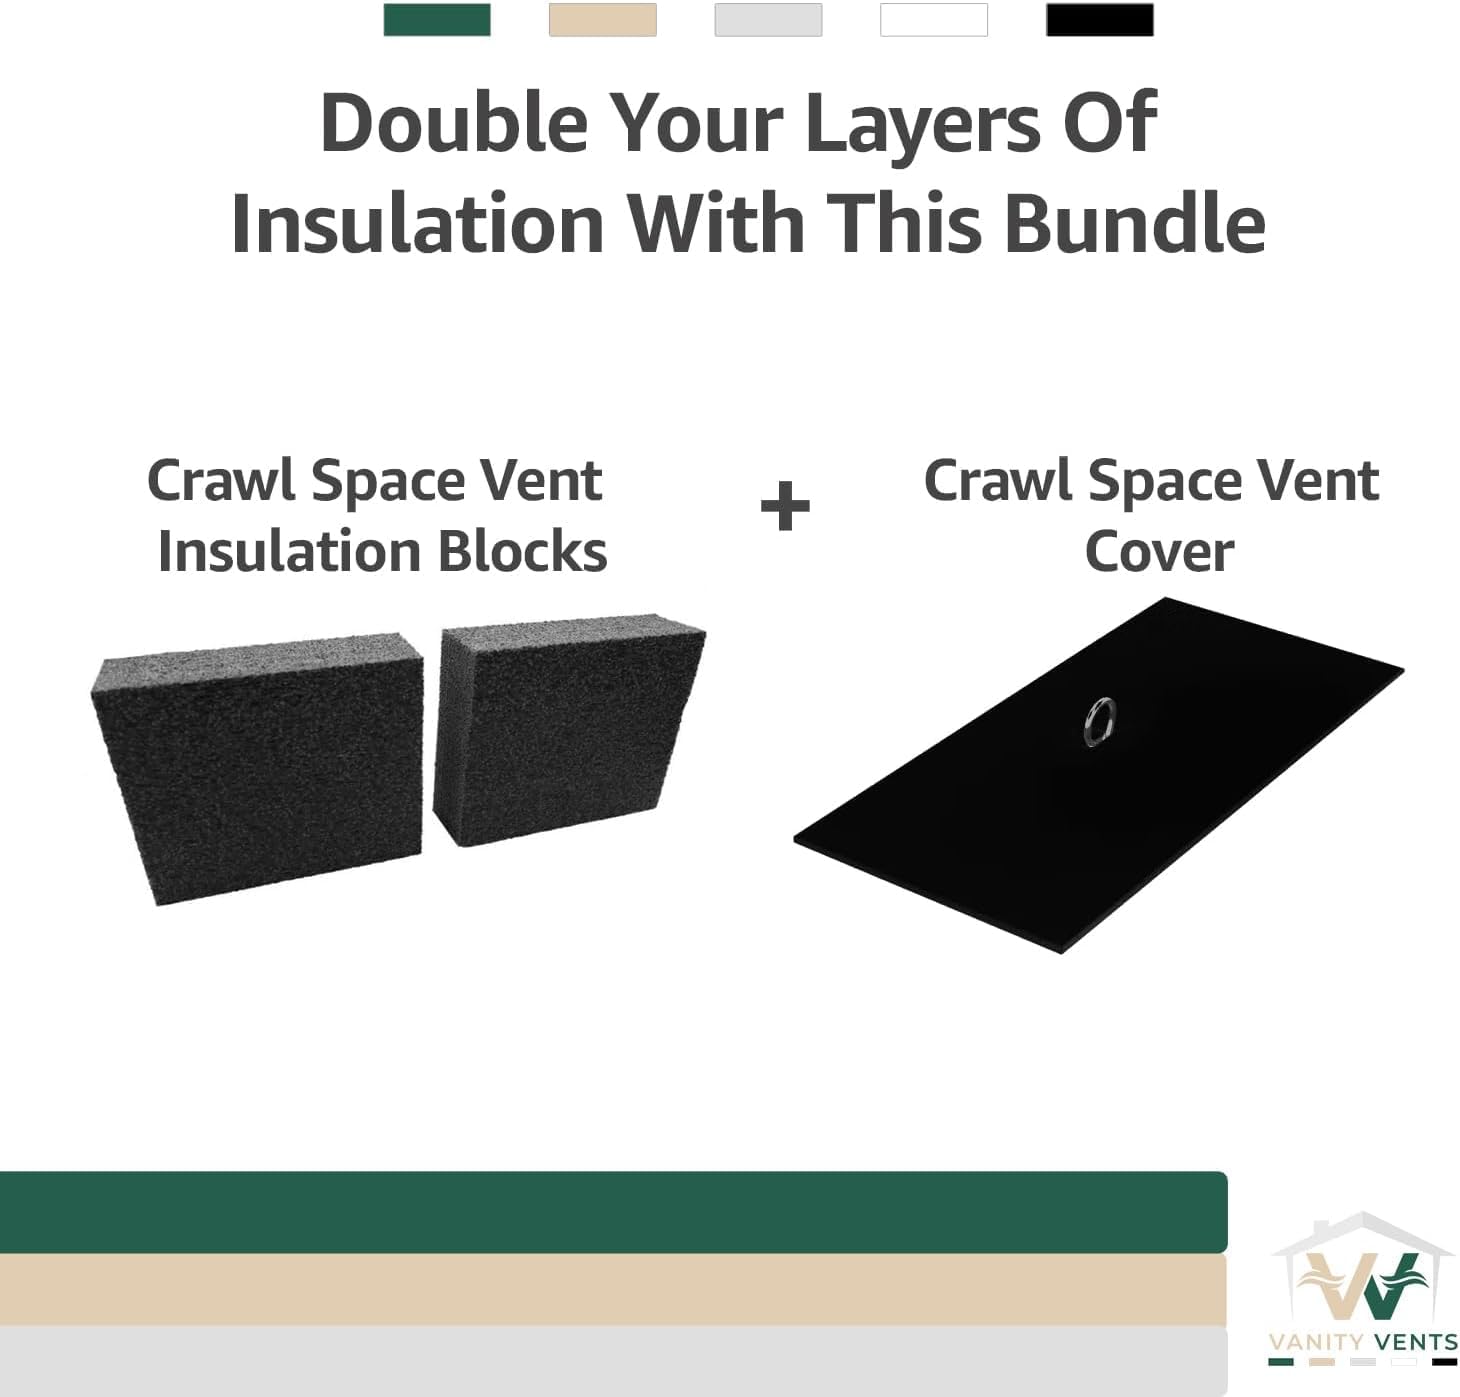


Exterior Crawl Space Vent Cover with 2-inch Insulation Blocks
Original price was: $224.39.$31.97Current price is: $31.97.
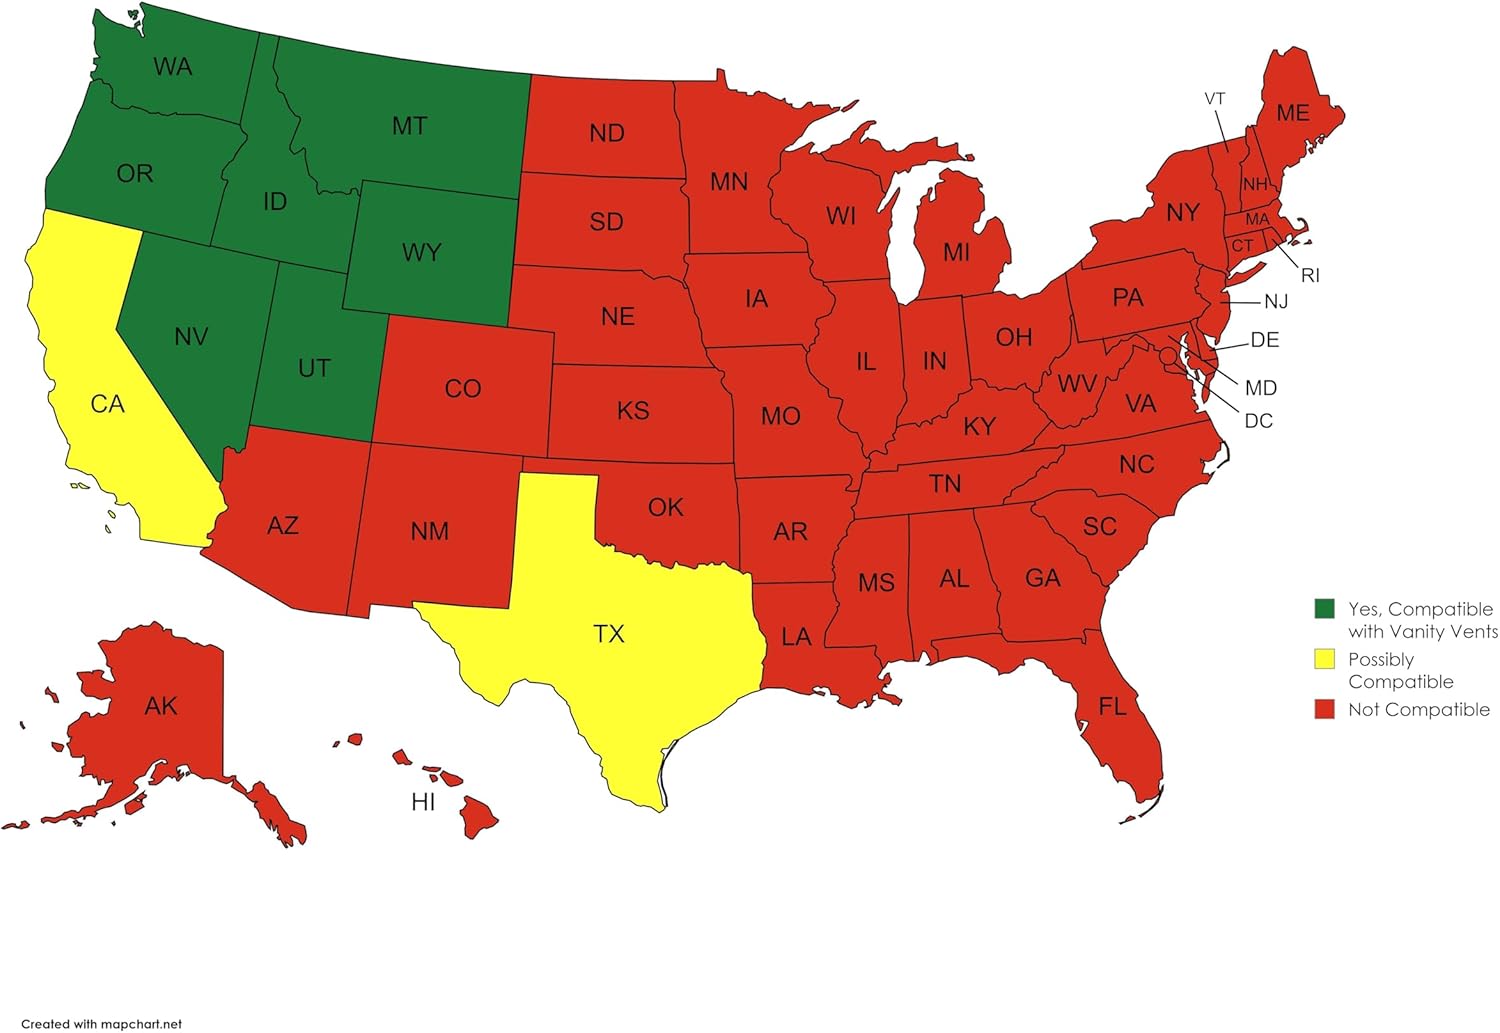
Give your foundation a clean, finished look while tightening up a drafty crawl space. The Exterior Crawl Space Vent Cover + 2-inch Vent Insulation Blocks (Gray) by Vanity Vents clips to the vent’s center divider and press-fits dense foam inside the opening, so you get instant curb appeal and a real air-sealing boost in seconds. Designed for standard 8 by 16 vents and currently shipping only within the Pacific Northwest, it’s a fast, tool-light way to cut cold air wash and support moisture control in a damp climate.
Description
If you live in the Pacific Northwest and want a cleaner look along with a tighter, drier crawl space, the Exterior Crawl Space Vent Cover with 2-inch Insulation Blocks is purpose-built for you. This combo pairs a handsome, exterior-grade foundation vent cover with thick foam inserts that slip in place in seconds to curb drafts, discourage pests, and help your home hold heat, which is a proven win for comfort and energy use in our climate.
From a pest-control standpoint, closing and insulating leaky foundation vents removes one of the easiest entry points for rodents and insects, while the clean, painted-look face instantly upgrades curb appeal. And since Vanity Vents currently ships this model only within the Pacific Northwest, it is matched to local building-science guidance for sealing and conditioning crawl spaces in marine and cold PNW zones.
Key Customer Benefits
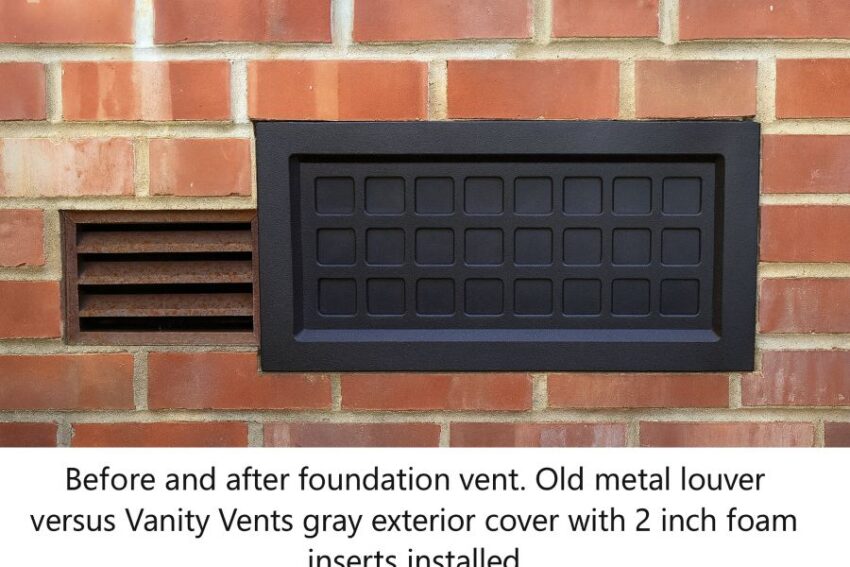
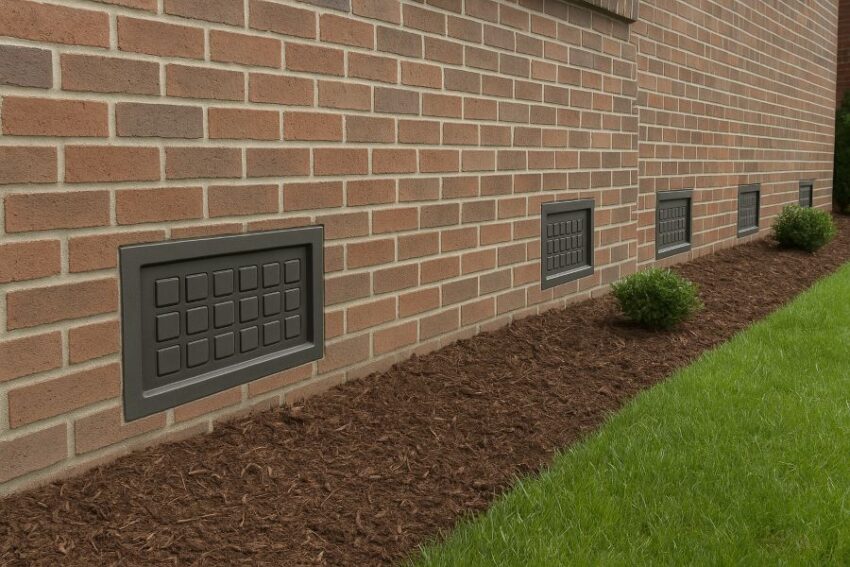
- Instant curb appeal that hides ugly vents: The finished exterior face gives your foundation a clean, uniform look so the eye goes to landscaping and siding, not rusty louvers or broken screens. Vanity Vents positions these covers as a simple, durable cosmetic upgrade that also pulls its weight for comfort and protection.
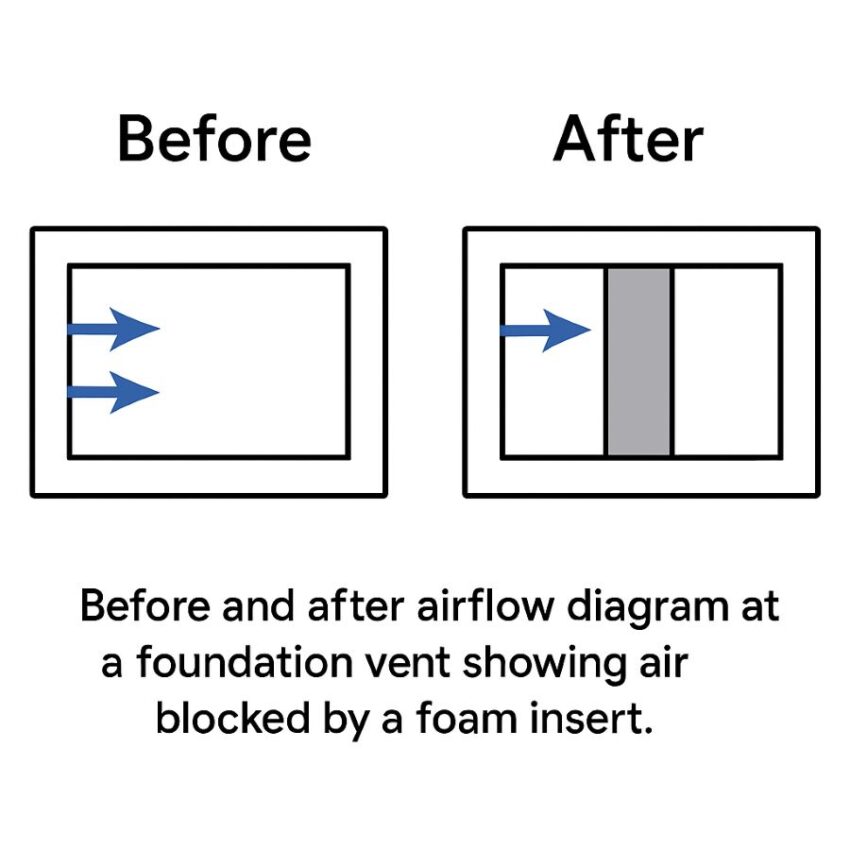
- Fewer drafts and lower energy waste from the crawlspace: Uncontrolled air moving through foundation vents can undermine comfort and drive up winter heating loads. Air sealing and insulating the crawl area is a recognized building-science strategy to improve durability and efficiency, especially in marine and cold Pacific Northwest zones. Adding an exterior crawl space vent cover with 2-inch foam inserts helps reduce cold air infiltration at one of the leakiest spots on the envelope.
- Moisture control support for a notoriously damp climate: In the PNW, many homes benefit from strategies that limit damp outdoor air from washing through crawlspaces. Regional guidance describes how sealing and insulating crawlspaces, when paired with proper ground vapor control and drainage, can help keep structures drier and more resilient. This combo cover and insulation set is a practical step in that direction.
- Discourages rodents and insects that use vents as front doors: Open or damaged foundation vents are easy entry points for mice and other pests. Closing and covering those openings during cold seasons can help block access while also protecting pipes from freezing, which is a common homeowner worry each winter.
- Purpose-built for Pacific Northwest homes: Vanity Vents states this exterior vent cover bundle ships only within the Pacific Northwest, aligning the product with regional best practices and sizing for the typical 8 by 16 foundation vent opening. That location focus matters when you are matching solutions to local weather patterns and code expectations.
- Fast, tool-light installation that actually seals: Listings emphasize that the 2-inch polyethylene foam blocks are cut for an air-tight push-fit and go in within seconds. That speed makes it realistic for homeowners to close vents before a cold snap or storm without a long weekend project.
- A smarter alternative to crumbly Styrofoam plugs: The combo replaces flimsy inserts with higher quality, water-resistant foam and a rigid exterior face, so you get a tighter seal and a better look at the same time. Retail pages and the brand site consistently call out durability and weather resistance as core advantages.
Product Description
What this combo is and when it makes sense
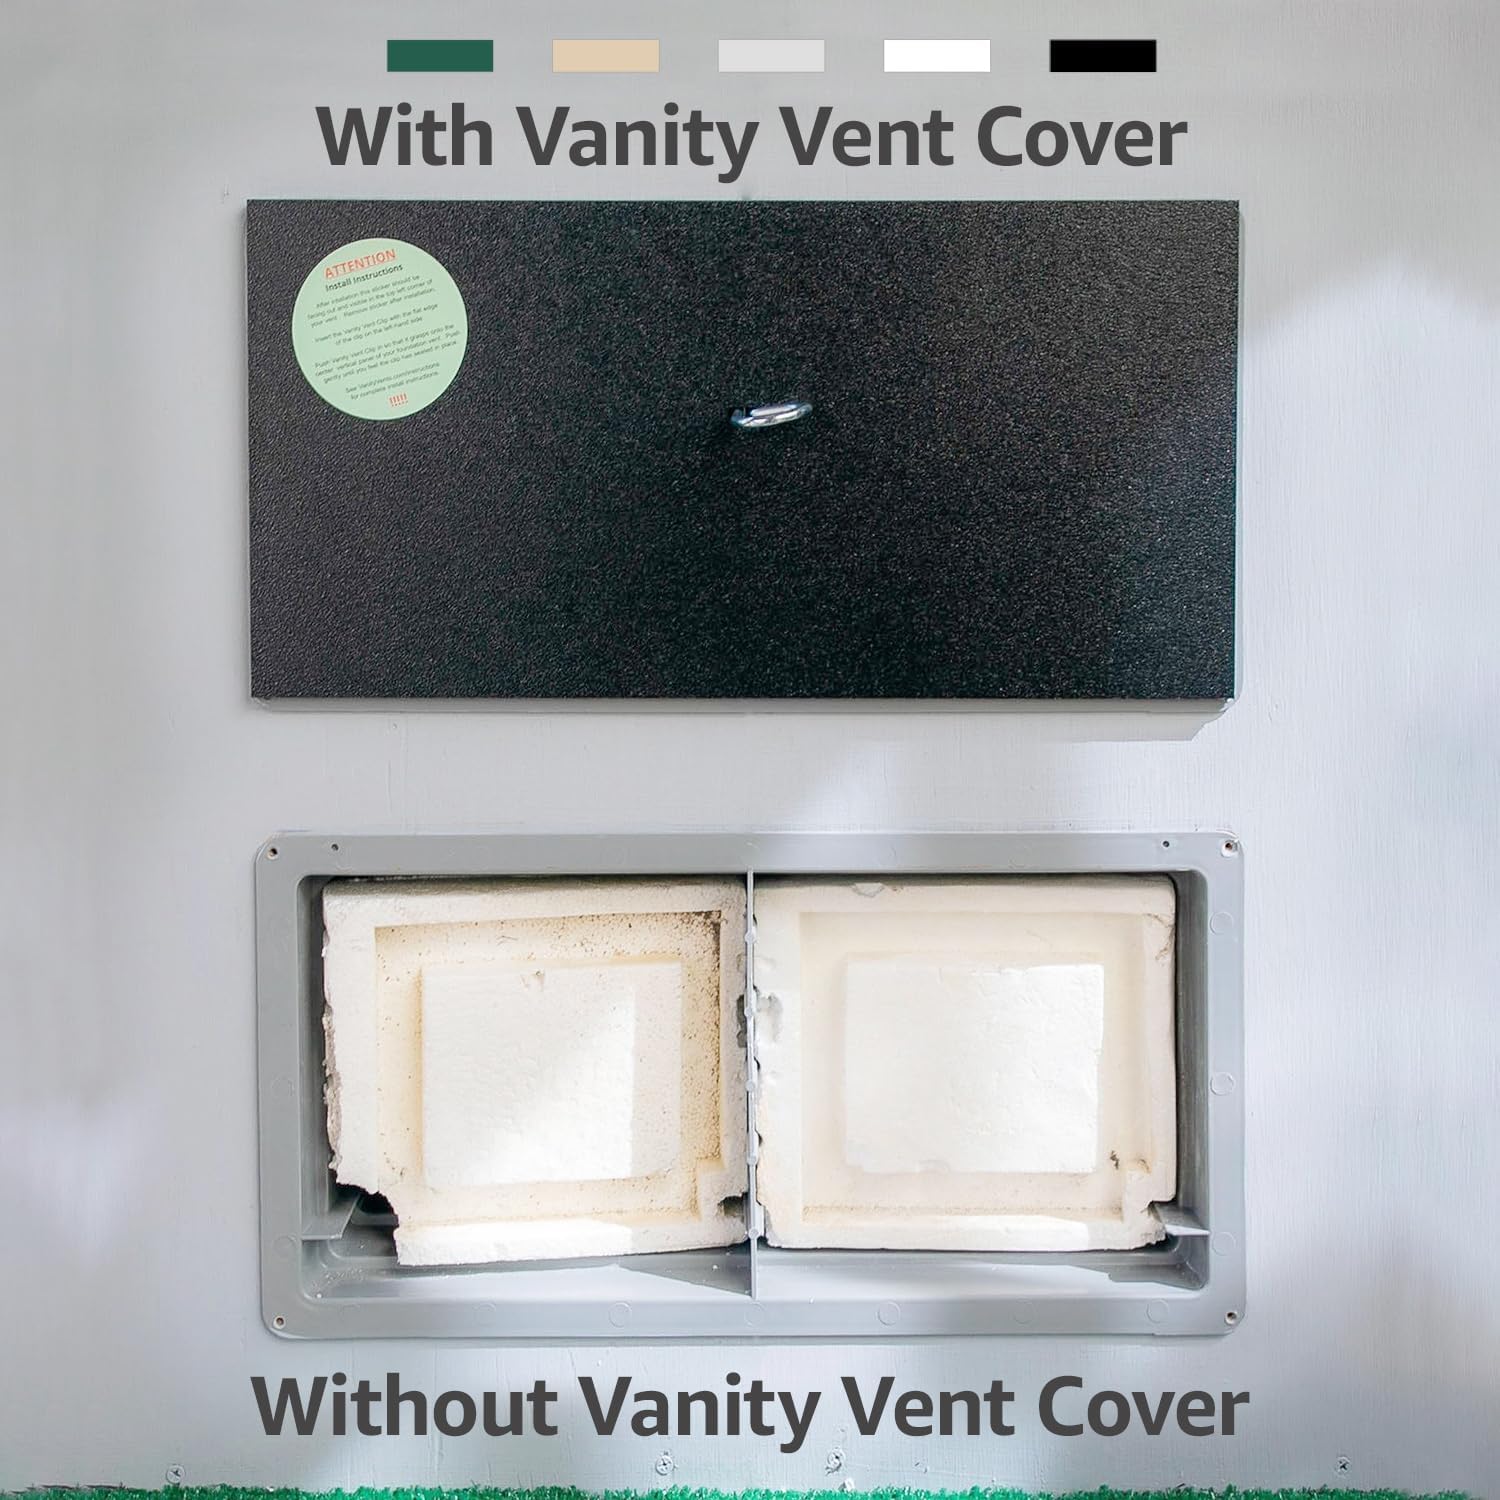
The Exterior Crawl Space Vent Cover + Set of 2-inch Vent Insulation Blocks from Vanity Vents is a two-part upgrade for standard 8 by 16 foundation vents. Outside, a rigid, finished cover tidies the opening for an instant cosmetic lift. Inside, dense 2-inch foam blocks press-fit into the vent cavity to slow cold drafts and help stabilize crawlspace conditions in a damp, marine climate like the Pacific Northwest. Vanity Vents’ listings make two points clear. First, this specific bundle currently ships only within the PNW. Second, the company positions the blocks as quick to install and far more durable than crumbly white foam plugs that often fall out or soak up water.
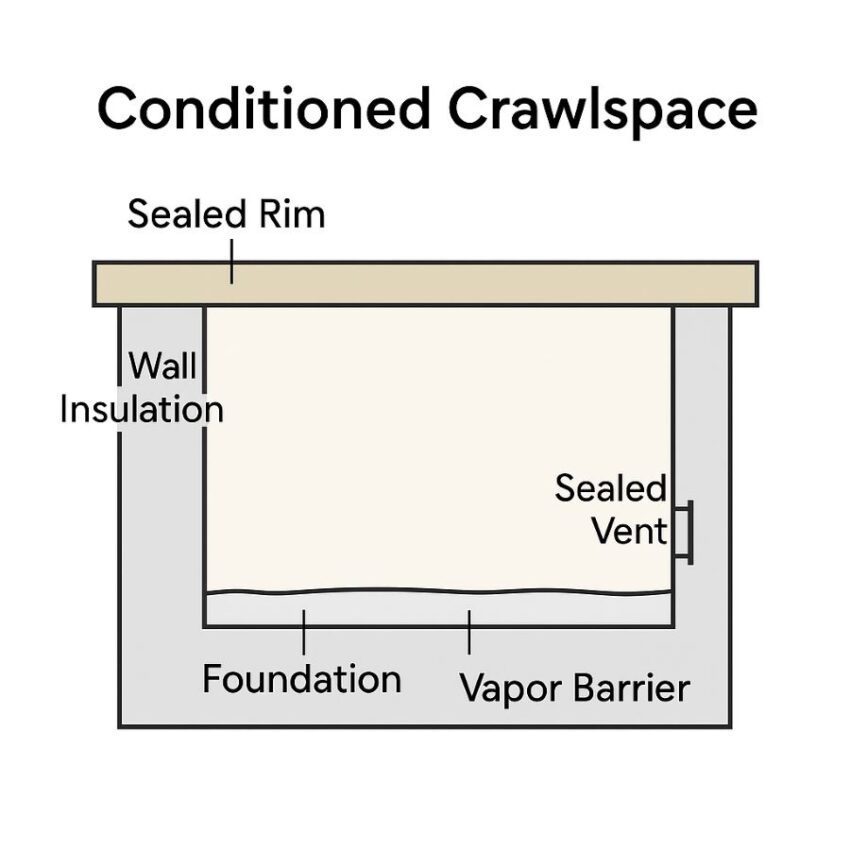
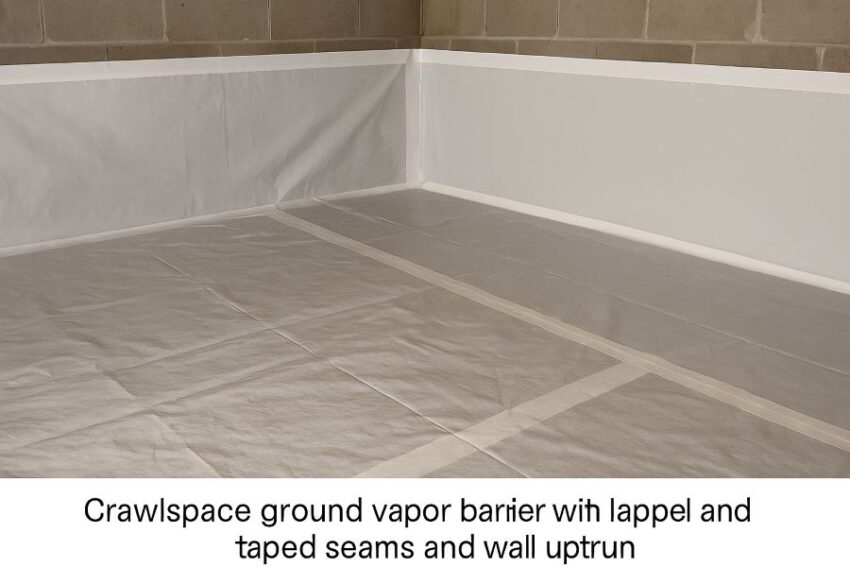
For context, building-science guidance in our region is steadily moving away from “open vents all the time” toward sealed or conditioned crawlspaces that manage moisture with vapor barriers, drainage, air sealing, and either supply air or dehumidification. The goal is to reduce wood moisture content, mold risk, and energy loss. A cover-plus-insulation approach at the vents is one practical step in that broader plan.
How it works
Most Pacific Northwest winters send cold, wet air through louvered vents and across joists, pipes, and wiring. When you close the exterior opening and push a 2-inch foam insert into the throat of that vent, you reduce uncontrolled air exchange at a known leak. Fewer drafts through the floor help comfort upstairs. In wet seasons, limiting outdoor air movement also supports lower crawlspace humidity when paired with ground vapor control and drain improvements. That sequence is consistent with Building America and Building Science Corporation guidance.
A quick code note so expectations are realistic. If you are converting to a fully unvented or conditioned crawlspace, modern codes and guidance expect more than just blocking vents. You should air-seal the rim and penetrations, install a continuous ground vapor retarder, and either supply a small amount of conditioned air or run a dehumidifier to keep relative humidity under control. Think of the Vanity Vents kit as the easy doorway seal that complements those steps, not the entire project on its own.
What makes this set different
Purpose-built foam with meaningful thermal value. Vanity Vents describes its 2-inch inserts as polyethylene foam with an approximate R-value near the low-teens at full thickness. Independent resources put high-performance rigid foams roughly in the R-6 to R-7 per inch range. At two inches, that is enough resistance to take the edge off wintertime convective loss at a typical 8 by 16 opening, especially compared with thin Styrofoam caps.
Region-specific availability and messaging. The company’s sales pages emphasize that this combo ships only within the Pacific Northwest. That matters because PNW energy offices and researchers have studied crawlspaces in marine and cold zones for decades. The consensus is that sealed, insulated, and conditioned approaches outperform passive venting for moisture and energy control when installed correctly. A cover that actually seals, paired with insulation, fits that playbook.
Pest resistance by closing an obvious highway. In the field, open or damaged vents are frequent entry points for mice. Homeowners and pros on pest-control forums often start with a simple checklist. Fix the vents. Close gaps. Trap inside if needed. By covering and tightening vents, you remove a common runway while you address other entry points around utilities and the sill.
Looks count at street level. The exterior faceplate hides rusted louvers and bent screens for a clean foundation line. That is a small upgrade that feels big when you repaint or refresh landscaping, and it is the part neighbors notice first. Product listings lean into this “instant curb appeal” benefit.
Where this fits within best practices
Closing crawlspace vents is not a one-size answer. In some PNW sites with very dry soils and perfect drainage, vented crawlspaces can still perform. Most older homes, however, see better long-term results when you treat the crawlspace as part of the building envelope, which means air sealing, ground vapor control, and managed conditioning rather than hoping outdoor air will dry things out. This kit helps you execute the “seal the obvious holes” part quickly and cleanly, then you can decide how far you want to go based on humidity readings and inspector guidance.
Product Specifications
| Item | Details |
|---|---|
| What is included | One exterior Vanity Vents foundation vent cover in Gray, plus two-inch polyethylene foam insulation blocks and the Vanity Vent clip for attachment. |
| Intended opening | Standard 8 in x 16 in crawl space vent opening. The product uses the vent’s vertical center panel to clip on, so that mullion is required. |
| Required inside opening for best fit | Inside measurement about 7 1/4 in high by 15 7/8 in wide, per the maker’s fit guidance. |
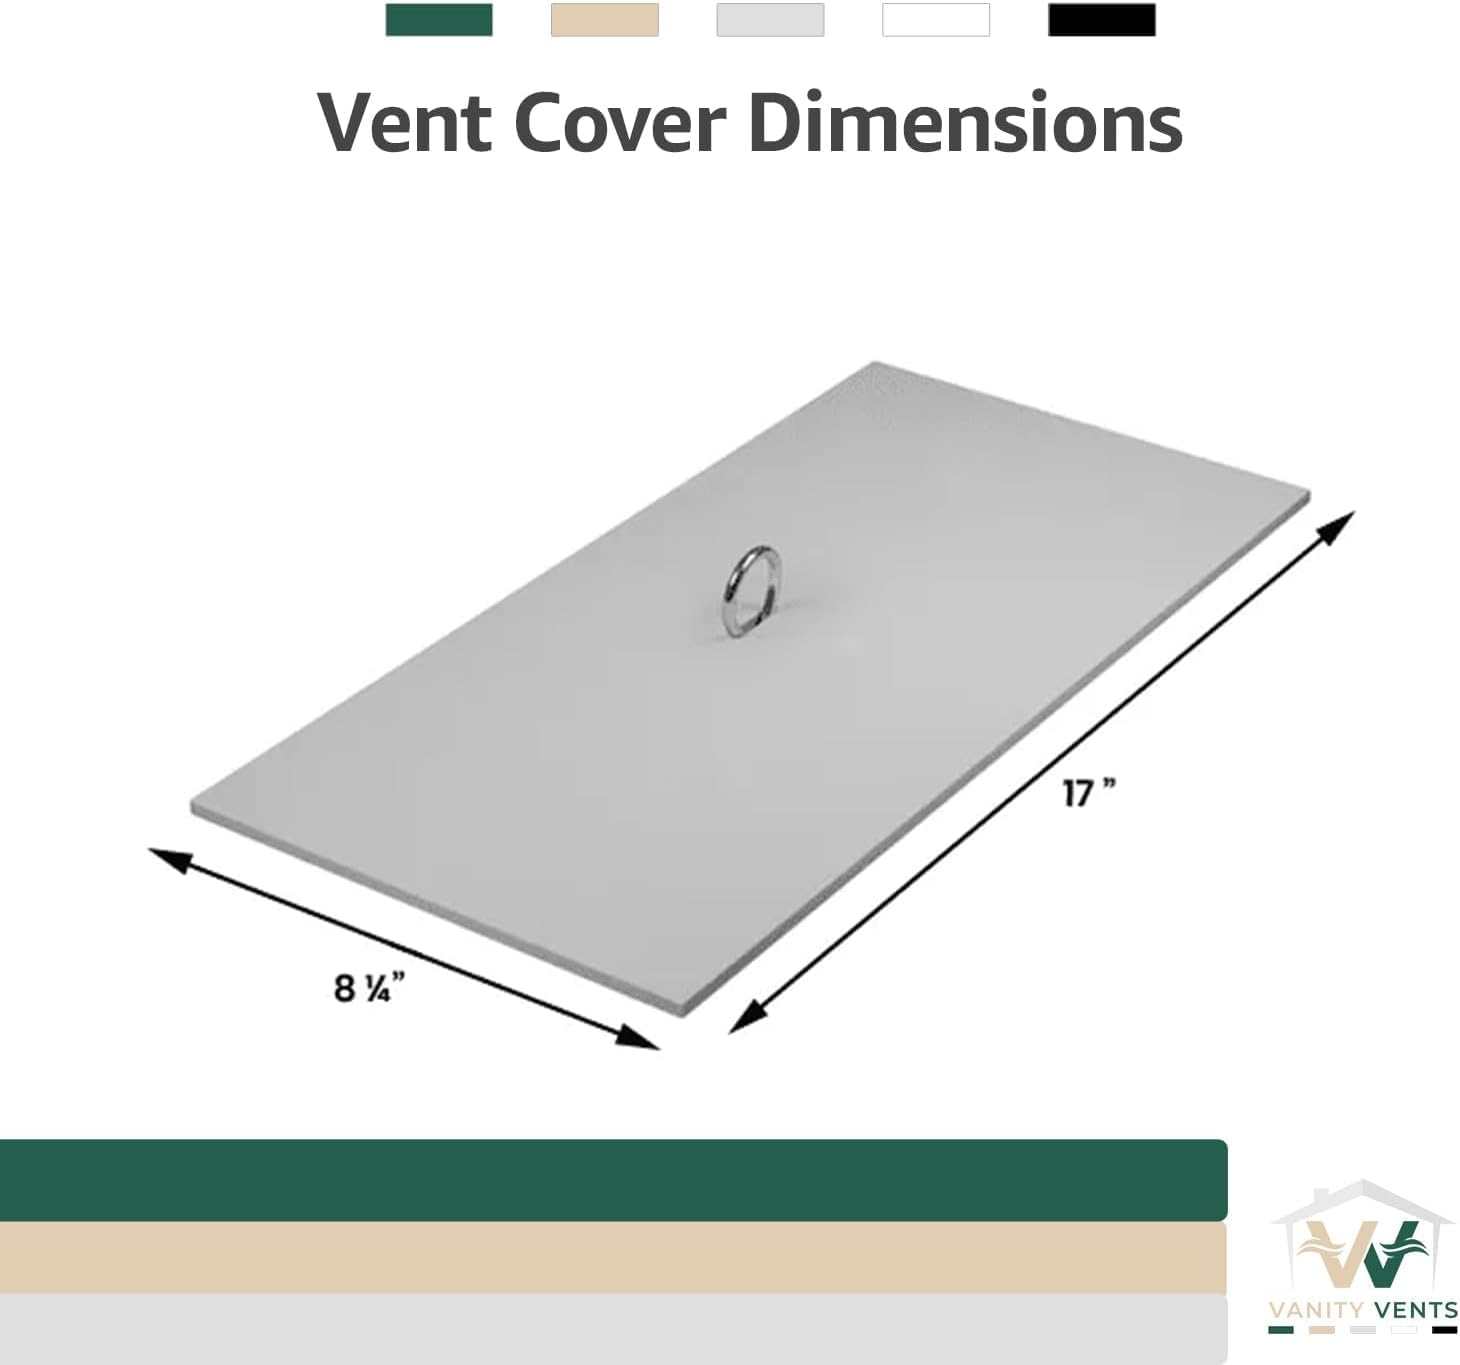
| Exterior cover dimensions | Manufacturer lists the cover at 17 in W x 8.25 in H x about 0.10 to 0.25 in D. Use the inside-opening requirement above to verify fit; the face trim intentionally overlaps the masonry opening. |
| Cover material | High-density polyethylene (HDPE) exterior face; fully recyclable. HDPE resists rust, dents, and common outdoor exposure. |
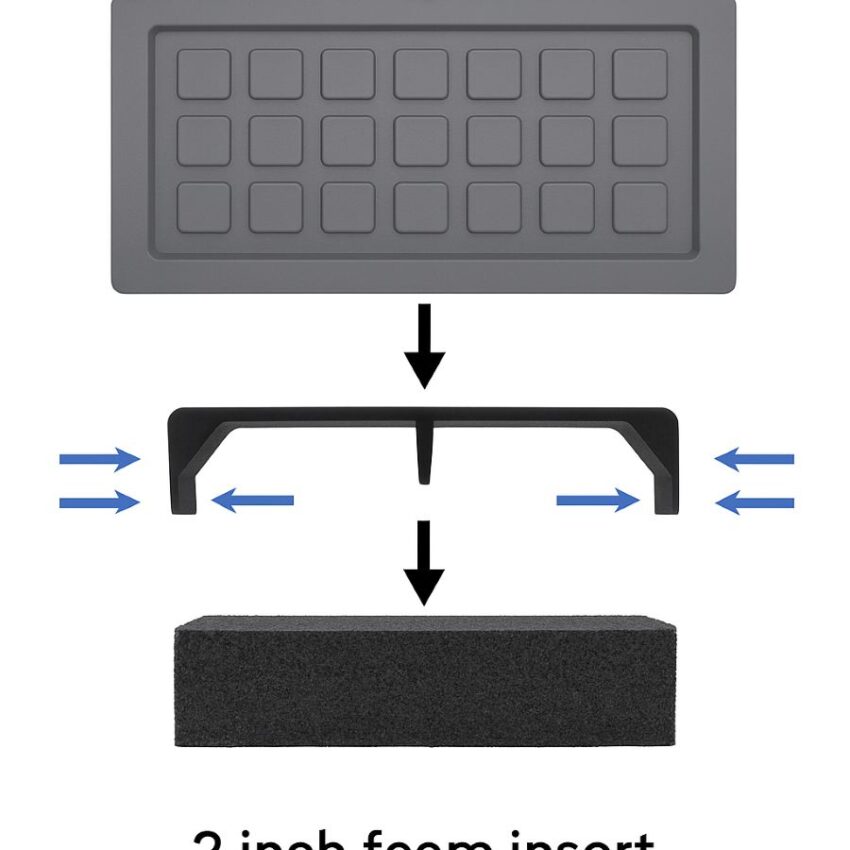
| Insulation blocks material and thickness | Polyethylene foam, 2 inches thick, CNC-cut for a snug, push-fit seal inside the vent throat. The maker emphasizes moisture resistance and a water-tight seal when seated correctly. |
| Moisture and water claims | Listings describe the foam as highly moisture resistant and even “99.9 percent waterproof.” Treat that as a manufacturer claim; in practice the inserts shed incidental wetting and help block humid outdoor air when used with a ground vapor barrier. |
| Thermal value context | The combo is sold as adding meaningful insulation at each vent opening. Some listings say the combined R-value is comparable to an exterior wall. That language is the seller’s claim, not a tested whole-assembly rating. The blocks are best treated as a useful local thermal break at a very leaky spot. |
| Color options | Gray shown here; brand pages and listings show five colors in total: Gray, White, Tan, Green, and Black. |
| Where it ships | Only ships within the Pacific Northwest according to the combo listing. That region-specific policy is repeated across product copy. |
| Country of origin | Designed and manufactured in the USA. |
| Installation type | No-tools, snap-on exterior cover that clips to the vent’s center mullion, plus press-fit foam blocks set into the vent cavity in seconds. |
| Compatibility cautions | Not for vents without a center mullion. Measure the inside vent opening carefully. Some trim-to-fit options exist in the market, but this model expects the standard size and clip point. |
| Safety and handling | Materials are described as CFC-free and recyclable; exterior cover will not rust. As with any crawlspace work, pair vent blocking with a ground vapor barrier and drainage to manage moisture. |
| Related industry size standard | Most accessories for crawlspaces reference the 8 in x 16 in vent module. Third-party vent blocks and covers use the same standard and often list an actual trim size slightly larger for overlap. |
How to Install and Use This Crawl Space Vent Cover and Insulation Set
Before you start: assess moisture, drainage, and safety
A vent cover can help with comfort and pests, but it works best when the crawlspace has basic moisture control in place. Walk the perimeter after a rain and confirm that roof runoff drains away from the foundation.
Inside the crawlspace, a ground vapor barrier that is lapped and sealed will cut evaporation from soil, and air leaks at the rim joist and penetrations should be sealed. These steps are consistent with national moisture guidance and Energy Star best practices for crawlspaces. Wear gloves, eye protection, and a respirator if you stir up dust. If you suspect high radon, consult local radon resources before closing vents.
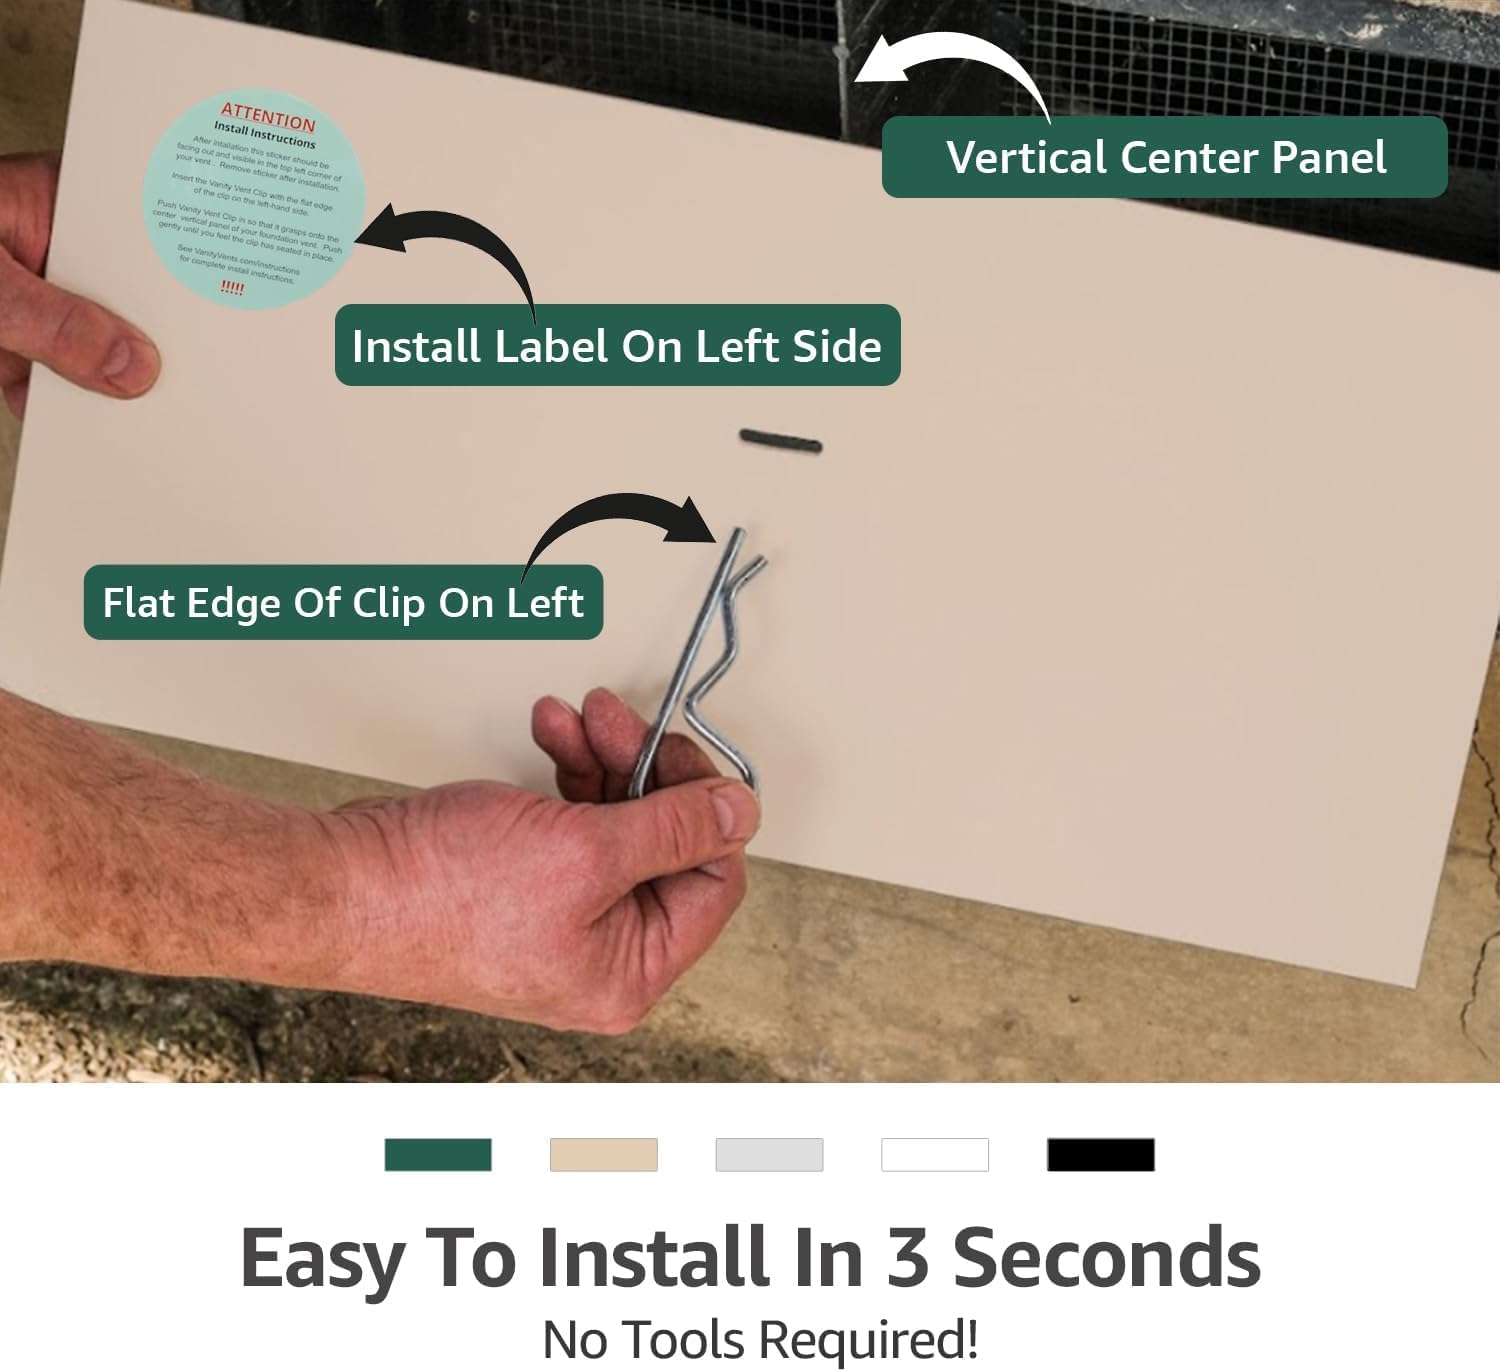
Step 1: verify that your vent has a center mullion and measure accurately
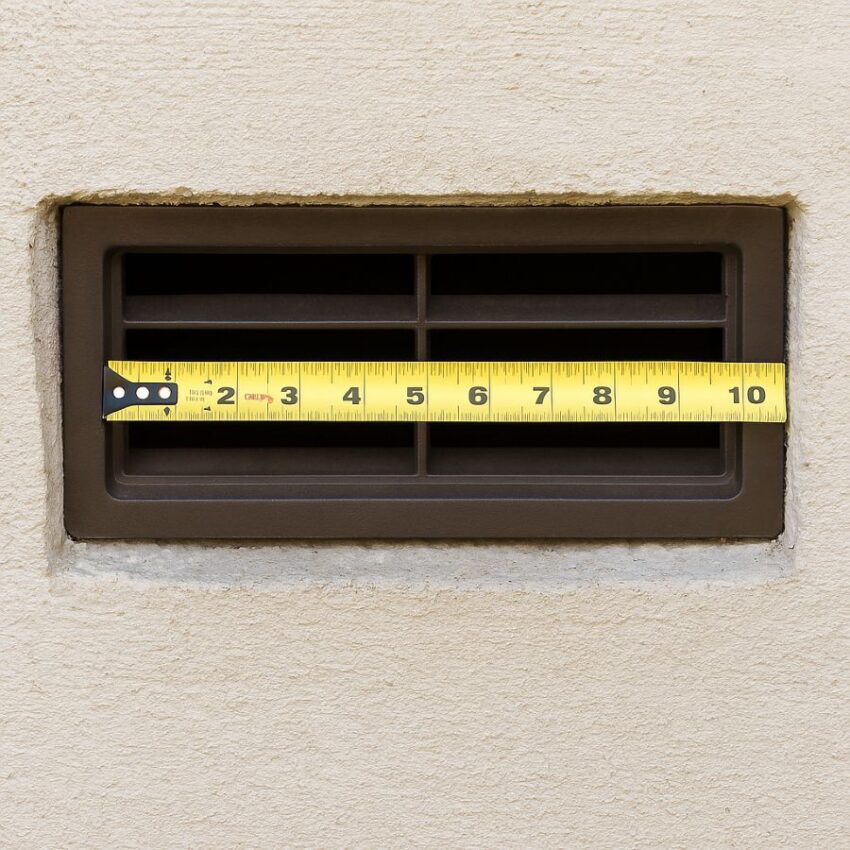
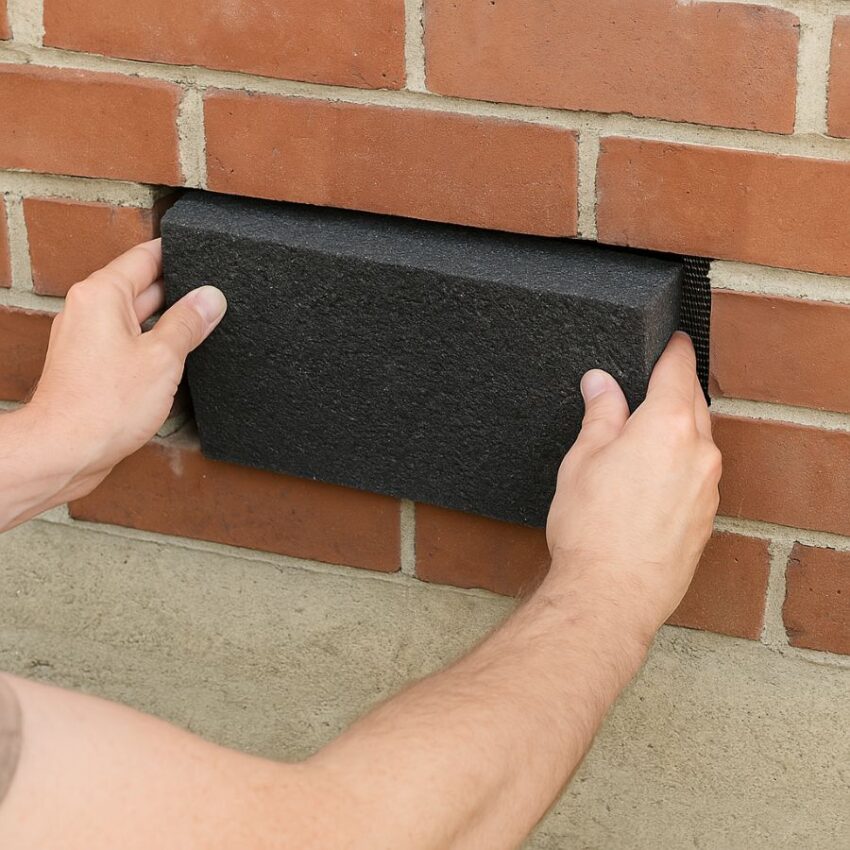
Vanity Vents covers are designed to clip to the vertical center divider of a standard 8 by 16 inch foundation vent. Measure the inside opening of the vent cavity, height and width, then note the presence of that mullion. The manufacturer highlights that inside dimensions near 7 and a quarter by 15 and seven eighths, with a center mullion, give the best fit and fastest installation. If your opening is irregular or lacks a divider, this specific clip-on system is not a match.
Step 2: dry fit the 2 inch foam blocks in the throat of the vent
Press the foam inserts into the vent cavity so they seat evenly against the interior edges. The goal is a snug push fit that seals air at the vent throat. Energy Star’s crawlspace guidance shows the same concept with rigid inserts, cut tight and perimeter sealed, because stopping air movement at vents supports humidity control once a ground vapor barrier and drainage are in place. If a corner chips or the masonry is slightly out of square, you can fine-tune the fit with a utility knife.
If you see small gaps at the masonry that you cannot close with a clean knife pass, tuck a little stainless mesh or steel wool at the gap before seating the foam. Many pros on homeowner forums pair mesh with a dab of foam or sealant to keep mice from exploring edges. Do not block any combustion air intakes, and never seal over active wiring.
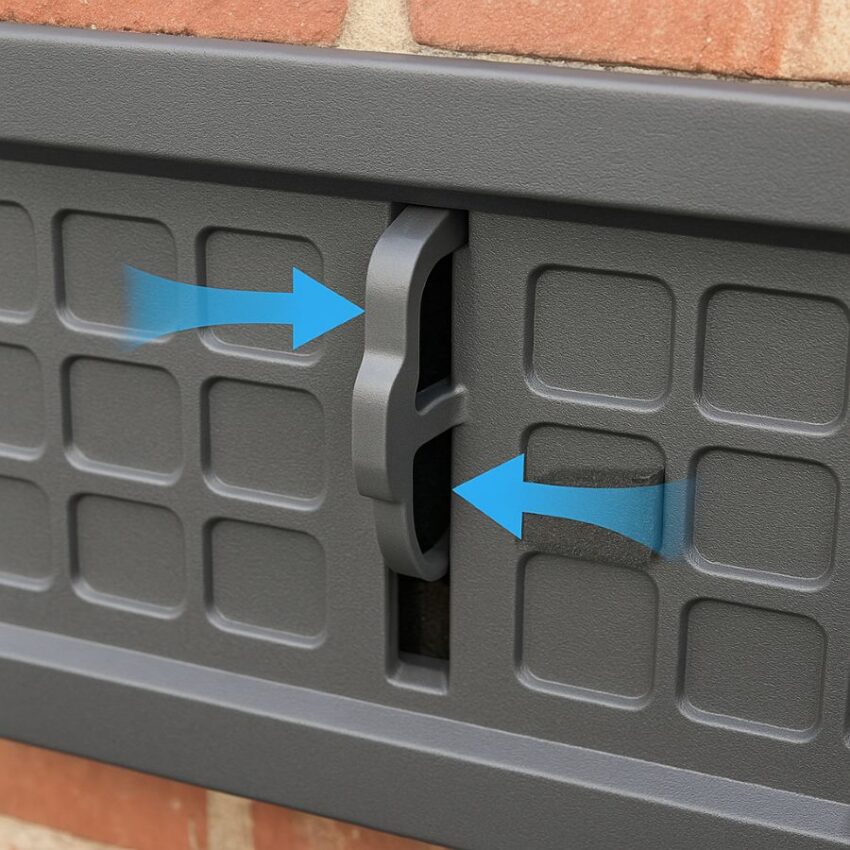
Step 3: clip on the exterior Vanity Vents cover
With the inserts seated, align the cover so the internal clip engages the vent’s center mullion, then press until it locks. The brand’s instructions emphasize a no-tools install that takes seconds when the opening is within spec. If your foundation surface is uneven and you want a tighter weather line, a thin bead of removable butyl or compressible weatherstrip behind the face trim can help, which is a common installer trick on non-planar masonry.
Step 4: confirm you are not creating a trapped moisture problem
Blocking vents without moisture management can raise humidity. EPA’s Moisture Control Guidance and Building Science Corporation’s crawlspace notes both stress that success depends on drainage, soil vapor control, air sealing to the house, and managed conditioning or dehumidification when you choose an unvented approach.
Use a simple hygrometer to track relative humidity for a few weeks. If it trends high, add dehumidification or have a contractor evaluate conditioning options that align with your local energy code and PNW best-practice advisories.
Seasonal strategy: when to close and when to open
In many PNW settings, homeowners close vents for the cold and wet season to cut drafts and discourage rodents, then reassess in the dry summer after verifying humidity. Regional sources point out that the PNW is not the same as the Southeast, so do not assume one national recipe works everywhere. Washington State University’s Energy Program and BetterBuiltNW experts note that conditioned crawlspaces can bring indoor air quality benefits, yet they can come with energy tradeoffs in some locations. The lesson is to make decisions with data. Measure humidity, confirm drainage, and follow regional guidance rather than a blanket rule.
If you are moving toward a fully conditioned crawlspace
A cover and foam insert are just the start. Building Science Corporation’s research shows that conditioned crawlspaces outperform vented ones for durability and comfort when built as a system. That system typically includes a continuous vapor barrier up the walls, non-water-sensitive wall insulation, air sealing at the rim, and either supply air or a dedicated dehumidifier, depending on regional recommendations and code. In the PNW, program guidance cautions against direct supply or return connections in many cases, and it encourages careful sealing between house and crawlspace. Coordinate with your local code official for the current state energy code details.
Common Issues and Solutions
- Cover will not clip or sits crooked. Recheck for a true center mullion and verify inside dimensions. Clean debris from the divider, then try again. If the vent lacks a divider, use a different attachment method or product that is designed for that condition.
- Drafts persist around the opening. Add a thin compressible weatherstrip behind the face, then reseat. Energy Star’s vent-blocking details also show sealing the edges of rigid inserts, which you can mimic with a light bead if your masonry is very rough.
- Rodent signs return. Inspect for other gaps at utility penetrations, rim joist, and siding transitions. Homeowner forum threads repeatedly recommend pairing physical exclusion, for example mesh at gaps, with trapping, and only then relying on repellents.
- Humidity climbs after closing vents. Verify that the ground vapor barrier is intact and sealed, check that gutters and grading are moving water away, and consider active dehumidification. EPA and Energy Star resources outline why each of those steps matters for moisture control.
Frequently Asked Question
Do I really need to cover crawl space vents in the Pacific Northwest, or should they stay open?
It depends on how your crawlspace is built and maintained. In the PNW’s marine climate, many pros and researchers favor sealing and conditioning crawlspaces when drainage and ground vapor barriers are done correctly. Washington State University’s Energy Program explains how conditioned crawlspaces can be compliant when treated like short basement walls with vapor control and managed ventilation or dehumidification. If you keep a crawlspace vented, it must still stay dry and air sealed to the living space above. In other words, pick one approach and do it well. Do not leave the crawlspace half connected to outside and half connected to inside. That is when ugly things happen.
Should I close foundation vents during winter to save energy and protect pipes?
Many homeowners close vents for the cold season to reduce drafts through the floor and to help protect plumbing from freezing. Consumer guidance echoes this and suggests removing covers once warmer, drier weather returns. The building science caveat is that blocking vents alone is not a moisture solution. Track humidity, make sure drainage and ground vapor control are in place, and add dehumidification if the crawlspace trends humid.
I read that insulating the vent opening does little. Is that true?
Context matters. Adding foam at the vent does not insulate your whole foundation. What the foam does very effectively is cut air leakage at a known hole. In leaky older homes, reducing uncontrolled airflow can have a bigger effect on comfort and heat loss than thin blanket insulation alone. Pair vent blocking with air sealing and, when feasible, insulating the crawlspace walls or the floor above for best results.
Will covering vents trap moisture and cause mold?
Not if you manage moisture the right way. EPA’s Moisture Control Guidance and other building science resources emphasize a simple recipe. Keep rainwater away from the foundation, cover soil with a sealed ground vapor barrier, air seal to the living space, and then either provide a small amount of conditioned air or dehumidify when you choose an unvented approach. The vent cover and 2 inch insert help stop outside air from washing through. They do not replace drainage and vapor control. Measure crawlspace humidity for a few weeks after changes and aim to stay below roughly 60 percent.
When should I remove the covers again?
For seasonal users, remove covers when weather warms and the outdoor season turns dry if you are not running the crawlspace as a conditioned, dehumidified space year round. Home improvement guidance suggests closing around the first freezes, then reopening after the threat of freezing passes while you verify humidity trends. The PNW is different from the Southeast. Use a hygrometer and your local climate patterns to decide.
Do these Vanity Vents covers ship everywhere?
No. This combo listing states that it only ships within the Pacific Northwest. That region-specific policy appears on the product pages, so confirm your shipping address before you plan a whole house order.
What size vents does this set fit, and do I need that little vertical divider?
The kit is built for the common eight by sixteen inch module. Vanity Vents’ attachment relies on the vertical center mullion. If your vent lacks that divider, choose a different attachment method or a different product. Measure the inside opening carefully, height and width, to be sure you will get a snug press fit for the 2 inch inserts.
If I am aiming for a fully conditioned crawlspace, what else must I do besides cover vents?
A conditioned crawlspace is a system. Seal the rim and penetrations to the house. Install a continuous ground vapor retarder that is lapped, sealed, and carried up the walls. Insulate the crawlspace walls with materials suited to ground contact. Then provide controlled drying, either with a small supply of conditioned air or a dedicated dehumidifier, per local energy code and regional best practice. Coordinate with your local authority for current code language.
I have no ductwork in the crawlspace. Is there still a case for sealing it?
In parts of the PNW with excellent rain management and ground vapor control, vented crawlspaces can sometimes perform acceptably. From an air leakage and comfort perspective, sealing and insulating still often win. The key point is that execution quality drives outcomes. If you keep it vented, keep it dry and isolate it from the house. If you seal it, finish the system with vapor control and managed conditioning.
Do homeowners really close vents in the Portland or Eastern Washington area, or is this just theory?
Both patterns exist. Many PNW homeowners report closing vents for winter after encapsulation and dehumidification, while others keep vents open in drier inland climates if the crawlspace stays dry and isolated from the home. The consistent advice is to measure your humidity and follow regional guidance rather than copying a nationwide rule.
Will closing the crawlspace vents affect my room air vents or HVAC performance?
This product does not touch your supply registers. It affects the crawlspace openings in the foundation walls. That said, any air sealing project that changes whole house leakage can change load and pressure balance slightly. The bigger HVAC myth to avoid is closing room vents to save energy, which reputable HVAC sources warn against. If you have HVAC equipment or ducts in the crawlspace, sealing the crawlspace correctly can often help efficiency and comfort, but it should still be done as a complete system.
Can I use these covers as my only flood vents in a flood zone?
No. If your home requires engineered flood vents, use code-approved units designed to pass water during a flood. When flood vents are required, choose models with the lowest possible standby leakage and do not block them.
Is there an official one-page how-to from a neutral source for sealing and insulating crawlspaces?
Yes. ENERGY STAR’s Basement and Crawlspace project page gives a plain language overview of sealing, moisture protection, and insulation steps. It is a good checklist to read before you start any crawlspace work and pairs well with the EPA Moisture Control Guidance for a deeper dive.
Conclusion
When you live in the Pacific Northwest, your crawlspace lives in a wet world. The research is consistent. Homes do best when moisture is managed, air leaks are sealed, and the crawlspace is treated as either fully outside or fully inside the building. There is no halfway that performs well. Your exterior crawl space vent cover with the 2-inch foundation vent insulation blocks is a small, smart step in that direction. It stops one of the most obvious leaks, tidies the look of the foundation, and helps you run the crawl as a controlled space rather than a wind tunnel. The broader building-science playbook backs this approach when paired with drainage, ground vapor control, and managed conditioning.
For PNW homeowners specifically, Vanity Vents designed and ships this combo locally, which means the fit, sizing, and use-case match typical 8 by 16 vents and regional guidance. If your plan is seasonal closure, it installs in minutes and comes off just as easily when the dry season returns. If your goal is a fully conditioned crawlspace, it becomes one piece of a complete system that regional programs and national energy resources have documented in practical detail.
From a pest-control angle, closing damaged or open vents removes a common runway for mice and other small intruders. Pros and homeowners discussing rodent proofing often start here, then tighten utility penetrations and set traps as needed. Blocking the obvious entry and reducing cold air wash also helps protect pipes during hard freezes.
Related products
-

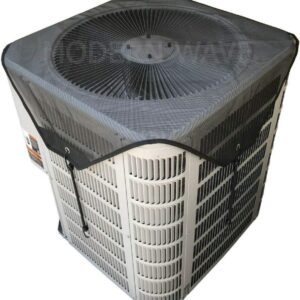
Modern Wave 36×36 Breathable Mesh AC Cover for Outdoor Units
$23.99 Buy Now -
Sale!
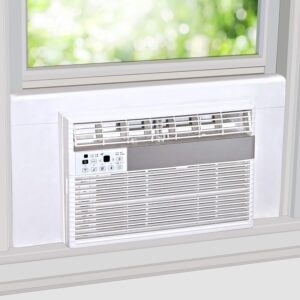
Breeze Stop Window AC Insulation Panels for All Seasons
Original price was: $34.99.$32.99Current price is: $32.99. Buy Now -
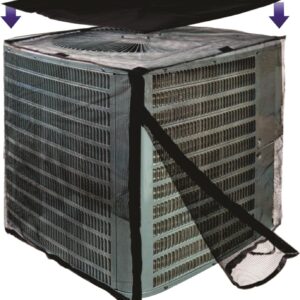
Modern Wave 32×32×36 inches Mesh AC Unit Protector
$33.99 Buy Now -
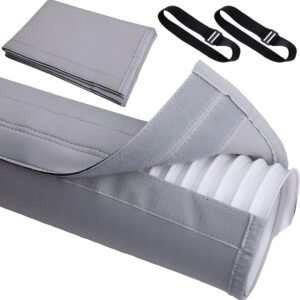
Insulated AC Hose Cover Wrap for 5 & 5.9 Inch Portable AC Vents
$23.99 Buy Now
Reviews
There are no reviews yet.