

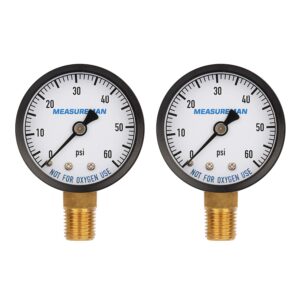
MEANLIN MEASURE 0 to 60 PSI Pool Filter Gauge, 1/4 inch NPT Center Back Mount
$10.99
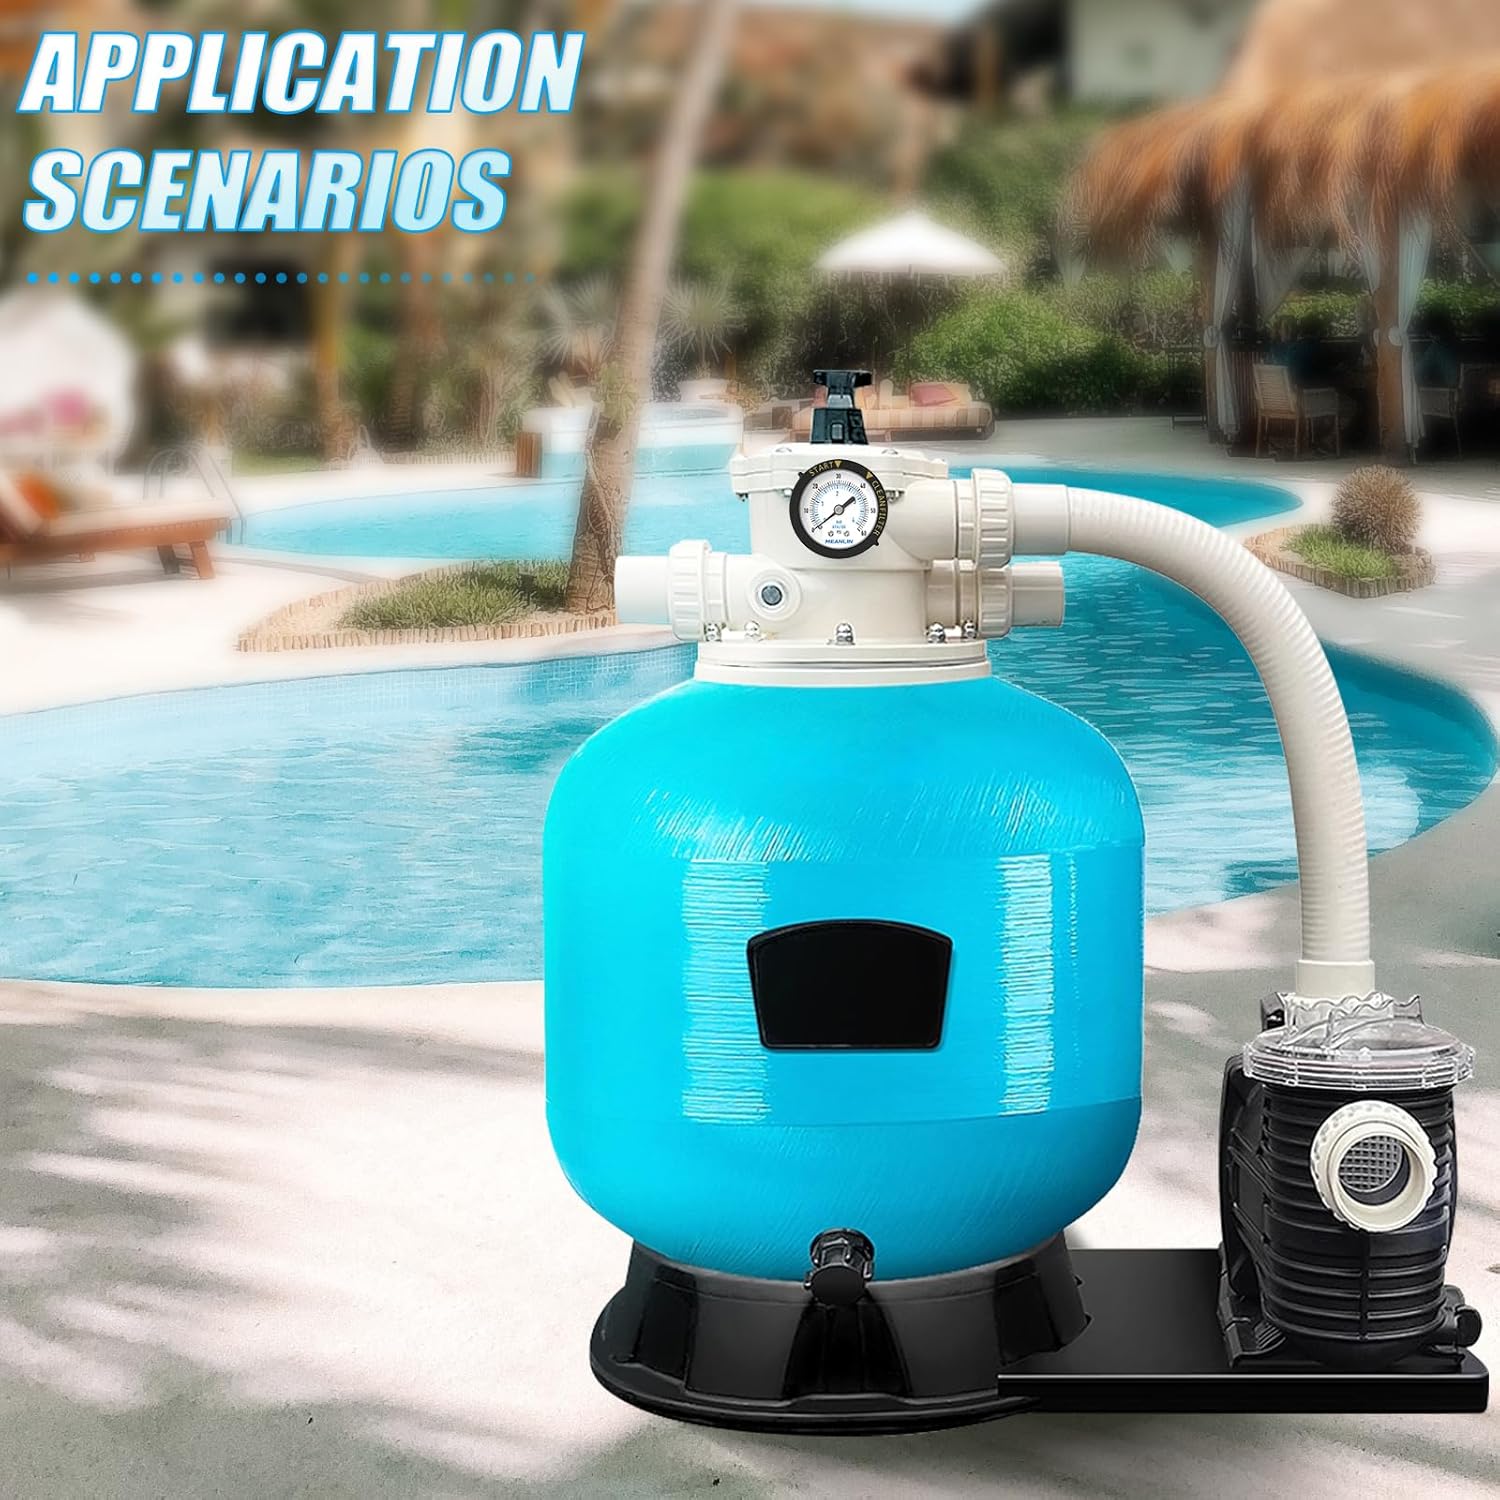
Keep your water crystal clear without guesswork. The MEANLIN MEASURE 0 to 60 PSI Pool Filter Pressure Gauge uses a 1/4 inch NPT center back mount and a clear 2 inch face with Start and Clean Filter markers, so you log your clean pressure and know exactly when to service the filter. It fits common pool, spa, and even aquarium filter housings, and aligns with trusted guidance to clean when pressure rises by about eight to ten pounds per square inch or roughly one quarter above your baseline.
Description
If you want clearer water and fewer surprise cleanings, the MEANLIN MEASURE 0 to 60 PSI Pool Filter Gauge, 1/4 inch NPT Center Back Mount keeps you honest about what your system is doing. The easy to read 2 inch dial and bold Start and Clean Filter markers make it simple to log your normal pressure, then know when the filter needs attention at a glance. It is sized and threaded for common pool, spa, and aquarium filter housings, and it covers the standard 0 to 60 psi range that service pros expect for pool filter monitoring.
Key Customer Benefits
- Know exactly when to clean, no guessing. The dial has clear Start and Clean Filter markings, so you log your system’s normal pressure, then act when it rises by about eight to ten pounds per square inch, which service guides recommend for backwashing or a cartridge clean. This helps you avoid cloudy water and wasted chemicals.
- Fits the ports most pool owners already have. A 1/4 inch NPT threaded, center back mount screws into standard pool, spa, and even aquarium filter housings, which makes this an easy swap for worn or fogged gauges.
- Covers the range you actually need. The 0 to 60 psi span matches what many pool filter systems operate within, so you can see low start-up pressure and the higher readings that tell you it is time to service the filter.
- Quick, at-a-glance readability. A 2 inch face with color cues for start and clean makes it easy to check pressure from a few steps away, which means you are more likely to notice changes before they become big problems.
- Helps extend filter life and save water. Cleaning only when pressure rises by the recommended amount prevents over-backwashing and unnecessary cartridge rinses, which can shorten filter life and waste water.
- Works across pool, spa, and aquarium setups. Listed for pools and spas and commonly used on aquarium canister or pre-filters, the center-back orientation keeps the dial upright on many valves and housings.
Product Description
What this gauge is
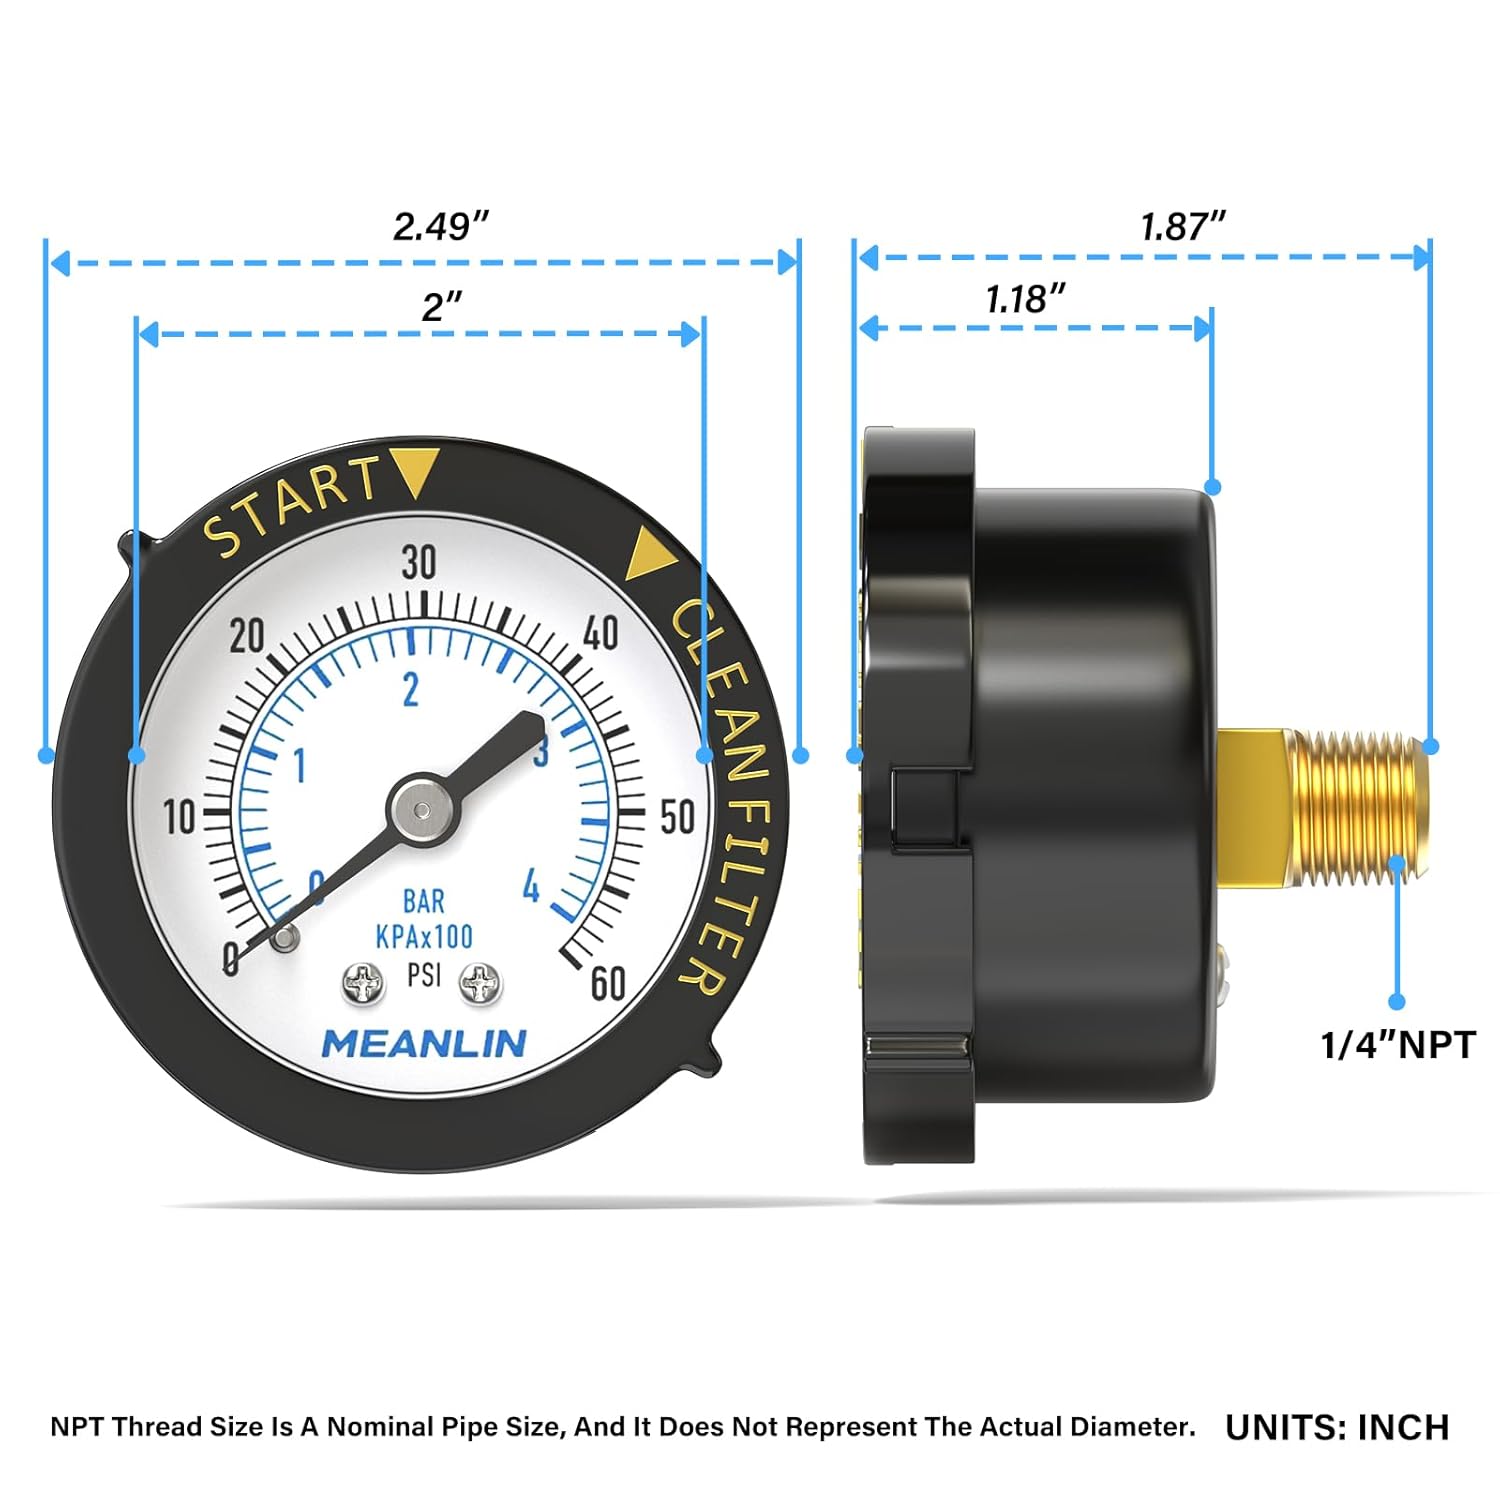
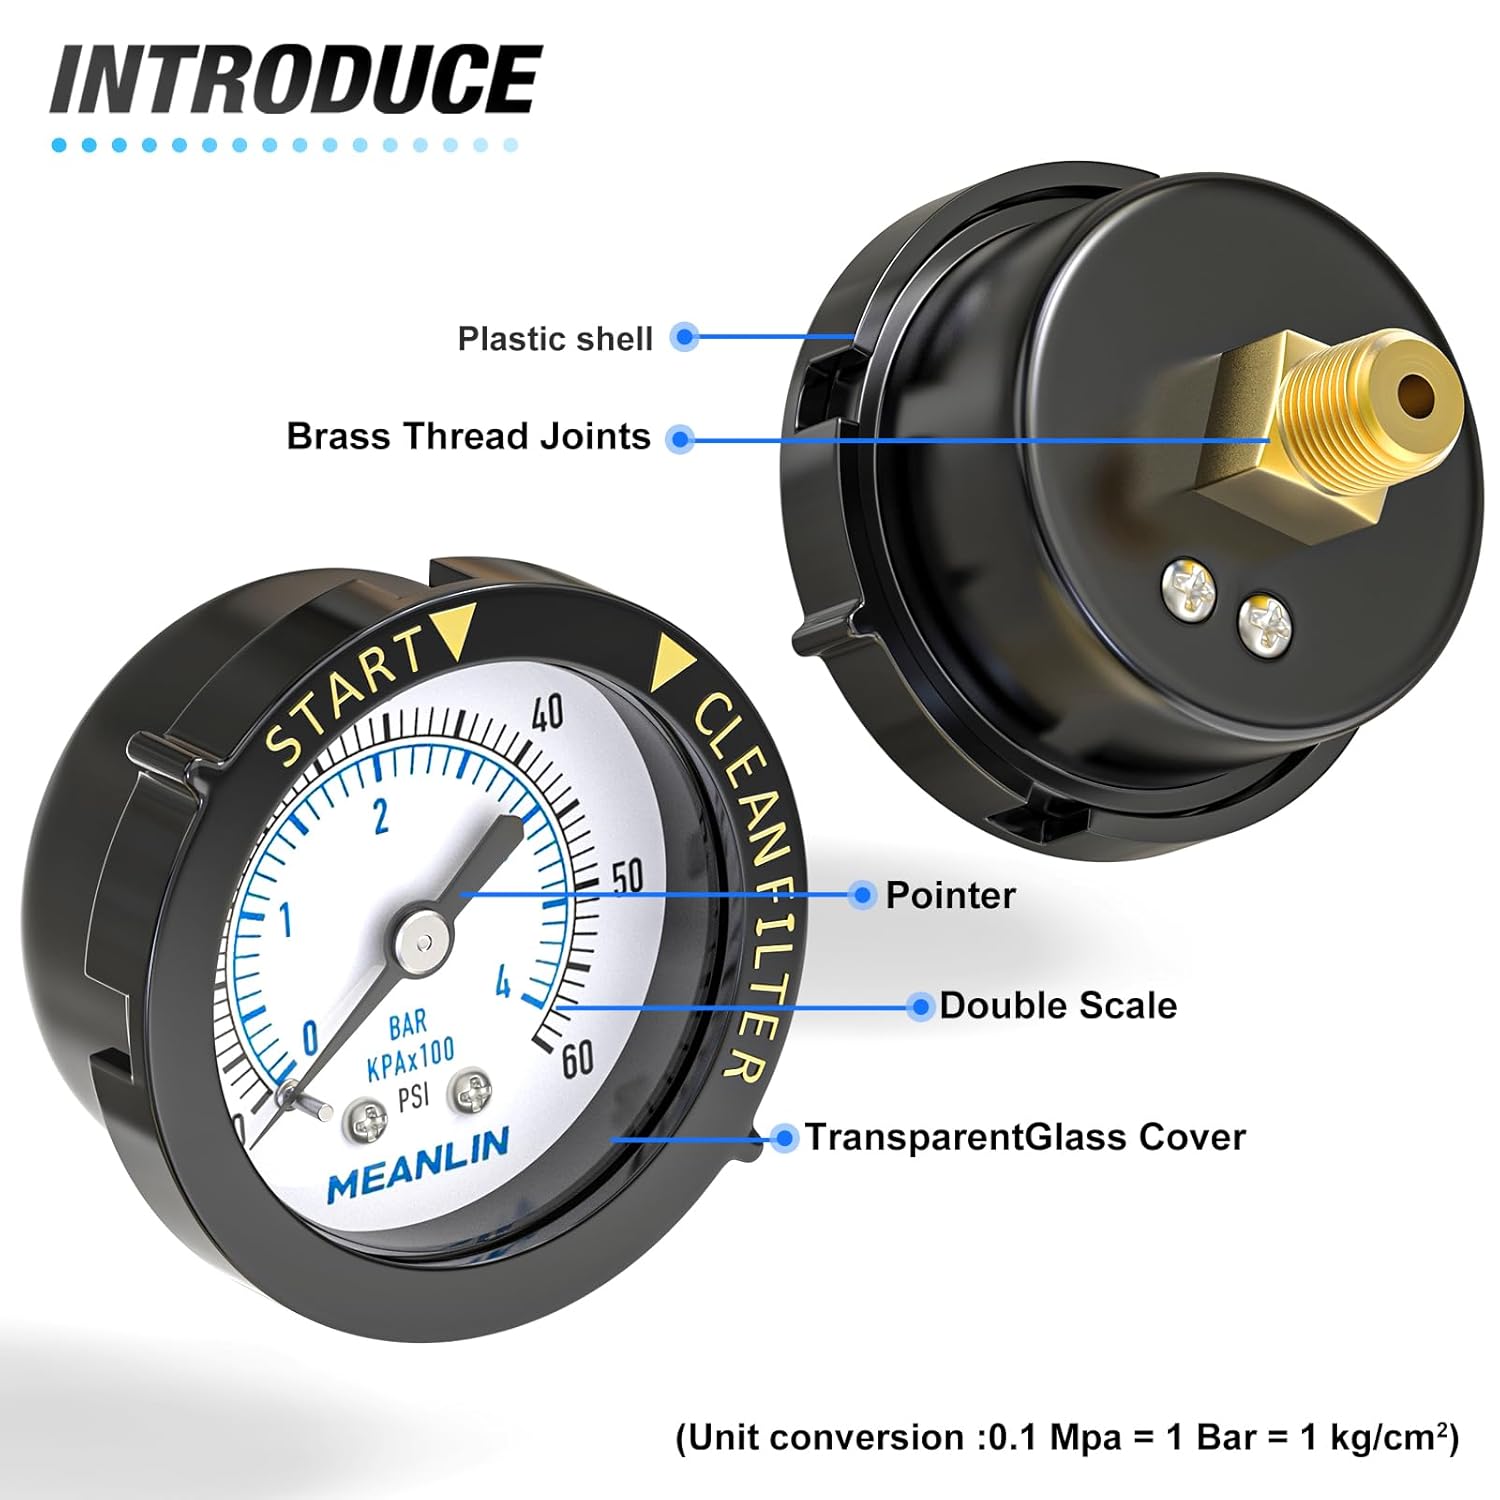
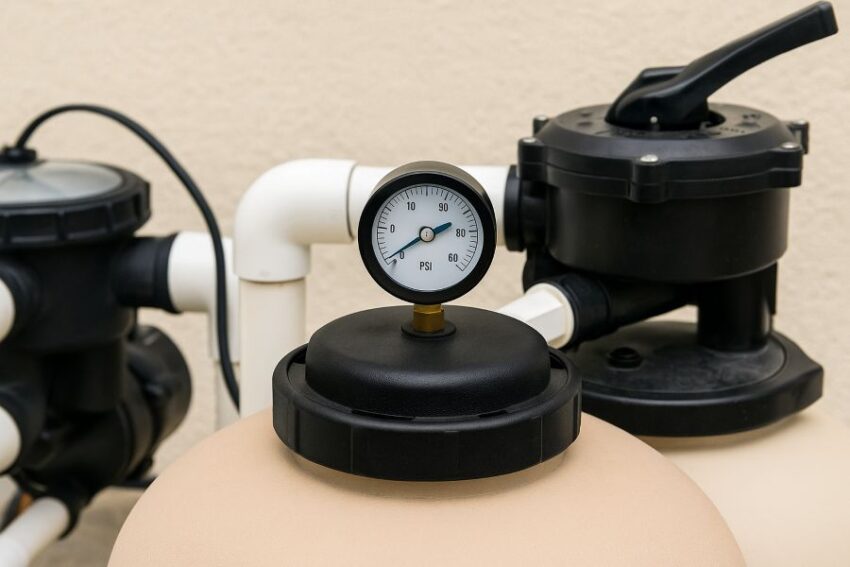
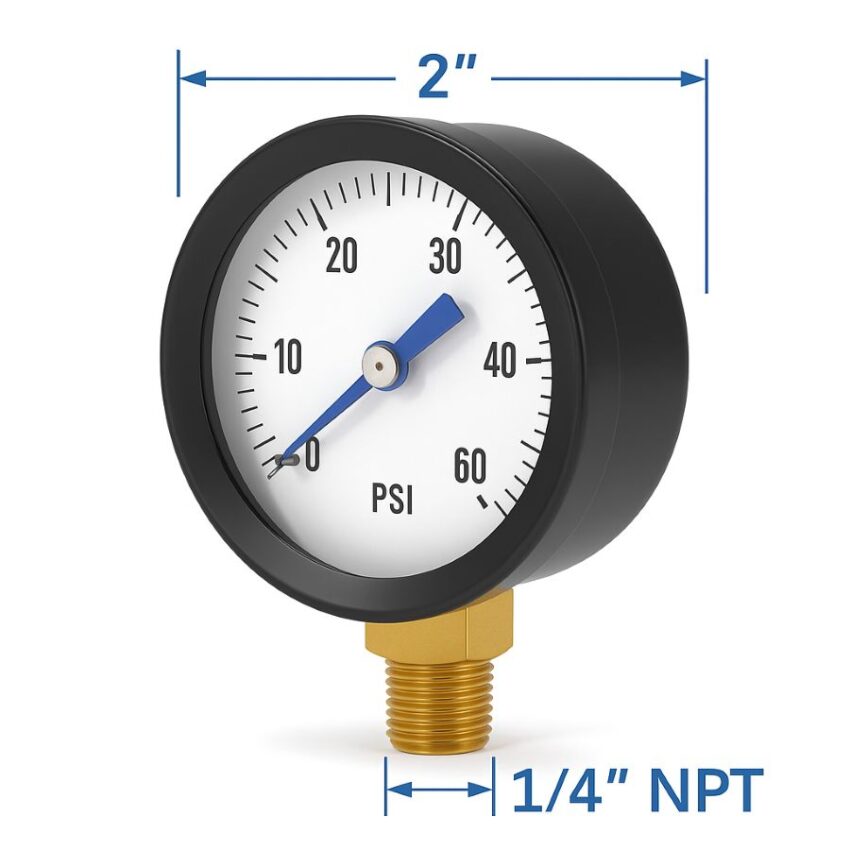
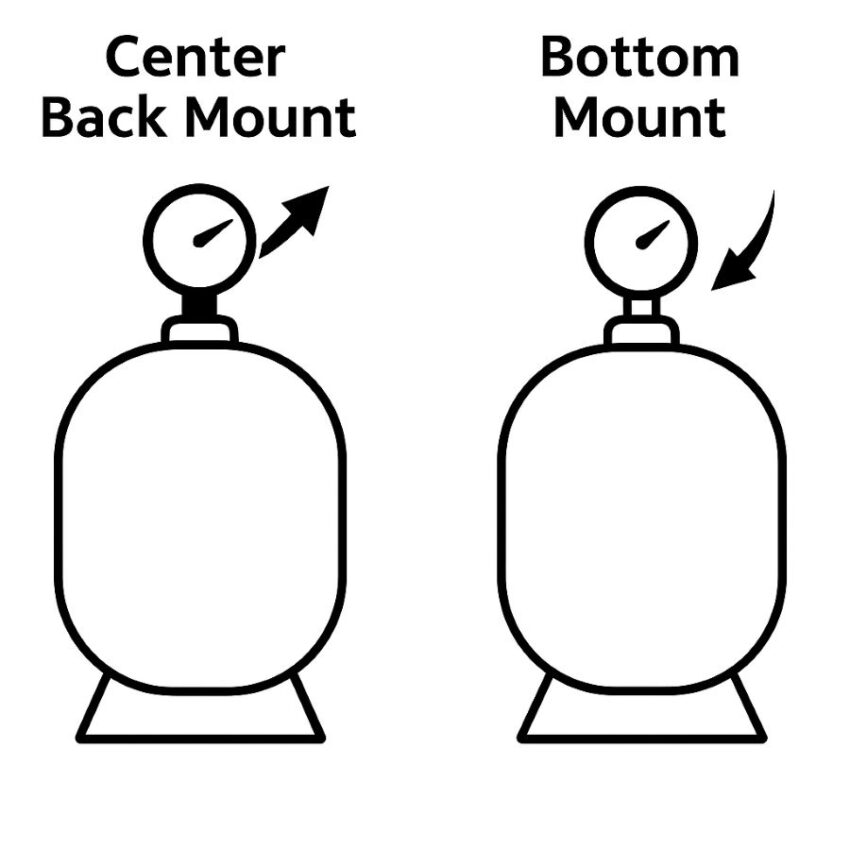
The MEANLIN MEASURE 0 to 60 PSI Pool Filter Gauge, 1/4 inch NPT Center Back Mount is a compact, easy to read dial gauge designed for pool, spa, and aquarium filter housings. It uses a standard 1/4 inch NPT threaded connection and a center back mount, which is the same layout used on many multiport valves and cartridge filter lids.
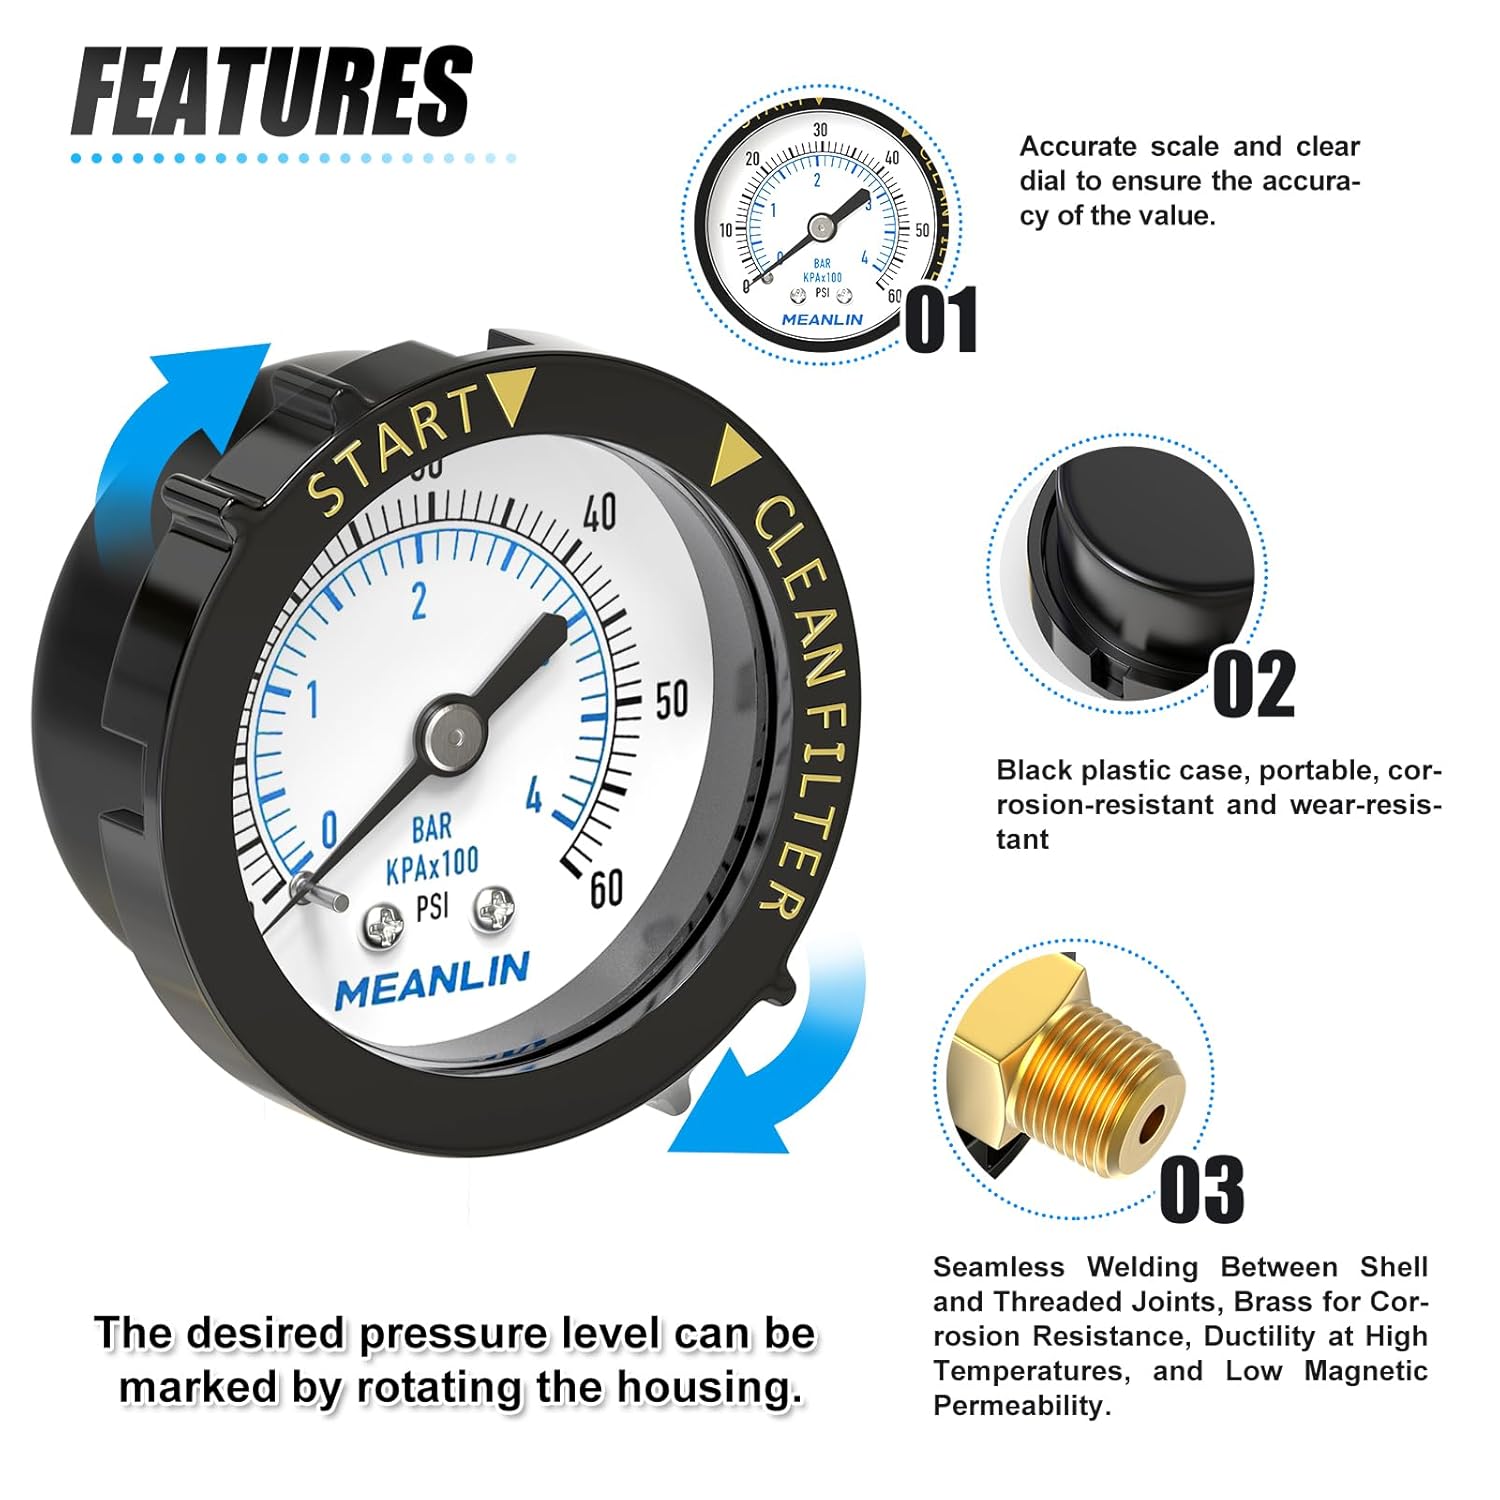
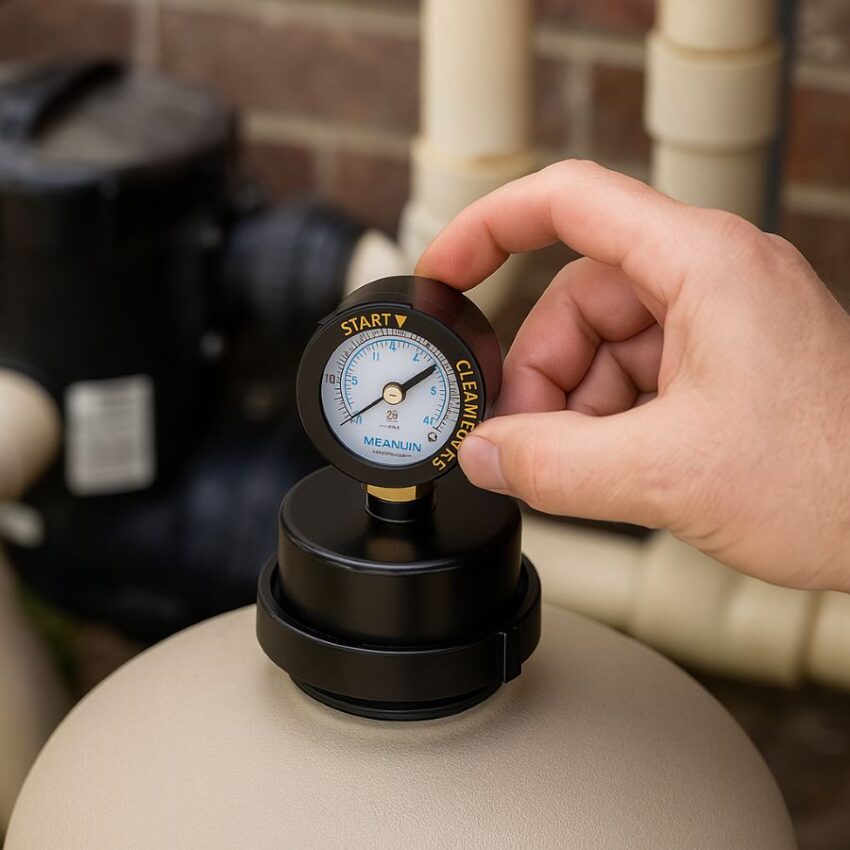
The 2 inch face is marked with “Start” and “Clean Filter,” so you can set your normal reading, then see at a glance when it is time to service the filter. The model is commonly listed with a plastic case, brass wetted parts, a 0 to 60 psi range, and a utility accuracy class of plus or minus 3-2-3 percent across the scale.
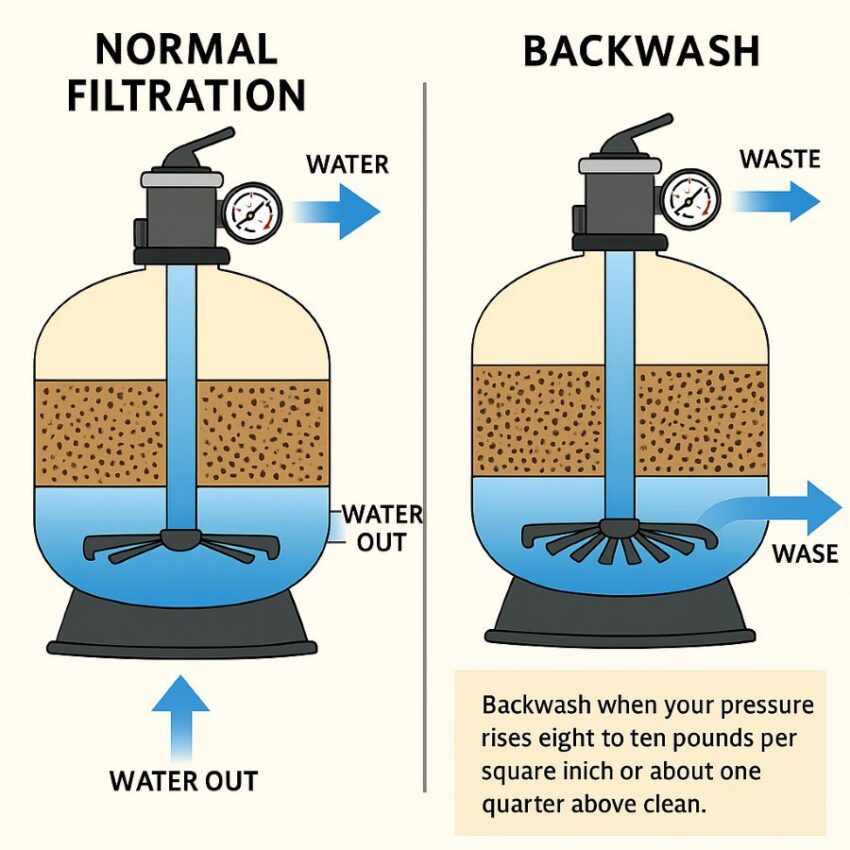
How it works
When your pump is running, water is pushed through the filter media. As the filter captures debris, resistance increases, and the pressure shown on the gauge rises above your “clean” baseline. That rise is your maintenance cue.
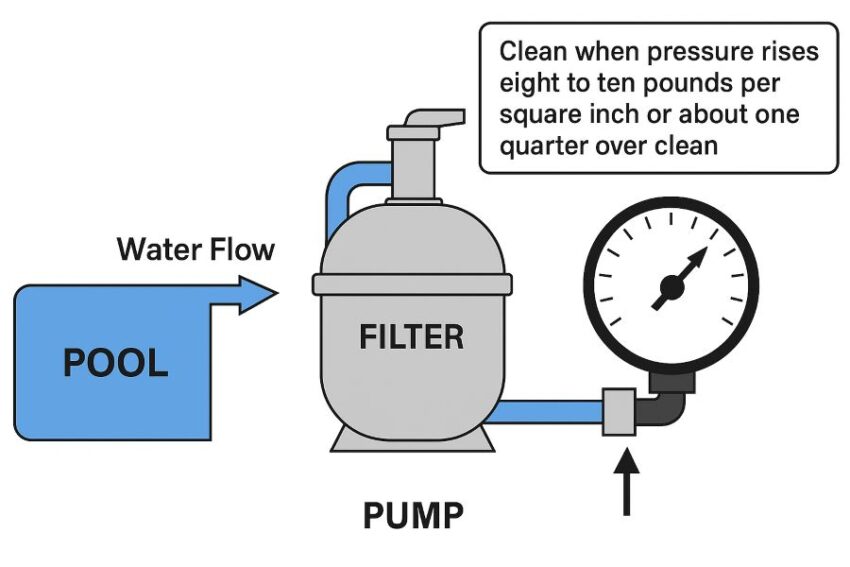
Many pool care guides advise acting when pressure climbs by about eight to ten pounds per square inch above the starting level. Practitioner communities like Trouble Free Pool also share a rule that focuses on a twenty five percent increase over your clean pressure, which scales the trigger to your system. Both methods aim at the same outcome, which is to clean before flow drops and water quality suffers.
Why this design is effective and a little different
Two details make this style practical for everyday owners. First, the 0 to 60 psi range covers what most residential pool and spa systems see, from low clean readings to the elevated numbers that signal service, and it is the replacement range often recommended by retail guides. Second, the start and clean markers on the rotating bezel let you “record” your clean pressure without a notebook, then align the clean marker where your system should be after a fresh backwash or cartridge rinse.
Add the center back mount and 1/4 inch NPT thread, and it drops into the same port that an old, fogged, or stuck gauge used, which keeps the dial upright and easy to read on many filter valves.
Product Specifications
| Attribute | Details |
|---|---|
| Brand and model | MEANLIN MEASURE, Start and Clean Filter Pressure Gauge |
| Pressure range | 0 to 60 pounds per square inch, dual scale noted on listings as 0 to 0.4 megapascal or 0 to 60 pounds per square inch |
| Dial size | 2 inch face for easy viewing |
| Connection thread | 1/4 inch NPT, common on pool and spa filter housings |
| Mounting style | Center back mount, positions the dial upright on many multiport valves and lids |
| Case and frame | Plastic frame style as listed for this variant, with MEANLIN also selling stainless versions in the same range |
| Temperature limits | Operating temperature listed as 32 to 131 degrees Fahrenheit, which corresponds to 0 to 55 degrees Celsius |
| Indicative accuracy class | Listed on MEANLIN gauge pages as three-two-three percent of span for comparable models in this family |
| Scale style | Dual units shown on listings, pounds per square inch and metric (megapascal or bar depending on seller template) |
| Typical media | Water service for pools and spas, also used on aquarium filters per product descriptions |
| Use markers | “Start” and “Clean Filter” bezel markers to log clean pressure and set a service cue |
| Not for oxygen service | Use standard water-service gauges only for water and air. Oxygen systems require instruments cleaned and certified for oxygen service, which is a different specification |
How to Use and Installation Guide
Before you start
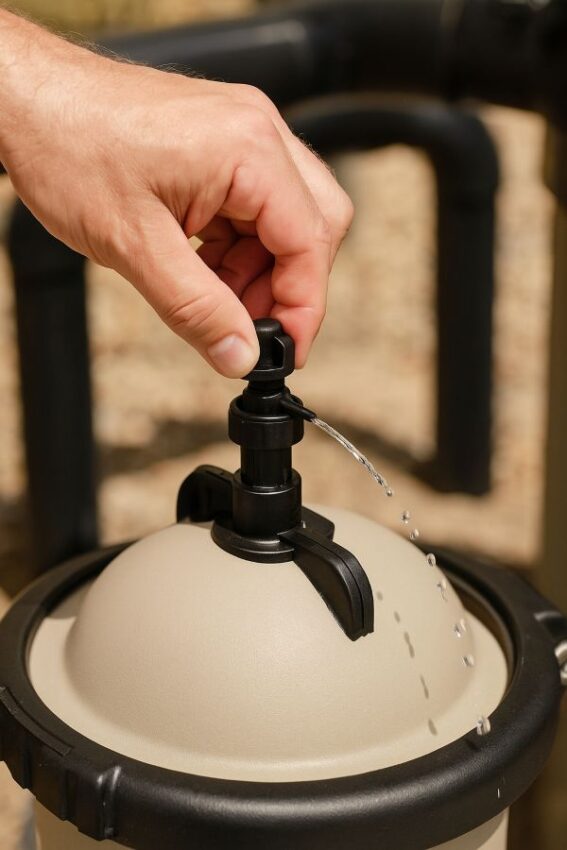
Turn the pump off at the breaker, then relieve pressure in the filter so you are never loosening a part on a pressurized tank. Cartridge and DE filters include a manual air-relief valve on top of the tank. Open it a quarter turn until it snaps open and you hear air bleed out, then wait for a steady stream of water before you work. This sequence is spelled out in Pentair filter manuals and is a safe habit no matter the brand.
What you will need: the new 1/4 inch NPT center back mount gauge, PTFE thread tape or a pool-safe pipe sealant, a small adjustable wrench, a rag. For a stubborn old gauge, have penetrating oil ready and give it five minutes to wick in.
Step-by-step installation
- Depressurize the system. Confirm the pump is off and the air-relief valve is open. Wait until you see a steady stream of water from the relief port, which indicates pressure is gone.
- Remove the old gauge. Put a rag under the port to catch drips. Use the wrench only on the metal flats of the gauge body, not on the plastic bezel, then turn counterclockwise to remove. If it resists, a brief penetrating-oil soak helps.
- Prepare the new threads. Wrap 2 to 3 turns of PTFE tape on the gauge’s male NPT threads in a clockwise direction, which is the same direction you will screw the gauge in. NPT is a tapered thread that seals in the threads with a suitable sealant, so tape or non-hardening pipe dope is recommended.
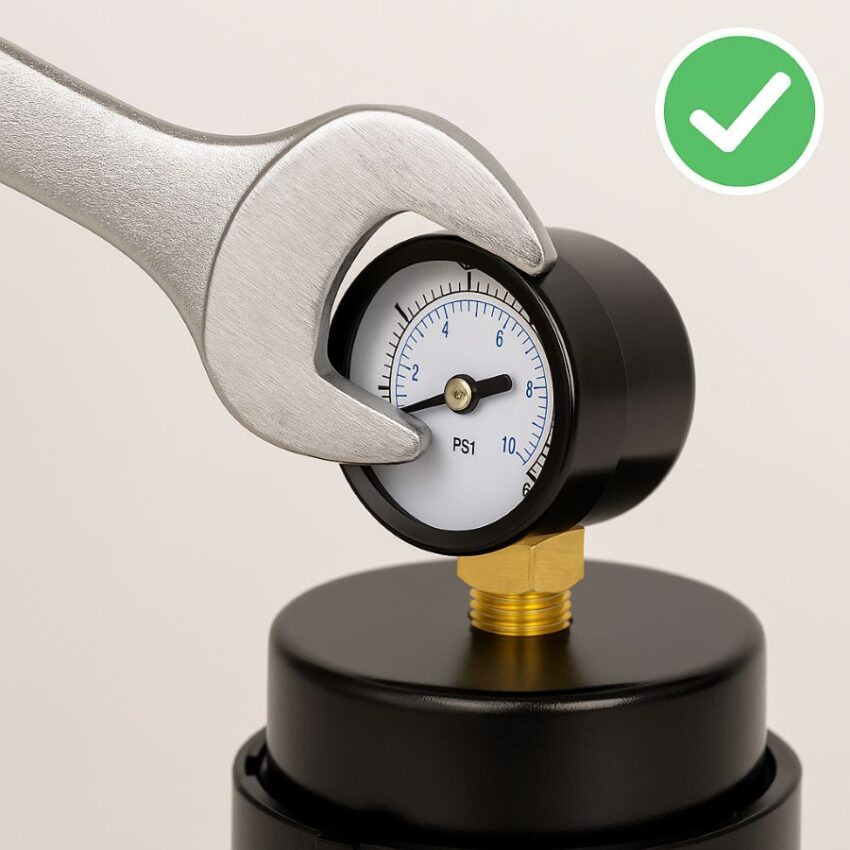
- Start by hand, finish with a wrench. Thread the new gauge into the port by hand until snug so you do not cross the threads. Then use a wrench on the flats to tighten until it is leak-tight and the dial faces you. Industrial gauge makers advise hand tight first, then wrench to final position, and to avoid over-torquing. For delicate housings, creep up on final orientation rather than forcing a last quarter turn.
- Re-pressurize carefully. Close the air-relief valve, restore power, and start the pump. Immediately reopen the air-relief valve and vent air until a solid stream of water comes out, then close it. This protects the filter tank and gives you a stable pressure reading.
Set your “clean” baseline the right way
Your gauge’s Start marker is most useful when it reflects a truly clean system. Do one full service first, for example a cartridge rinse and reassembly or a sand backwash and rinse, then run the system at your normal pump speed and valve settings. Record the stabilized reading after several minutes, then rotate the bezel so the Start marker lines up with that number. Pool brands suggest you schedule cleaning when pressure rises by eight to ten pounds per square inch over this clean value, which is a plain and reliable rule of thumb.
Some owners prefer a percentage trigger because every pad is different. The Trouble Free Pool community teaches a service point at roughly twenty five percent over your clean pressure, and they remind users to compare at the same pump speed for consistent readings. If your clean pressure is 14 pounds per square inch, your service point by the twenty five percent rule is about 17.5 to 18 pounds per square inch. Set the Clean Filter marker there.
Daily and weekly checks, what “good” looks like
With a healthy, recently cleaned filter, the needle should sit on or just above your Start marker at your usual pump speed. Minor rises happen after storms, heavy bather load, or pollen surges. If you glance over and the needle has jumped eight to ten pounds per square inch, or about one quarter above your Start value, plan a backwash or cartridge rinse that day. This practice is echoed in Hayward’s customer guides and long standing forum wisdom, and it is a simple way to prevent cloudy water or flow loss.
Reading the dial when something feels off
- High and still climbing after cleaning. If pressure is high right after a cleaning, confirm the air-relief is bled until a steady stream appears. Trapped air can push readings up. Also recheck multiport or return valves for partial closures that add head pressure.
- Needle bounces or is slow to return. A failing internal mechanism or water hammer can cause a jumpy dial. Replacement is often the fix, and it is why service pros keep a spare on the truck. Vibration is also a cause of gauge wear.
- Stuck on one number forever. If the needle never moves while the water clearly slows, the gauge may be clogged or failed. Remove it, briefly pulse the pump with the port open to flush debris away from the hole, then reinstall or replace.
- Low pressure after cleaning and weak flow. Look for a pump priming issue or suction-side air leak rather than a filter issue. If the pump does not fill the filter completely, open the air-relief again and prime until that steady stream returns.
Using the gauge to time backwashing and rinses
After you align Start and Clean Filter on the bezel, your routine is simple. Watch for a rise of eight to ten pounds per square inch above Start for sand and DE systems, or apply the twenty five percent rule. Backwash per your valve type, then return to Filter and re-charge DE grids if applicable. Hayward’s DE guides describe the sequence clearly, including when to shut off, set to Backwash, and when to re-coat with the labeled amount of DE after cleaning.
Tips that extend gauge and filter life
- Seal gently, not aggressively. Tapered NPT seals in the threads with sealant. Too much torque can crack plastic lids. Industrial instructions say hand tight first, then wrench to position. If you overshoot alignment, back out, re-tape, and try again rather than forcing it.
- Always vent after any service. Air collects at the top of the tank after opening the system. Every major filter manual tells you to open the relief until water runs in a steady stream, then close it. Make this a ritual after every cleaning or gauge swap.
- Log your Start pressure. Write the clean number on the filter lid with a paint pen. Service techs also note the pump speed for variable-speed systems so all comparisons are apples to apples.
- Protect from water hammer and freeze. If your pad is in a freeze zone, remove the gauge for winter and store it indoors. For pads with frequent pump cycling, consider adding a short pigtail or snubber to cushion shocks, a best practice borrowed from industrial gauge mounting.
For aquarium and pond users
This gauge can be used on certain pre-filters and canister filter lids that are drilled and tapped for 1/4 inch NPT, but most aquarium systems run at very low pressure. If you install a gauge on a pre-filter, set your Start value after a fresh media change and use small rises as your cue to rinse sponges or floss, just as pool owners watch for an eight to ten pounds per square inch rise. Keep in mind that many aquarium canisters are not threaded for NPT from the factory, so use manufacturer-approved adapters only.
Frequently Asked Questions
What is a “normal” pool filter pressure and when should I clean?
“Normal” is whatever your system reads right after a thorough clean at your usual pump speed. Set that number as your Start value, then clean when pressure rises significantly above it. Manufacturers like Hayward say to clean or backwash when pressure climbs by about eight to ten pounds per square inch over the clean starting pressure. Many pool pros on Trouble Free Pool suggest an alternative rule that triggers cleaning when pressure rises by about one quarter over your clean value. Both methods work. Pick one, stick to it, and you will avoid cloudy water and wasted chemicals.
My pressure is high even after I cleaned the filter. What should I check next?
First, vent trapped air completely. Pentair manuals instruct you to open the manual air-relief valve on top of the tank until air purges and a steady stream of water appears, then close it. Trapped air can keep pressure higher than expected. Next, verify that multiport or return valves are in the correct position and fully open. If pressure remains high, re-inspect the media for packing or an incomplete backwash on sand and DE systems.
My gauge reads very low or almost zero, and flow is weak. Is the gauge bad?
Sometimes, but not always. Low readings often point to a suction-side problem such as a clogged impeller, a blocked skimmer or pump basket, or an air leak at the pump lid O-ring. InyoPools’ troubleshooting guides and videos walk through these exact checks. If the system is truly moving water but the gauge is stuck at zero, debris may be clogging the tiny port to the gauge. Remove the gauge and rinse the port before you replace the instrument.
The needle does not move, or it sits below zero. Can I fix it?
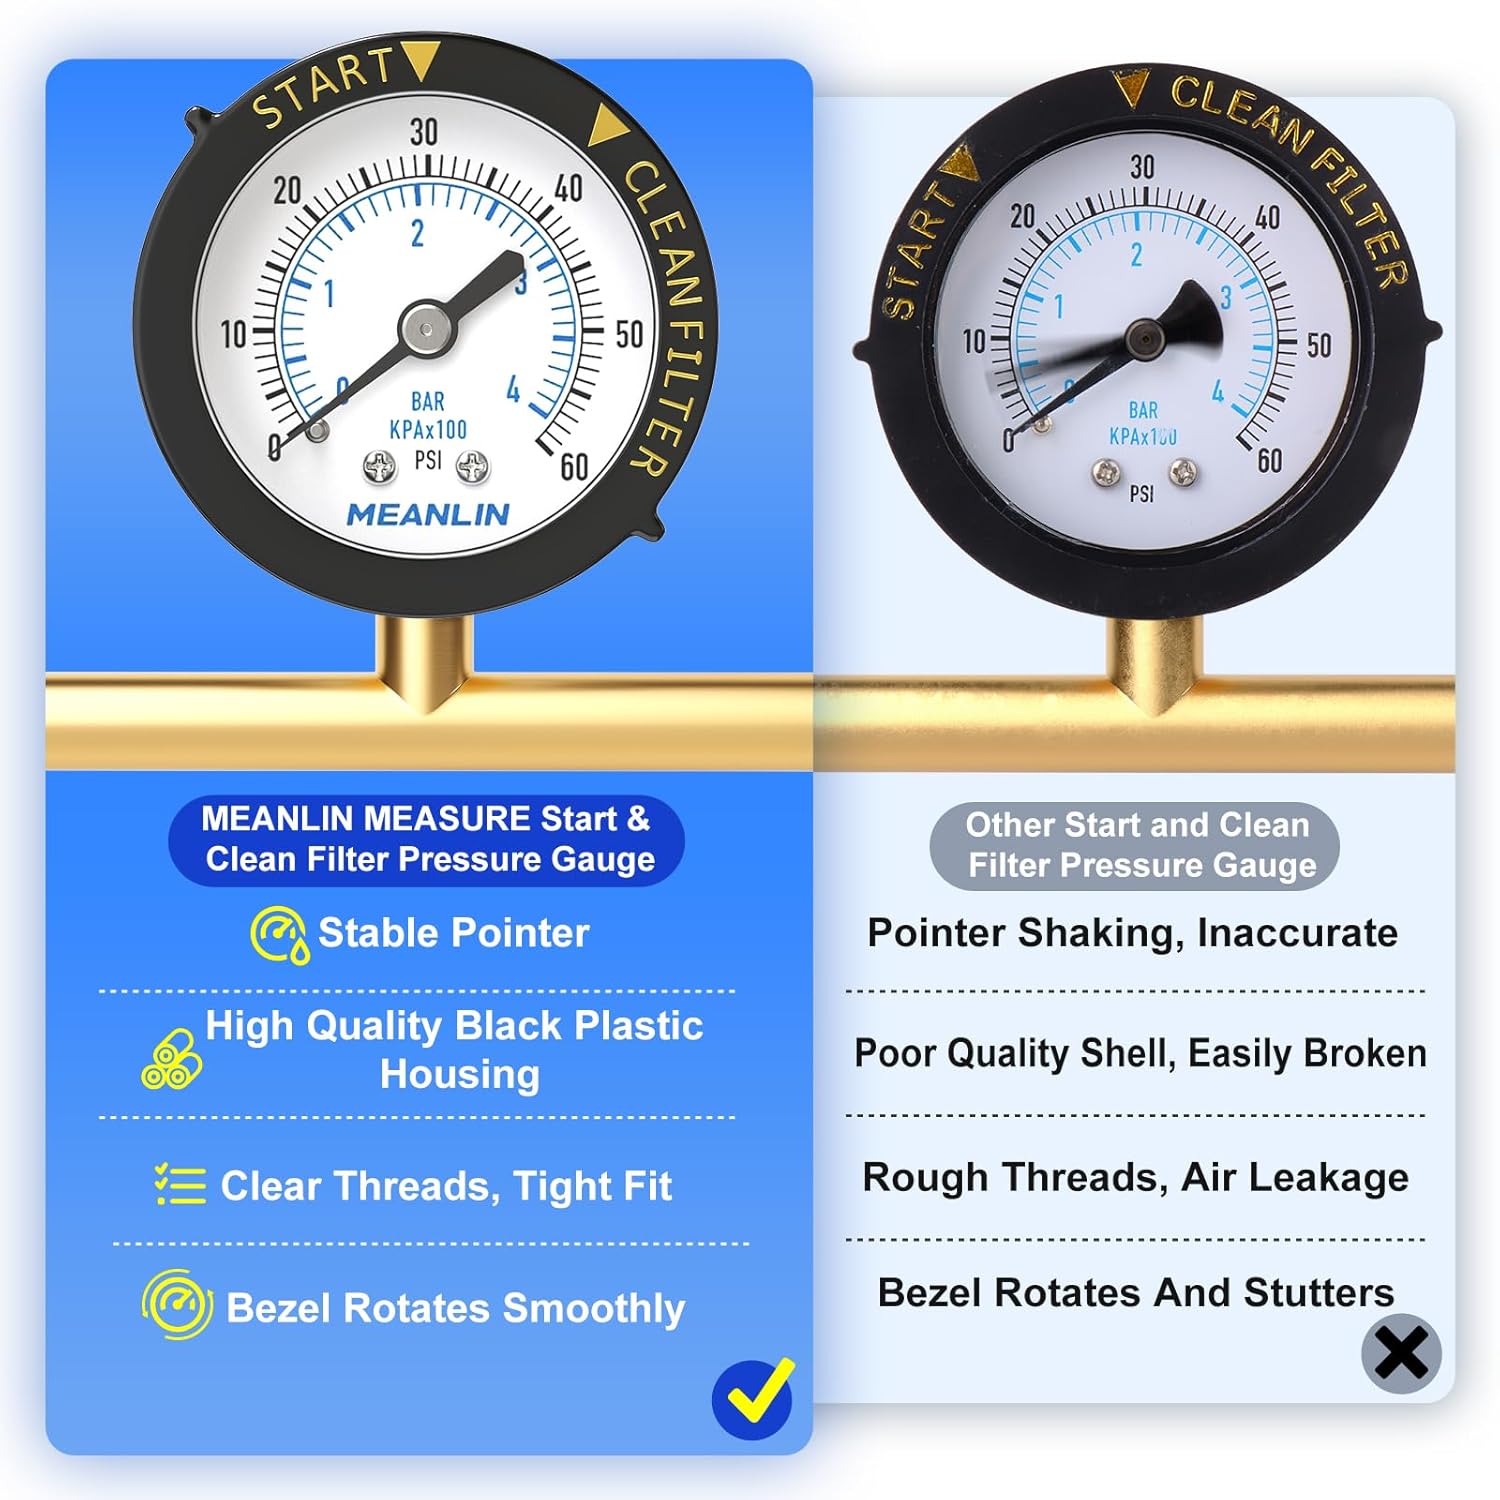
Sticky or mispositioned pointers are a common failure mode as shared by owners on pool forums. If the pointer is on the wrong side of the gauge’s internal stop pin, the gauge was likely knocked or failed and should be replaced. If the pointer does not return to zero with the pump off, that is also a typical failure sign. Save the rotating Start/Clean bezel if you like it, but plan to install a new gauge.
What thread type does this gauge use, and how do I install it correctly?
This model uses 1/4 inch NPT threads, which are tapered and seal with PTFE tape or a non-hardening pipe sealant. Best practice from industrial gauge makers is to start the gauge by hand so you do not cross the threads, then use a wrench on the gauge’s flats to snug and orient the face. Do not twist the case to tighten, and avoid over-torquing plastic filter lids.
Do I need a liquid-filled gauge, or is a dry gauge fine for pool use?
Dry gauges are common on pools and work well in stable environments. Liquid-filled gauges damp vibration and pointer flutter, which can improve readability near equipment that cycles. However, glycerin can thicken in cold weather, can yellow in direct sun, and might bias the pointer slightly off zero as the case fluid expands. If your pad sees vibration, go liquid-filled. If you winterize or have big temperature swings, a dry gauge is simpler.
My system uses a variable-speed pump. Will my gauge reading change with RPM?
Yes. Lower RPM means lower flow, which usually yields a lower clean pressure. Forum veterans recommend noting your Start pressure at the RPM you use most of the day and making comparisons at that same speed, then increasing RPM for certain tasks like vacuuming or mixing chemicals.
Why do manuals insist on opening the air-relief every time the system starts?
Because air collects in the top of the tank after the pump stops or the filter is opened. Pentair manuals instruct you to open the valve until a steady stream of water appears. This step protects the tank and gives you a stable, repeatable reading on the gauge. It is a small habit that prevents big issues.
Can I use this gauge on an aquarium canister or pond pre-filter?
If the lid or housing is tapped for 1/4 inch NPT, yes. Most aquatics systems run at low pressure, so the gauge is simply a visual cue that media is clogging. Set your Start value after a fresh media change and treat a modest rise as your prompt to rinse sponges or floss. If your canister is not NPT-threaded from the factory, use the manufacturer’s approved adapter to avoid leaks.
The dial shows both pounds per square inch and a metric scale. Which should I follow?
Follow pounds per square inch for pool care in North America, since manufacturer guidance and service forums give thresholds in pounds per square inch. The metric scale is there for broad compatibility, but your cleaning rules of thumb are still “eight to ten pounds per square inch over clean” or “about twenty five percent above clean.”
Conclusion
If your goal is clear water without guesswork, a dependable pool filter pressure gauge is the quiet hero that keeps everything on schedule. With the MEANLIN MEASURE 0 to 60 PSI Pool Filter Gauge, 1/4 inch NPT Center Back Mount, you set a clean baseline after service, then act only when the dial tells you it is time. That is the same routine manufacturers and long standing pool communities teach. Clean or backwash when your pressure climbs by about eight to ten pounds per square inch above the clean reading, or follow the twenty five percent rule if you prefer a percentage based cue. Either approach keeps flow healthy and water bright.
A few habits make the gauge even more valuable. On every startup, open the air relief until a steady stream of water appears, then close it. This step protects the tank and gives you stable, repeatable readings. Install the gauge hand tight first, then finish with a wrench on the flats so the face points where you need it, which is a best practice from industrial instrument makers.
Related products
-

0 to 100 psi Liquid Filled Pressure Gauge, 2.5 in Dial, 1/4 in NPT Lower Mount
$12.25 Buy Now -
0-200 PSI Water Pressure Gauge with Lazy Hand for Home Water, 2.5 in Dial, 3/4 GHT
$13.99 Buy Now -
MEASUREMAN 2-inch Pool Filter Pressure Gauge, 0 to 60 psi, 1/4 inch NPT Lower Mount, Two Pack
$11.97 Buy Now
Reviews
There are no reviews yet.