TMS Automatic Door Bottom Seal, Fully Mortised 36 inch, 1 inch Drop Neoprene Bulb
$84.99
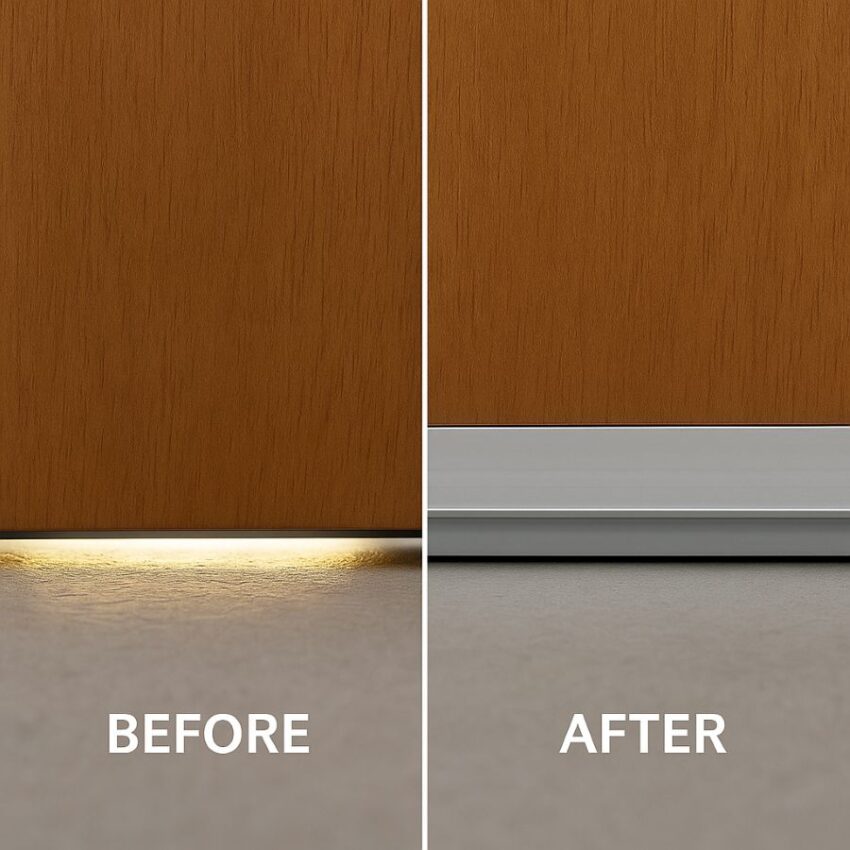
Seal that stubborn under-door gap without changing your door’s look. The TMS Automatic Door Bottom Seal, Fully Mortised, 36 inches with a 1 inch drop and a neoprene bulb, hides inside the door and lowers only when you close it, creating a tight seal against drafts, dust, light, and noise while protecting floors. The spring-activated, hinge-side plunger delivers even compression along uneven thresholds, which makes it quieter and more effective than a fixed sweep.
Description
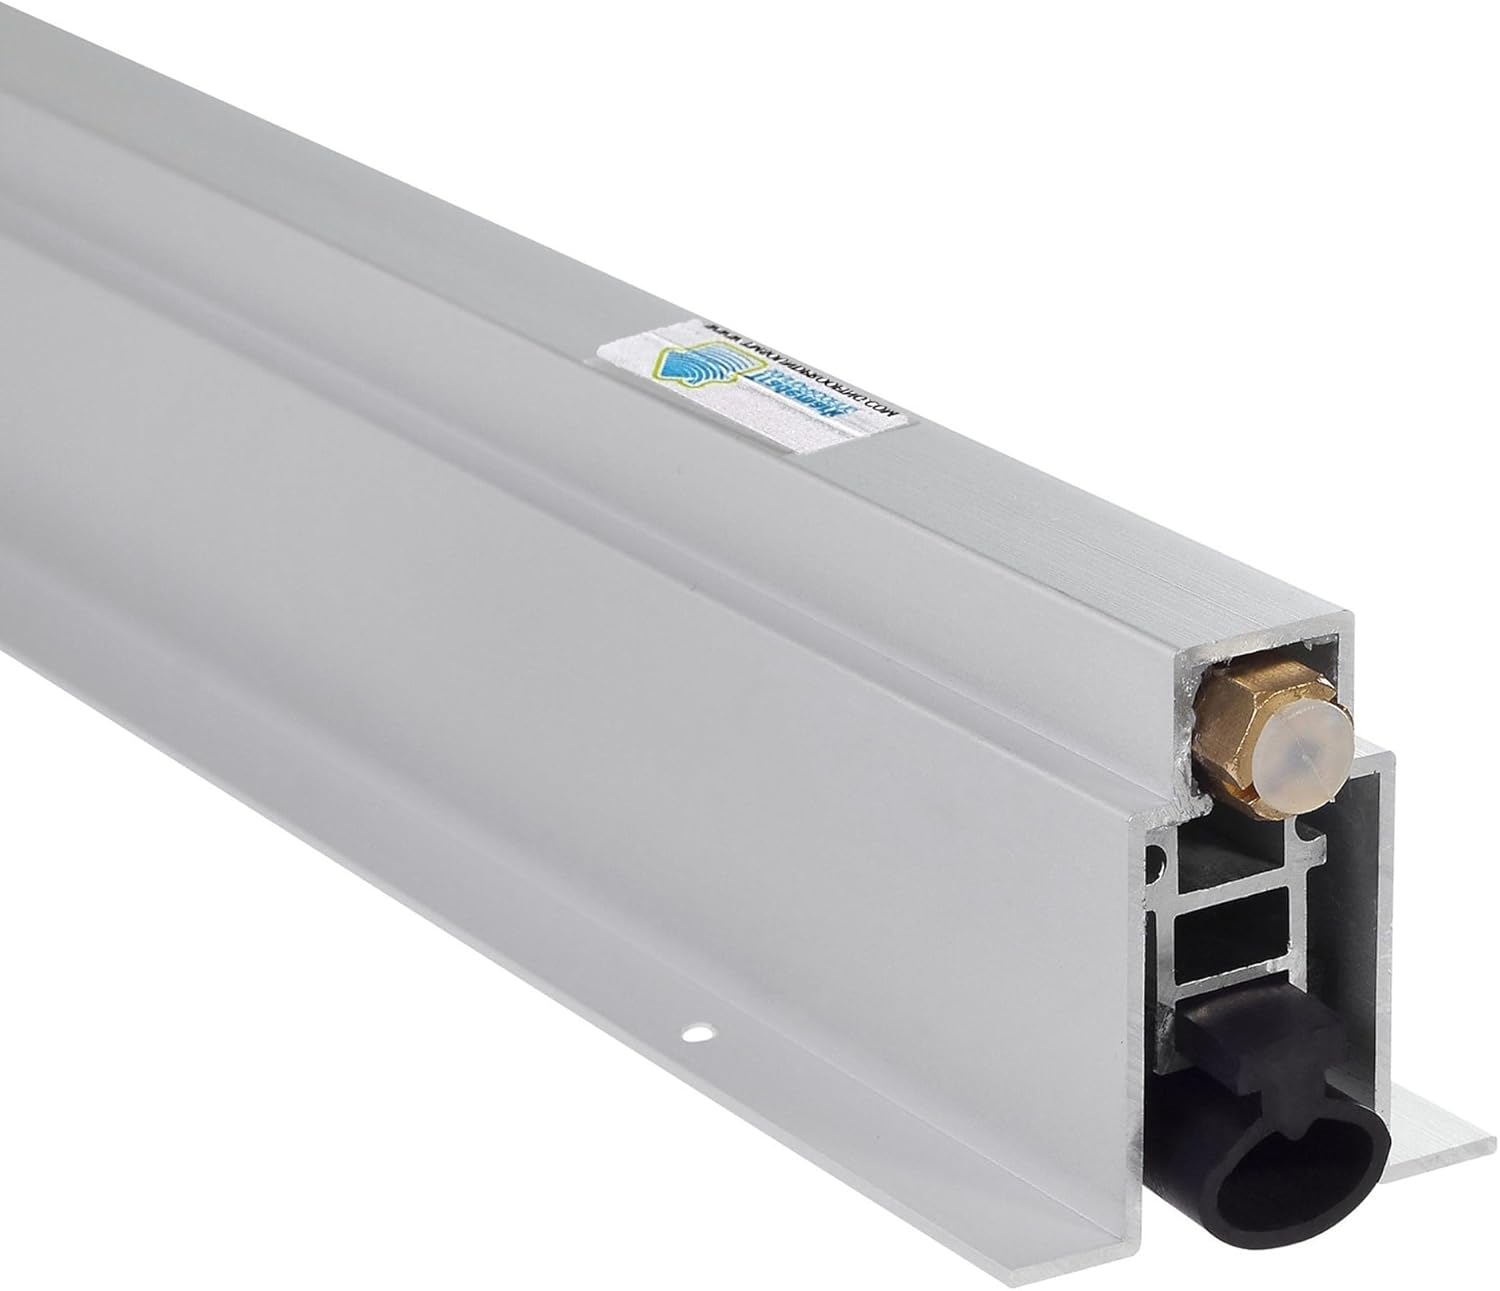
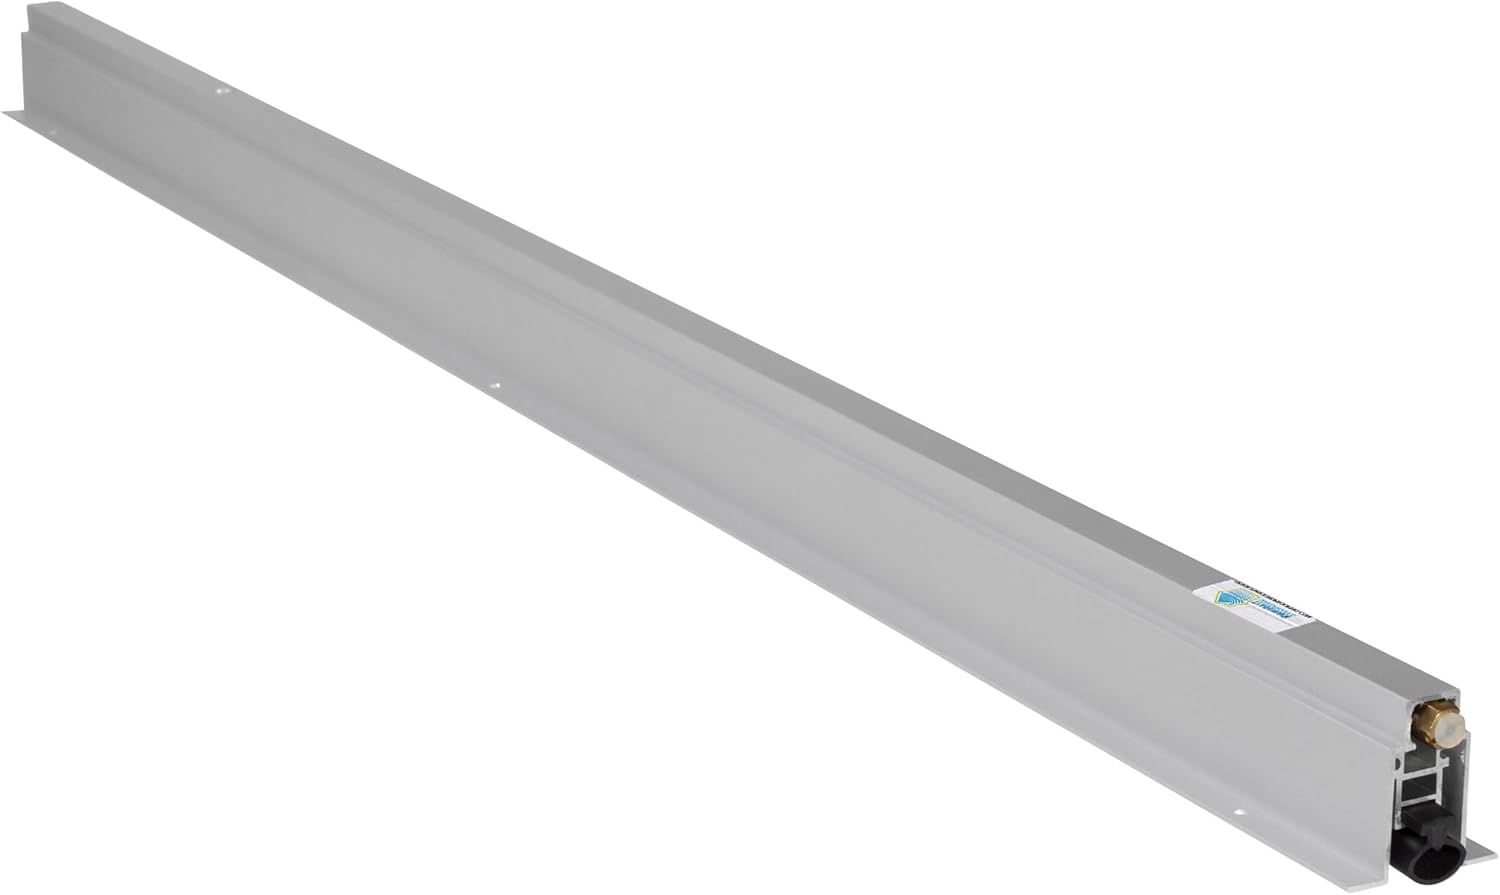
The TMS Automatic Door Bottom Seal, fully mortised at 36 inches with a 1 inch drop and a heavy duty metal body with a neoprene bulb seal, closes the stubborn gap under your door so drafts, dust, and hallway noise stop sneaking in. It tucks cleanly into a routed pocket in a wooden door and uses a spring-activated bar that lowers the neoprene seal only when the door shuts, which means a tight seal without dragging on your floors.
Key Customer Benefits
- A real seal for real gaps. The TMS Automatic Door Bottom Seal fills under-door gaps up to one inch, so drafts, dust, and light stop leaking through the biggest trouble spots. The fully mortised design keeps the hardware hidden while the spring lowers a neoprene bulb only when the door shuts, which gives you a snug seal without drag.
- Quieter rooms without a fussy threshold. Automatic door bottoms are widely used when a higher level of sound control is needed because the drop bar compresses evenly along the floor, unlike a fixed sweep that rides on highs and misses the lows. Add perimeter gasketing and you noticeably cut room-to-room noise.
- Smooth swing and protected floors. The mechanism lifts the seal as soon as you open the door, so there is no scraping and no extra push force. That saves finish floors and feels lighter under hand compared with traditional sweeps that constantly rub.
- More comfort and less wasted energy. Air leakage is a major driver of comfort complaints and energy waste in buildings. Sealing under-door pathways reduces uncontrolled airflow that can raise space-conditioning energy needs, especially when rooms are pressure-imbalanced.
- Fewer pests wandering in. In integrated pest management, closing entry points is step one. A tight under-door seal helps block insects and cuts the pencil-width gap that mice can exploit, especially at exterior doors. Pair this fully mortised automatic door bottom with side and top weatherstripping for best results.
- Built for daily use. The heavy-duty metal housing with a solid neoprene bulb delivers reliable compression and rebound, and neoprene is known for weather resistance and good sealing under repeated cycles. That combination makes this fully mortised automatic door bottom a durable, low-profile upgrade for homes and light commercial spaces.
Product Description

What this product is
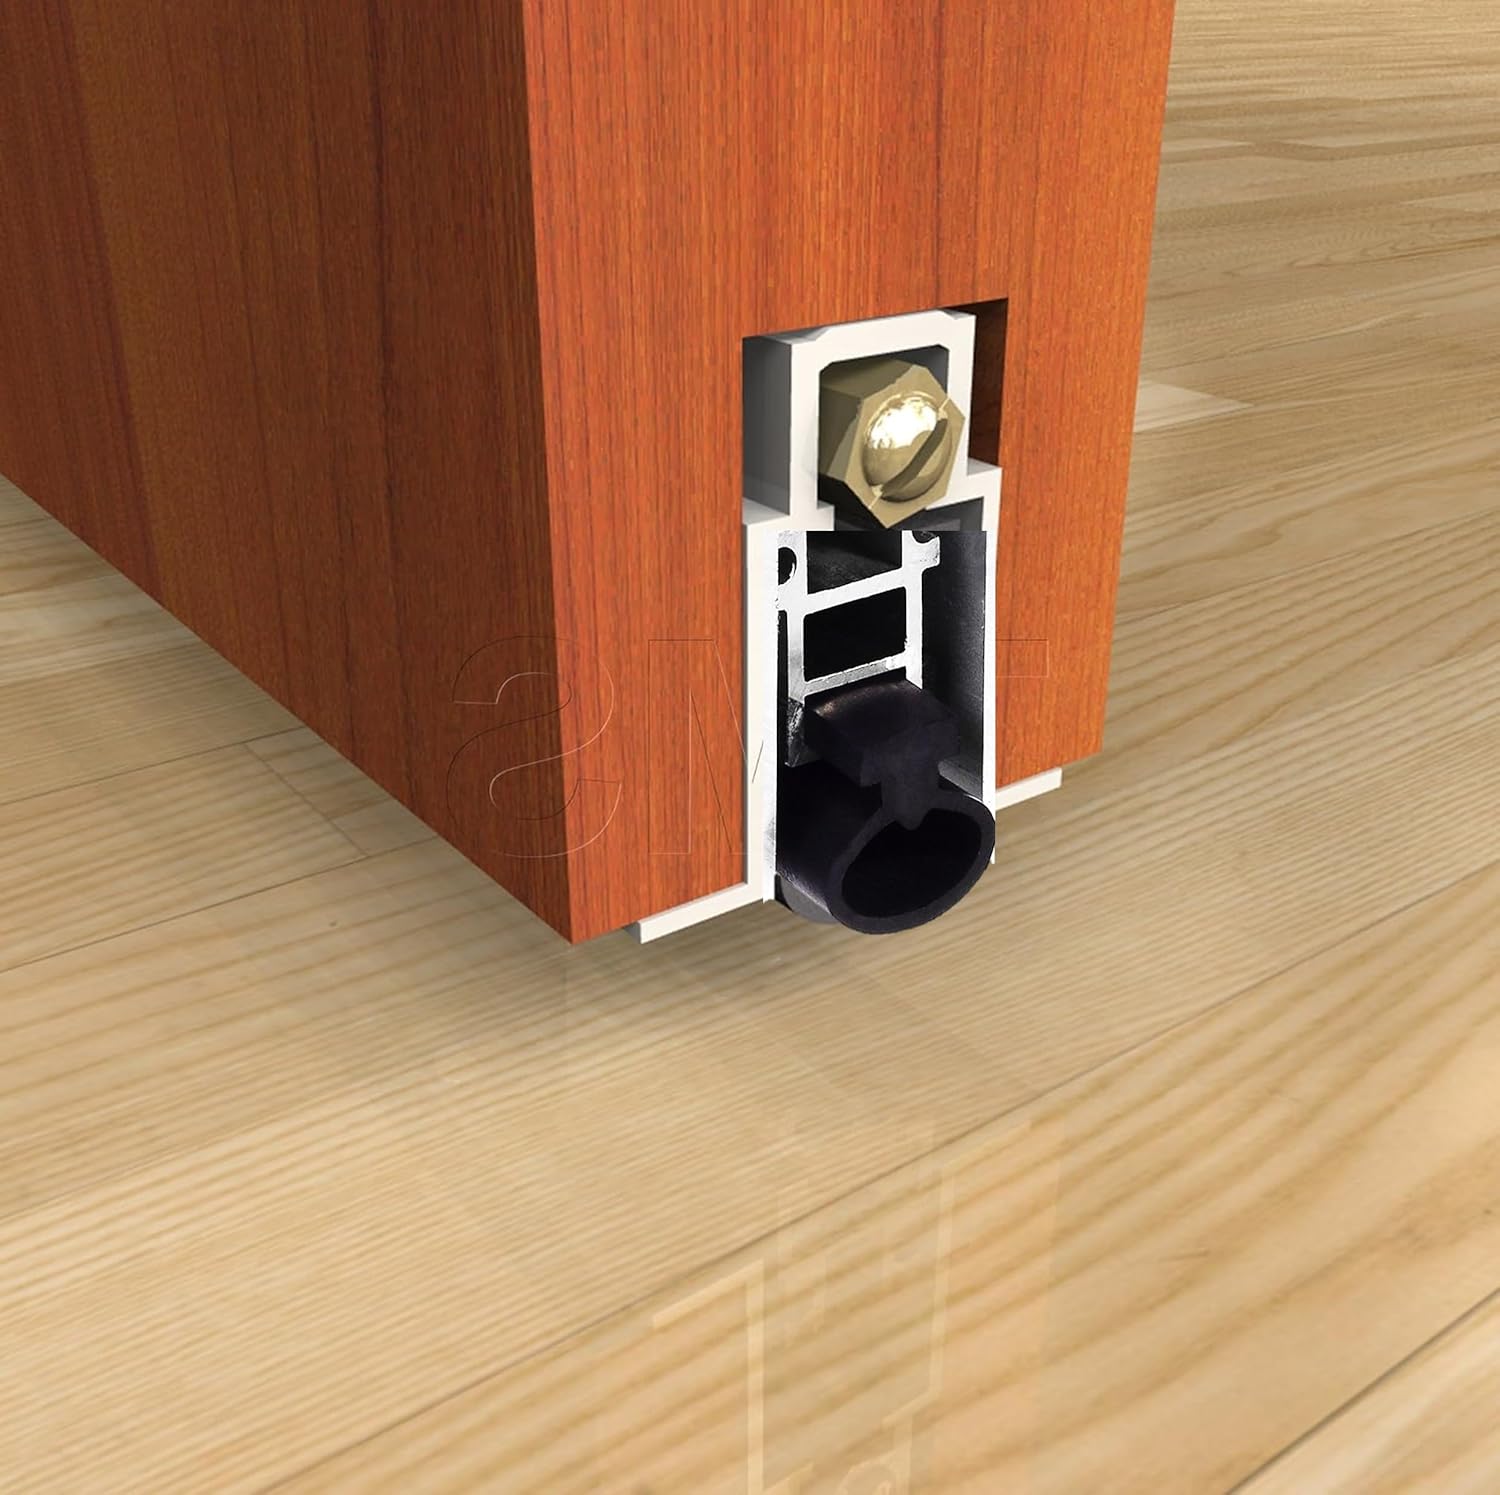
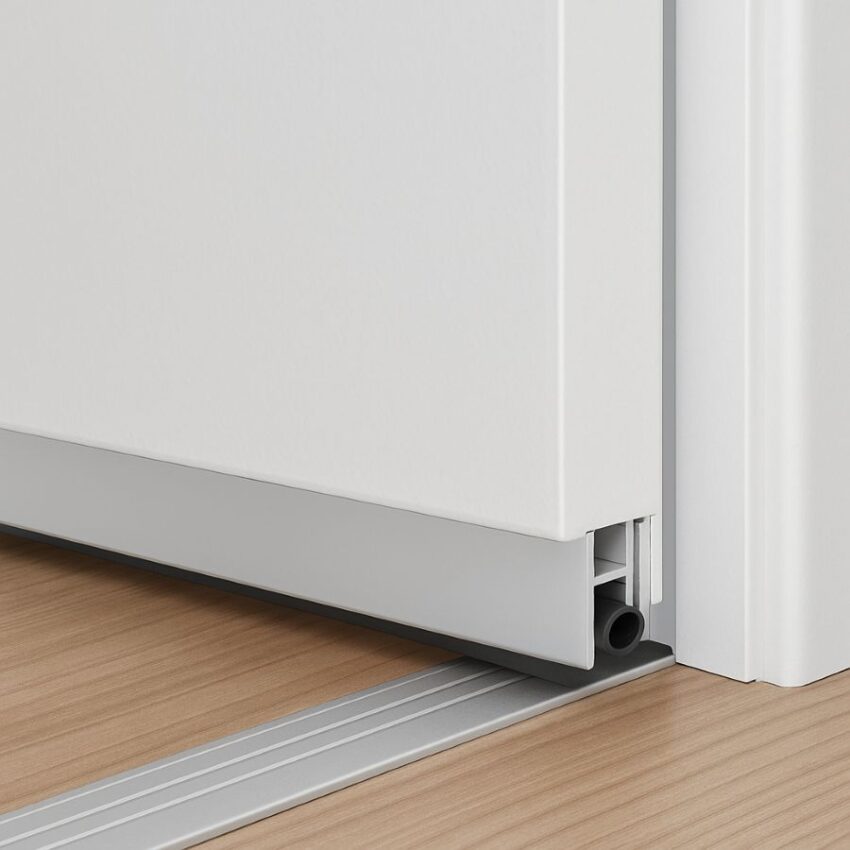
The TMS Automatic Door Bottom Seal, fully mortised, 36 inches with a one inch drop and a neoprene bulb, is a spring-activated drop seal that hides inside a routed pocket at the bottom of a wooden door. When the door closes, the internal mechanism lowers a solid neoprene bulb against the floor or threshold, which fills gaps up to one inch while keeping the hardware out of sight. The result is a clean look with a dependable seal that keeps out drafts, dust, light, and smoke leakage at the sill.
How it works
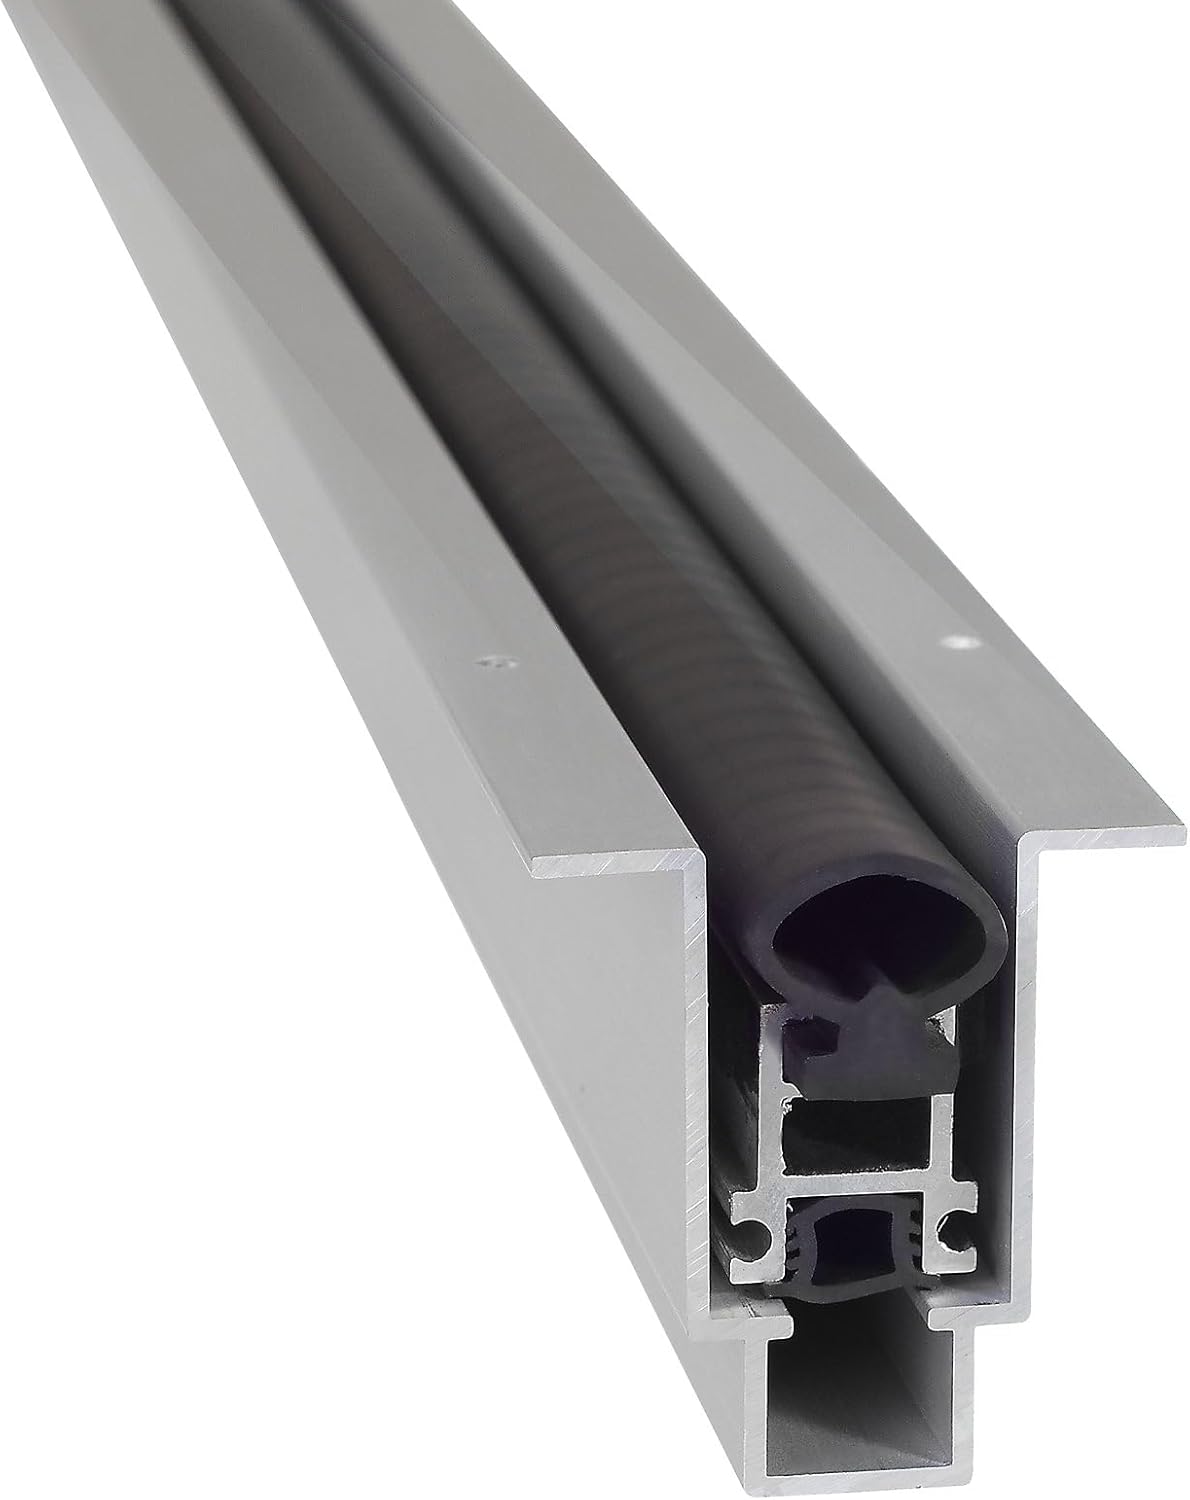
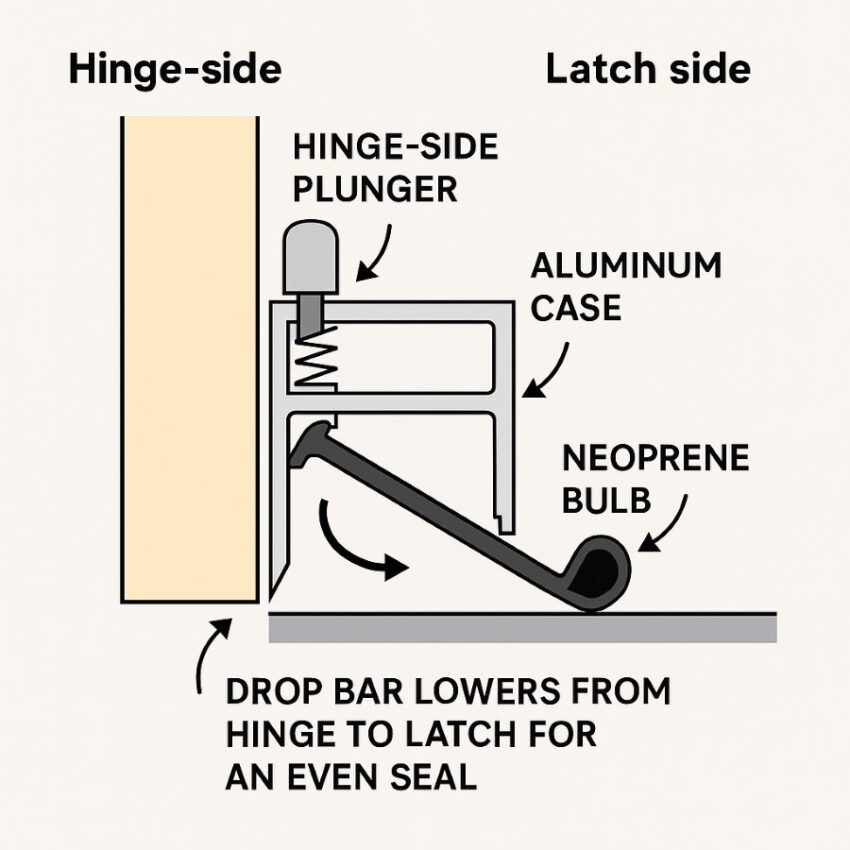
Inside the aluminum case is a flat-spring drop bar controlled by a small plunger on the hinge side. As the door latches, the plunger contacts the jamb and triggers the bar to swing downward from the hinge side first. That scissor-like action lets the seal adjust to minor highs and lows in the floor and compress evenly along the entire width, which is why automatic door bottoms outperform fixed sweeps on uneven thresholds. When you open the door, the spring lifts the bulb immediately, so there is no drag on the flooring.
What makes it effective and different
Unlike stick-on or fixed aluminum sweeps, a fully mortised automatic door bottom is adjustable, serviceable, and designed for a tighter acoustic and weather seal. The hidden installation preserves the door’s appearance, and the compression action creates a more uniform contact line that helps with sound, light, and air control at the most leak-prone part of the door assembly.
Neoprene is a proven sealing material with good compression-set resistance and weather durability, which helps the bulb rebound after thousands of cycles. If you are upgrading for comfort or for a quieter room, automatic door bottoms are commonly recommended by acoustic suppliers and hardware pros for their superior closure and long-term reliability compared with standard sweeps.
Product Specifications
| Feature | Detail |
|---|---|
| Model and brand | Trademark Soundproofing, often shown as TM or TMS. |
| Mounting type | Fully mortised into a wooden door. Non-handed. |
| Standard lengths | 36 inches stock size, also offered in 32 inches. Field-trim capability described below. |
| Maximum drop | 1.00 inch maximum effective drop. |
| Under-door gap sealing | Fills and seals gaps up to one inch at the sill. |
| Housing material and finish | Extruded aluminum, mill finish. |
| Seal material | Solid neoprene bulb. Manufacturer notes the insert is self-extinguishing and oil resistant. |
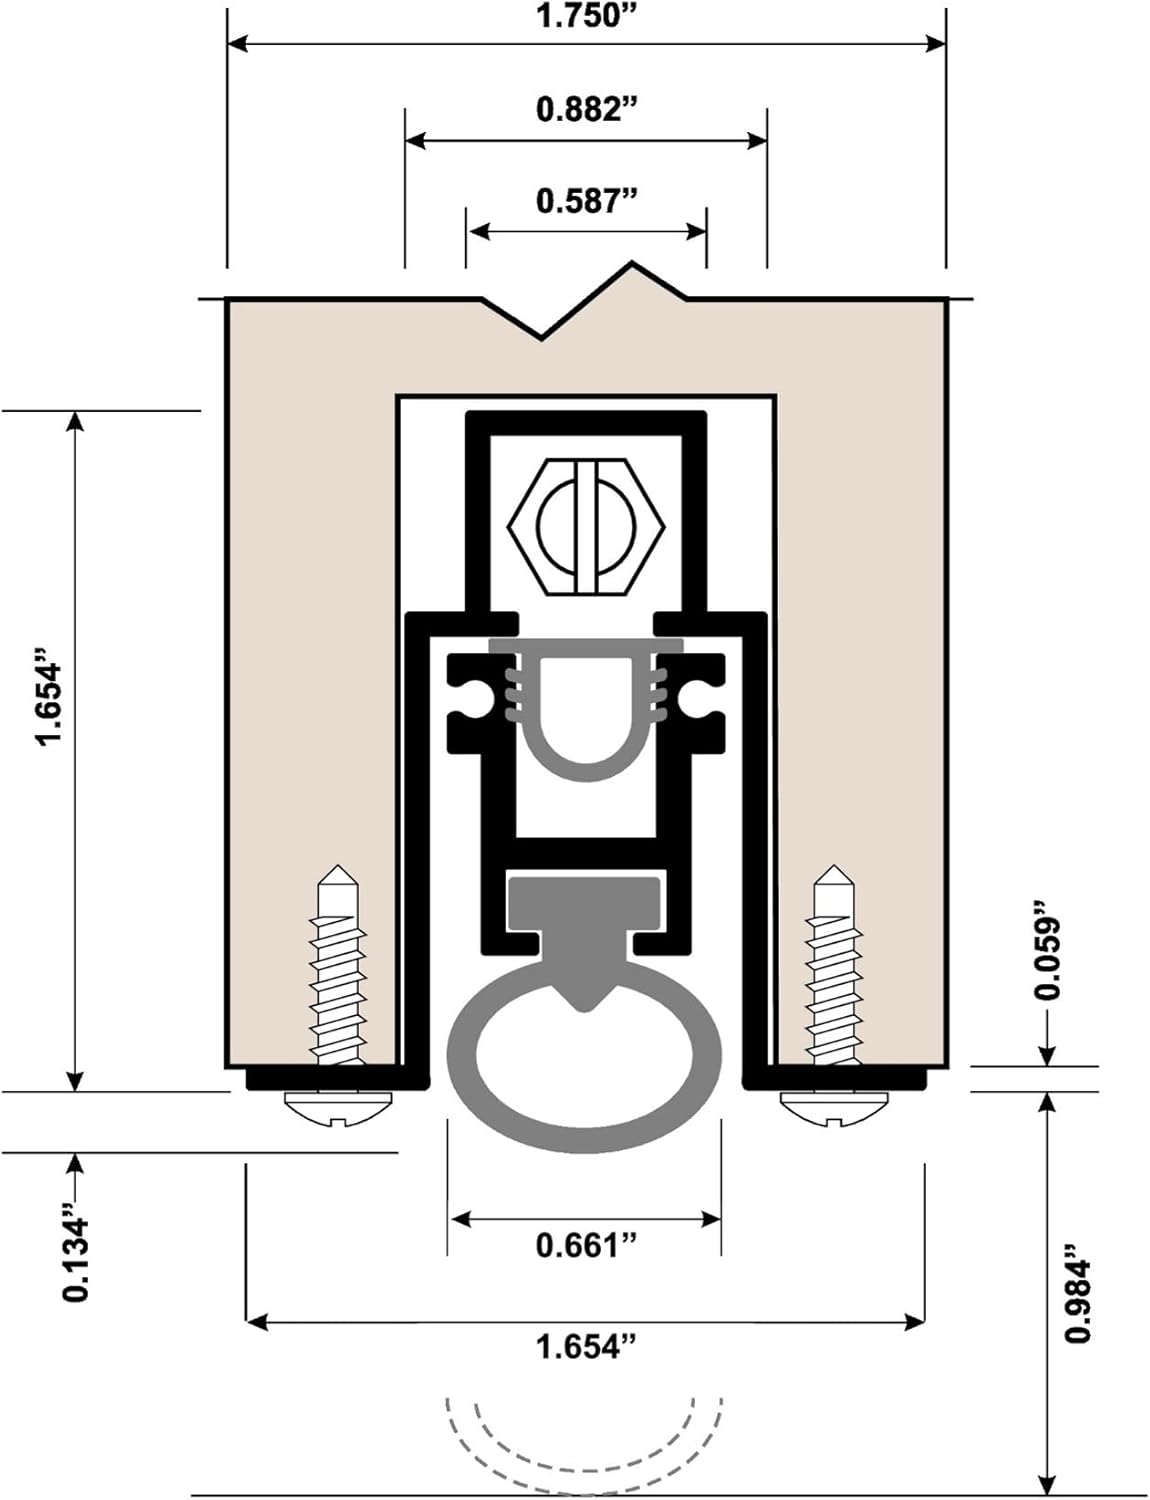
| Cross-section, mortise size | Approx. 0.924 inch wide by 1.575 inches tall, per section drawing. |
| Fasteners | Uses #6 x 0.500 inch SMS screws, instructions and screws supplied. |
| Actuation | Concealed flat mechanism with hinge-side plunger that lowers the bulb as the door closes and lifts it when opened. |
| Cycle durability | Mechanism tested through five million cycles, per manufacturer. |
| Fire and smoke information | UL listed and ITS Warnock Hersey listed. “10C Classified.” Seal provides smoke infiltration protection in line with NFPA 101 Life Safety Code and NFPA 80 for Fire Doors and Opening Protectives. |
| Recommended surfaces | Can seal directly to floor or to a doorway saddle. A saddle is recommended for higher sound control and for carpets. |
| Field trimming | Can be trimmed in the field, typically up to about three to four inches depending on ordered size. Trim only on the side opposite the actuating plunger. |
| Suggested undercut guidance | For best acoustic results, keep the door-to-floor gap at roughly three eighths of an inch or less. Use a saddle or add a wood strip if the gap is larger. |
| Weight | About 2.05 pounds for the 36 inch unit, per listing. |
How to Use and Install (Fully Mortised)
Before you start
This is a fully mortised automatic door bottom, so the body hides inside a routed pocket at the bottom edge of a wooden door. For a fully mortised install, plan to take the door off its hinges. If your door is fire-labeled or of special construction, the mortise must be prepared by the door manufacturer or under their listing, not in the field. That is straight from standard install literature used by hardware suppliers.
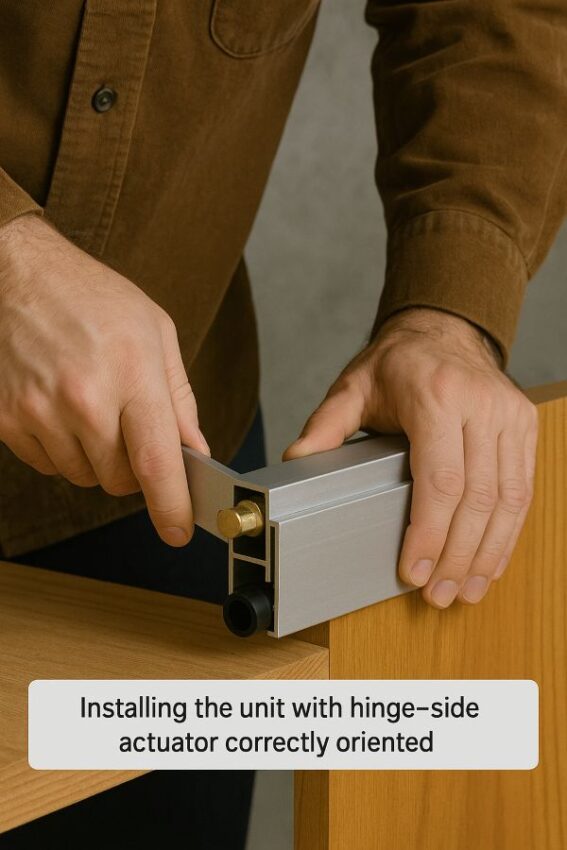
Confirm two things before you pick up a tool. First, the actuating plunger on the TMS Automatic Door Bottom Seal must be on the hinge side when installed. Second, this model is built for a maximum one inch drop. If your gap is bigger, add a threshold (saddle) or resize the door rather than over-adjusting the seal.
Many installers pair automatic door bottoms with a low saddle for better acoustic and draft control, especially over carpet or uneven floors. Several manufacturers recommend sealing to a saddle where practical.
Tools and materials
Router with straight bit and edge guide, sharp chisel, file, tape measure, square, pencil, clamps, hearing and eye protection, drill and bits (pilot bit about 5/64 inch for typical mounting screws), fine-tooth hacksaw or chop saw for field trimming, and wood sealer for the fresh mortise. These tool sizes and pilot-hole tips align with published instructions from major automatic-door-bottom makers.
Step 1: Measure the door and plan the mortise
With the door still hung, measure the exact net door width. That is the final length you will cut the hardware to. Remove the door, then mark the mortise centerline along the bottom edge. Mortise dimensions vary by model, so use the spec sheet that ships with your TMS unit as the primary reference. Typical mortises for comparable products range roughly from five-eighths to one inch wide and around one and a half to just over two inches deep.

Make the mortise in multiple router passes and widen with the fence for a clean, centered pocket. Fine Homebuilding’s step-by-step shows this clearly and also recommends sealing the raw wood before you mount hardware.
Step 2: Cut the mortise cleanly
Clamp the door securely on sawhorses. Rout the pocket to depth, keeping it square at the ends. Test fit the case in the mortise. The face of the case should sit flush with the bottom of the door, with a hairline clearance at each end for expansion and to avoid binding during adjustment. Several brands call out roughly one sixteenth of an inch clearance per end.
If your project is a listed fire door, keep clearances in mind for later. NFPA 80 limits bottom clearance to three quarters of an inch above the finished floor or threshold, and inspectors check this. A listed threshold can help you land in that range cleanly.

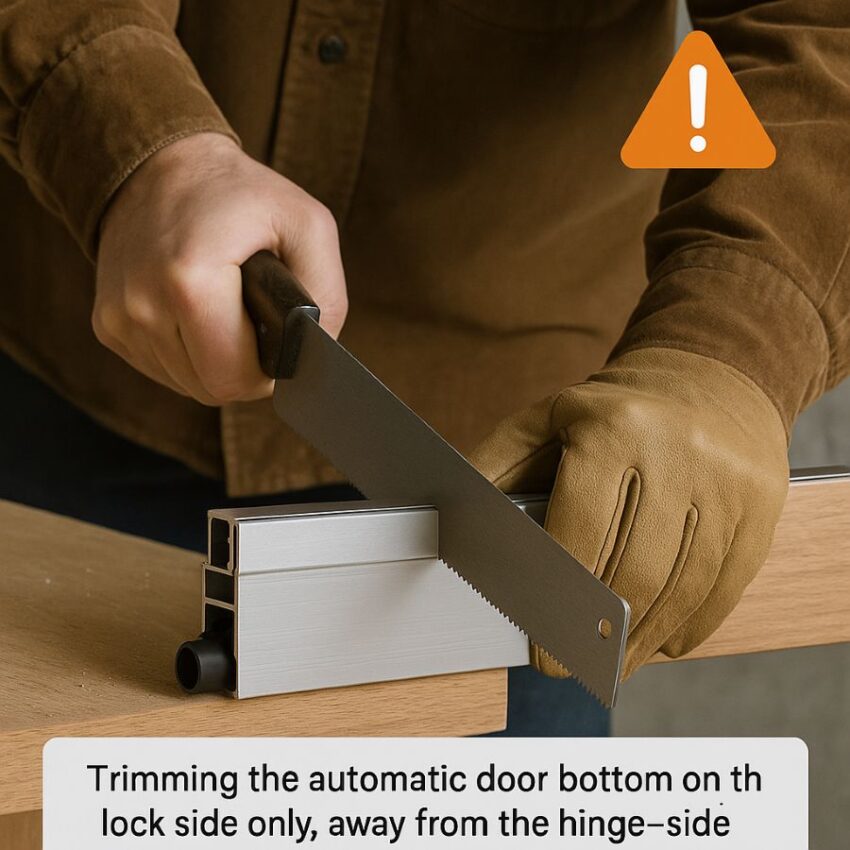
Step 3: Field-trim the hardware (only on the latch side)
Extend the drop bar per the instruction sheet, then mark the housing to the net door width. Cut only on the side opposite the plunger or adjusting rod, and never pull the drop mechanism out of the case while cutting. Many mortised models allow up to about four inches of trimming on 36-inch units; shorter units often should not be field cut at all. These limits and cautions are standard across major brands.
Step 4: Position and fasten
Slide the unit into the mortise with the actuator toward the hinge edge. Close and latch the door while you mark the screw holes, then drill pilot holes. Close-latched mounting helps the seal drop correctly against the finished floor or saddle when you start adjusting. Use the screws provided and do not over-tighten.
If your kit includes a small strike plate for the jamb where the plunger touches, install it now to prevent frame wear over time.
Step 5: Adjust the drop for an even seal
With the door closed, turn the brass adjusting nut to tune how far the neoprene bulb drops. Turn out to increase drop, in to reduce. The mechanism lowers from the hinge side first, which helps it follow small floor highs and lows. Aim for a light, continuous compression that seals without adding heavy swing resistance. Installers often confirm with a paper-strip test at several points across the width, then re-check that the door opens freely with no drag.
If your floor variation or undercut is too large for a clean seal at a one inch maximum drop, add or raise a threshold rather than cranking the seal harder. Community troubleshooting threads point to this as the long-term fix when one side seals and the other does not.
Step 6: Rehang, test, and pair with perimeter seals
Rehang the door if you removed it earlier. Open and close the door several times and listen for any scrape. Automatic door bottoms are designed to lift immediately when you open the door, so operation should feel smooth. For better sound and smoke control between rooms, add perimeter gasketing at the jambs and head. That combination is recommended by acoustic suppliers and is required on designated smoke and draft control openings tested to UL 1784.
Everyday use and care
Use the door normally. Keep the sill clean of grit so the neoprene bulb compresses uniformly. Wipe the bulb with a damp cloth if it picks up debris. If seasons or humidity change the floor-to-door relationship, a quarter-turn on the adjusting nut will bring the seal back into the sweet spot. This simple maintenance is echoed in pro guides.
Some manufacturer literature for neoprene products includes a Proposition 65 warning about chloroprene exposure. Handle and dispose of worn inserts per local guidance.
Common Issues and Solutions
Uneven drop or daylight on the latch side: Verify the plunger is on the hinge side and that the case sits fully flush in the mortise. Re-level the unit and re-set end clearances if needed, then fine-tune the brass nut.
Seal hits the floor and drags: Reduce the drop slightly. If your door undercut is very tight and you still need contact for acoustics, install a thin saddle rather than letting the bulb scrape. Code resources note that accessible thresholds are typically limited to about one half inch in height, which helps you plan the correct profile.
Gap larger than one inch: Add a saddle or resize the door. Forum case studies show that trying to force extra drop leads to poor operation.
Frequently Asked Questions
1) Which side does the plunger go on for a fully mortised automatic door bottom?
Always put the adjusting plunger on the hinge side of the door. That is how the drop bar starts its motion and why it can follow minor floor highs and lows. Manufacturer instructions from several brands state this plainly, and they also remind you to adjust the nut so the seal just kisses the floor, not overcompresses.
2) How do I adjust the drop so it seals without dragging?
Close the door and turn the hinge-side adjusting screw in or out until the bulb makes light, continuous contact across the sill. The goal is a positive seal that retracts as soon as you begin to open the door. Adjustment guides from acoustic and hardware manufacturers emphasize this “contact without crush” idea because an overcompressed seal increases opening force and wears faster.
3) Can I trim a 36 inch unit to fit, and if so, how much?
Yes, mortised models are designed for limited field trimming. The common rule is to cut only on the side opposite the plunger and never disassemble the internal mechanism. The exact trim allowance varies by model, however many instructions permit trimming up to the point indicated by a case screw or similar marker. Check your specific TMS listing before you cut.
4) Will this work over carpet, or do I need a threshold (saddle)?
For reliable sealing and smooth operation, manufacturers and acoustic door specialists recommend sealing to a solid threshold rather than directly to carpet. Carpets compress unpredictably and can scuff the neoprene. Guidance from an acoustic door maker explains that thresholds should sit at or slightly above the carpet height, set to the subfloor, and fluted abrasive tops are not recommended because they wear the bulb. Installer discussions echo that a small raised sealing surface solves the carpet issue.
5) My floor is out of level and I see daylight on one side. Will an automatic door bottom help?
Yes. Automatic door bottoms drop from the hinge side first, then “scissor” down to follow minor slopes, which is why they outperform fixed sweeps on uneven thresholds. If the slope is extreme, pair the seal with a saddle to bring the gap into range.
6) What clearance is allowed at the bottom of a fire door?
Under NFPA 80, the clearance at the bottom of a swinging fire door is typically three quarters of an inch maximum when measured to the finished floor or threshold. Multiple code summaries and NFPA resources confirm this, and inspectors check it. If your gap is larger, add a listed threshold or have the door adjusted to comply.
7) Do automatic door bottoms really help with sound control?
They help a lot when used with perimeter gasketing. Acoustic suppliers explain that the hinge-side plunger compresses the seal evenly across the sill, which closes the largest sound leak path under most doors. For best results, combine a fully mortised automatic door bottom with jamb and head seals, and seal to a solid threshold.
8) Neoprene vs silicone, which seal material should I choose?
Neoprene is the standard for automatic door bottoms because it balances durability, weather resistance, and cost. Technical references note that neoprene offers good resistance to oils, ozone, and weathering, and operates over a useful temperature range for typical building use. For very high temperature environments, silicone has a higher heat tolerance, although it costs more.
9) Can I use a fully mortised automatic door bottom on exterior doors for pest control?
Yes, sealing the under-door gap is a core exclusion step in integrated pest management. Public health and IPM manuals recommend installing door sweeps at exterior doors to block insects and rodents, and they remind us that mice can fit through very small openings, about the size of a pencil. If rodents are a known issue, consider pairing the automatic door bottom with rodent-resistant sweeps or kick plates at areas prone to gnawing.
10) Do I need to remove the door to install a fully mortised unit?
Plan on removing the door for a clean, accurate mortise. Manufacturer instructions for mortised models call for routing a pocket in the door bottom, installing the case flush, fastening with the provided screws, then rehanging and adjusting. Surface-mounted models can be installed on a hung door, however a fully mortised design is different.
11) The seal drops on the hinge side but not at the latch. What did I do wrong?
That symptom usually means the plunger is not on the hinge side, the case is not fully seated or level in the mortise, or the adjustment is set too light. The side near the plunger always drops first, then the other side follows. Reconfirm orientation and give the adjusting nut a quarter turn, testing across the width.
12) Are there versions for metal doors too?
Yes. There are handed, fully mortised automatic door bottoms designed for hollow metal doors, often with double neoprene bulbs and custom cut lengths. If your slab is steel, choose a model listed for metal door cavities rather than the wood-door version.
13) What ongoing care does the neoprene bulb need?
Keep the sill clean and grit-free, and wipe the bulb with a damp cloth if debris accumulates. If seasons or humidity change the undercut, a small adjustment on the brass nut brings the seal back into contact. Several installation sheets include the same tip, which helps preserve smooth operation.
Conclusion
When you want a room that feels calmer, cleaner, and more comfortable, the TMS Automatic Door Bottom Seal, fully mortised, 36 inches with a one inch drop and a neoprene bulb is the kind of upgrade that quietly pays you back every single day. It hides inside the door, fills stubborn under-door gaps up to one inch, and closes the biggest pathway for drafts, dust, light, and hallway noise without changing how your door looks.
What I like most is how it works. The hinge-side plunger lowers the seal as the door latches, then lifts it the moment you open the door. You get an even seal across mild floor irregularities, smoother swing, and no scraping on finished floors. That small bit of smart hardware design is why automatic door bottoms outperform fixed sweeps on uneven thresholds.
And if pests have been sneaking in, sealing the under-door gap is one of the most effective, low-toxicity steps you can take. Public health IPM guides remind us that mice can squeeze under a door gap about the width of a pencil, so closing that space with a durable sweep or automatic door bottom quickly cuts entries.
Related products
-

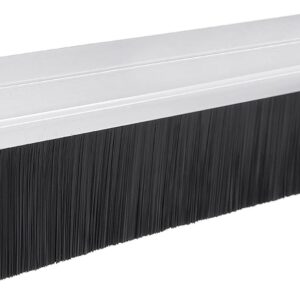
Pemko 36″ Aluminum Brush Door Sweep with Gray Nylon Brush
$20.39 Buy Now -
M‑D 36″ Aluminum U‑Shape Screw‑On Under–Door Seal with Kick Plate
$32.90 Buy Now -
Door Sweep H‑Shape Aluminum Base with 3.94 in Nylon Brush Seal
$36.99 Buy Now -
Upgraded 28–32in Black Door Draft Stopper for Big Gaps
$19.99 Buy Now
Reviews
There are no reviews yet.